Safety / Tips and Tricks / Rope access and confined space
Activity 01 · Rope access
General Principles for Work at Height: The Order of Decisions Before You Rig
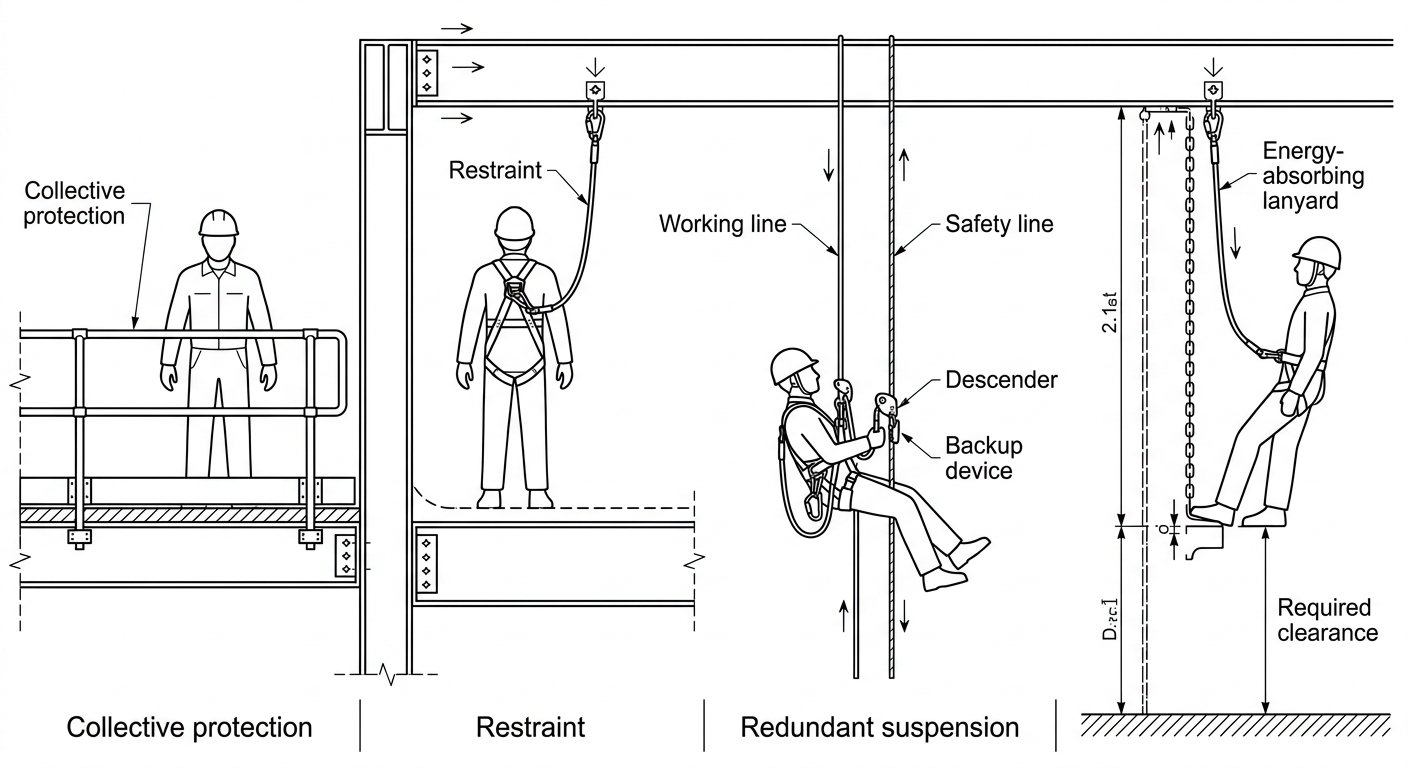
Most work-at-height failures are not equipment failures. They are ordering failures: someone chose a harness before checking whether the anchor could sit overhead, or chose a lanyard before measuring the clearance below the work position, or planned the access without planning the retrieval. The general principles for work at height exist to fix that order — to make sure the decisions that constrain everything else get made first, on the ground, before anyone is on a rope.
This note sets out those principles in the sequence a competent person should apply them, and shows where each one changes the hardware you end up clipping in.
1. Removing the exposure outranks managing it
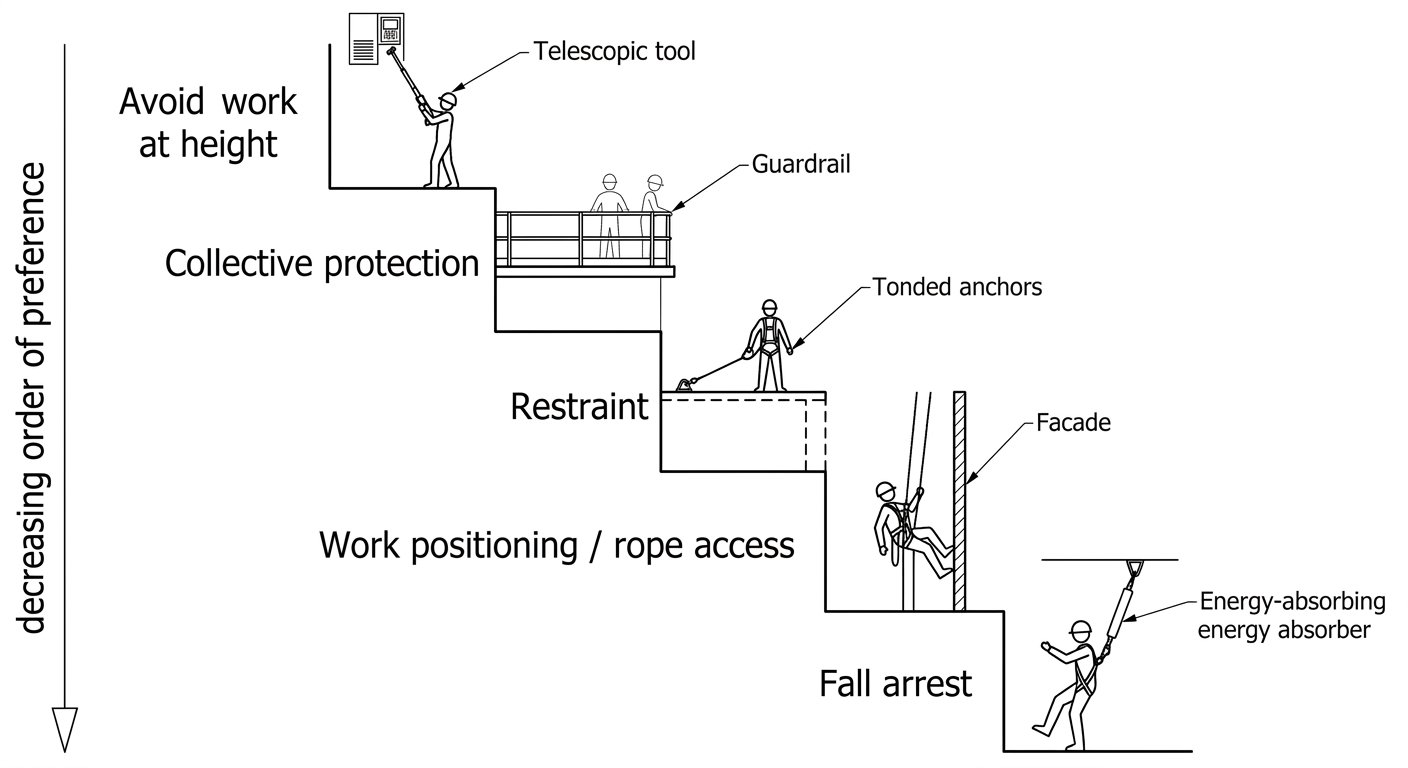
The first question is not which PPE to use, but whether anyone needs to be exposed to a fall at all. Standard practice across European and North American frameworks follows the same descending order of preference:
- Avoid the work at height. Lower the load, use a telescopic tool, service the unit at ground level, design the inspection point where a person can reach it standing.
- Use collective protection. Guardrails, a scaffold with a compliant edge protection, a covered opening, a MEWP with an enclosed basket. Collective measures protect everyone present and do not depend on an individual clipping in correctly.
- Use restraint. A system physically too short to let the worker reach the fall hazard.
- Use work positioning or rope access. The worker is suspended or leaning on the system as a working method, with a backup.
- Use fall arrest. The fall is permitted to start and then stopped. This is the last option, not the default one, because it accepts the fall, the arrest forces, the clearance requirement and the post-fall suspension problem.
Personal fall protection is the bottom of that list for a reason: it only works if it is selected correctly, fitted correctly, connected to a sound anchor, and backed by a rescue capability. Each of those is a chance to get it wrong.
2. Restraint before arrest, wherever the geometry allows it
If the lanyard and anchor can be arranged so that the worker cannot physically reach the edge, that is a restraint system, and it is nearly always the better engineering answer. Nothing is arrested because nothing falls: no arrest forces, no clearance calculation, no suspension trauma, no deployed absorber to replace.
Restraint depends entirely on the length of the connection and the position of the anchor relative to the hazard. It stops being restraint the moment the worker moves laterally to a point where the same lanyard length reaches an edge — so the working envelope has to be defined and, in practice, marked or physically limited.
Restraint is also the one case where a waist belt to EN 358 for work positioning and restraint can be appropriate on its own, because no fall is expected. As soon as a fall is foreseeable, the load path has to move to a full body harness to EN 361, using a designated fall-arrest attachment point. Which attachment points are legitimate for which function is a frequent source of error — see the note on which attachment points to use for restraint.
3. The anchor decides most of the outcome
Once a fall is possible, the anchor position governs the severity of that fall more than any other single choice. Three anchor properties matter, in this order:
Position relative to the attachment point
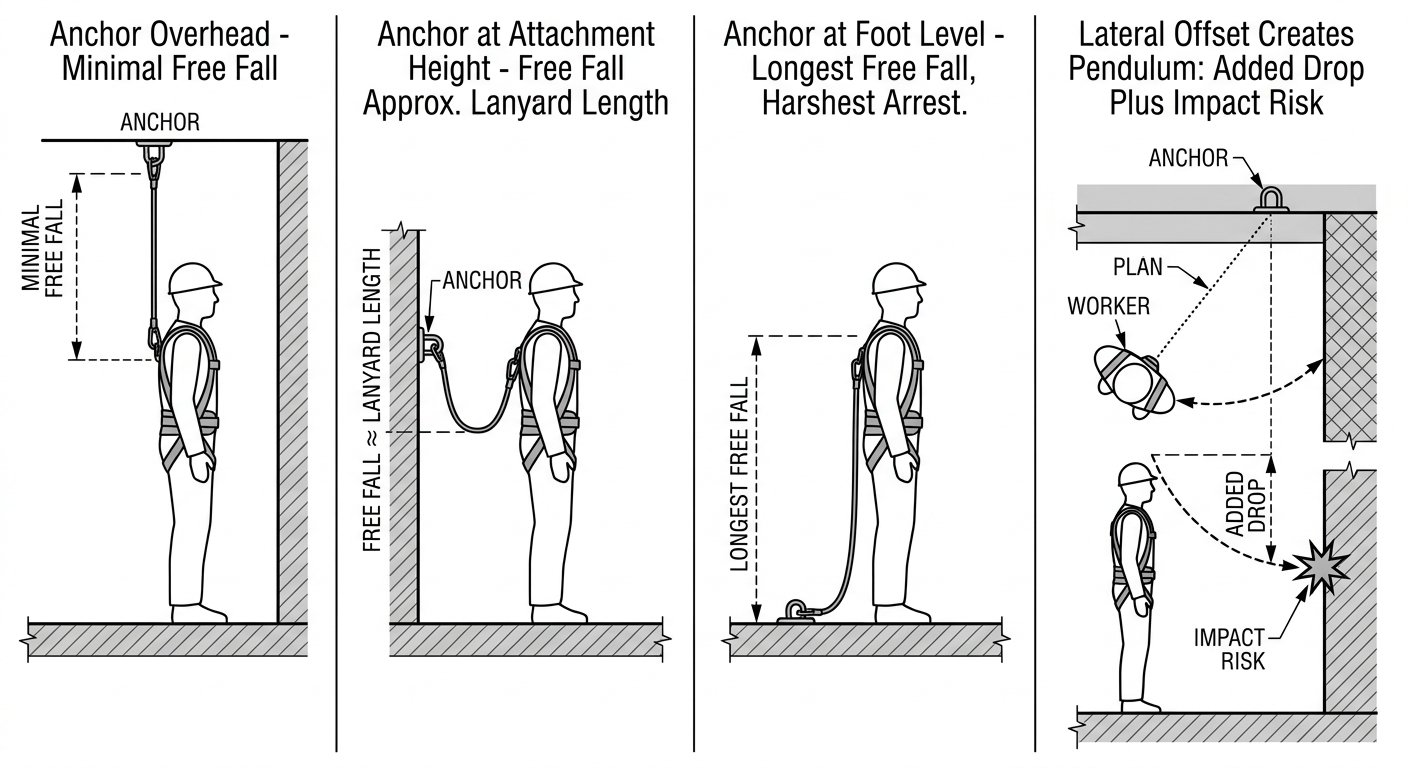
An anchor directly overhead of the harness attachment point means little or no free fall before the system starts to take load. An anchor at harness height means the worker falls roughly the length of the lanyard before loading begins. An anchor below the feet means a substantially longer free fall and a harsher arrest. The convention for describing this is the fall factor — free fall distance divided by the length of the system available to absorb it — and it is why as high as practicable, as close to vertical as practicable is the standing instruction for anchor placement.
Lateral offset and swing fall
Working sideways from the anchor converts a vertical fall into a pendulum. The worker swings toward the point below the anchor and may strike structure on the way. Swing fall also increases the total drop and therefore the clearance needed. Keeping the working position within a modest cone below the anchor, or using a horizontal lifeline or intermediate anchors, is the usual control.
Strength and direction of loading
The anchor has to take the arrest load in the direction it will actually be pulled, including after a swing. Structural anchors and anchor devices are rated in kilonewtons under the applicable anchor standard; improvised anchors — handrails, small-bore pipework, cable tray, roof vents — frequently are not, and should be treated as unproven until a competent person confirms them. Connector shape and orientation matter here too, since a captive anchor connection loaded across the minor axis loses a large share of its rated strength; the note on choosing connectors for anchor rigging covers the practical selection.
4. Clearance is calculated, not eyeballed
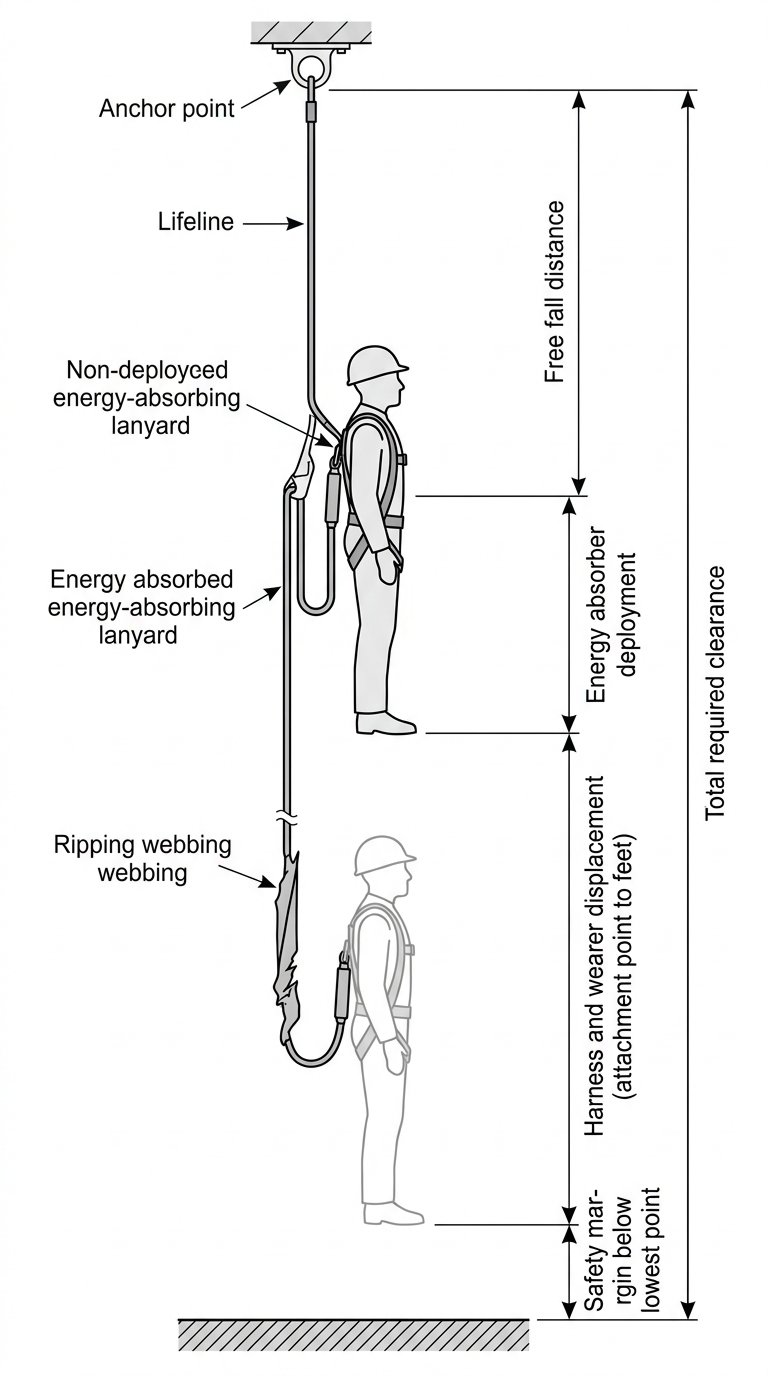
A fall-arrest system that is correct in every other respect will still fail if there is not enough space beneath the worker for it to function. Required clearance is a stack, and every element has to be added:
- the free fall distance permitted by the lanyard length and anchor position;
- the deployment length of the energy absorber, which is a published figure for the device and varies between models;
- displacement of the harness and the wearer — webbing take-up, plus the distance from the attachment point to the feet;
- a safety margin below the lowest point reached, commonly taken as around one metre, so the worker does not contact the surface or an obstruction.
Where the available clearance is tight — short drops, work over machinery, low-headroom plant — the absorber and lanyard type have to be chosen against the measured space rather than picked off the shelf. See choosing an absorber for the clearance available and the detail on energy absorber deployment lengths. In genuinely restricted clearance, a retractable device or a repositioned overhead anchor usually solves the problem where a standard absorbing lanyard cannot.
Fall-arrest systems are designed to limit the force transmitted to the body, and a 6 kN ceiling is the reference figure used across the European fall-arrest standards. That limit is only met if the absorber is allowed to deploy — which brings the argument back to clearance.
5. Suspended work: two systems, not one
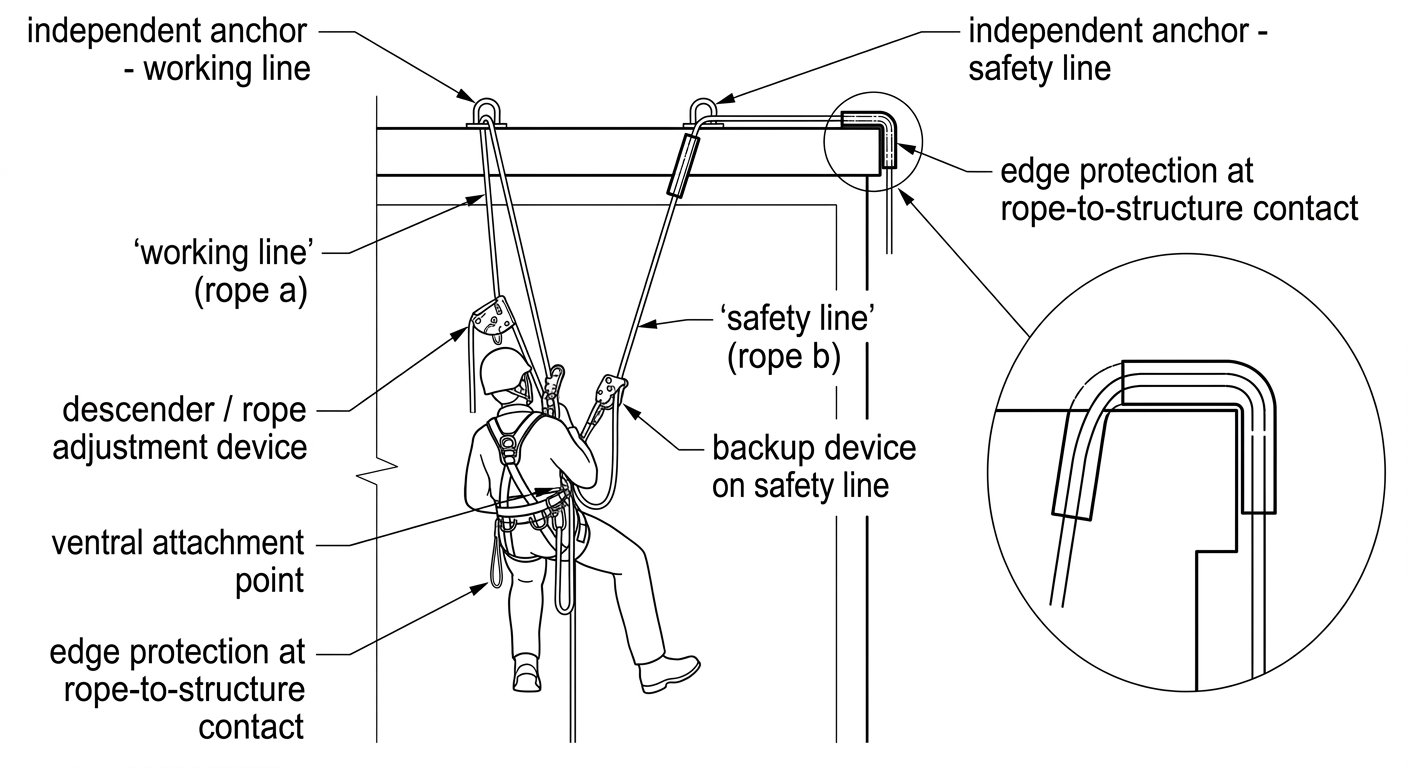
Rope access differs from fall arrest in that the worker’s weight is on the system as a working method, continuously, for the whole task. The governing principle is redundancy: a working line and a separate safety line, each with its own attachment to the harness and, wherever practicable, its own anchor. Loss of any single component — a device, a connector, an anchor, a rope — must not put the worker in free fall.
In practice that means:
- a descender or rope adjustment device on the working line, and a backup device on the safety line, both compatible with the rope in use;
- devices selected within the diameter range marked on them, and ropes selected to match — rope adjustment devices for rope access are covered by EN 12841, which classifies them by function (type A backup, type B ascent, type C descent);
- edge protection wherever a loaded rope crosses structure, because abrasion under load is the realistic rope failure mode;
- the safety line kept tended and free of slack, so a working-line failure produces a short shock-load, not a factor-1 fall onto a backup.
The same redundancy logic applies to the harness: a rope access harness carries ventral and sternal attachment points sized for suspension and a dorsal point for arrest, and the function of each point is fixed by design, not by convenience. The selection note on which harness for which use sets out the differences.
6. Rescue is part of the method statement, not a contingency
A worker hanging in a harness cannot generally self-rescue after an arrested fall, and cannot wait indefinitely: suspension in a harness becomes physiologically dangerous well before a general emergency service is likely to have set up an aerial rescue. The planning consequence is blunt — if the team on site cannot retrieve a suspended casualty with the equipment present, the job is not adequately planned.
Minimum expectations for a work-at-height plan:
- a named rescue method for each access position, not a generic “call the emergency services”;
- rescue equipment on site and accessible, matched to the geometry — see selecting a rescue kit for the task;
- at least one person present who is trained and current in that method, and who is not the person at height;
- a means of raising the alarm from the work position that does not depend on being seen.
Confined space work at height — vertical entries into tanks, silos, shafts — combines both problem sets and needs the entry controls resolved before the rigging: see the confined space entry permit sequence.
7. Equipment performs as fitted, inspected and recorded
The last principle is the least glamorous and the most frequently skipped. A correct system with a loose harness, an unverified connector or an out-of-service rope is not a correct system.
- Fit. A harness that is slack at the thighs or has a sternal point sitting low transfers load to the wrong places and lets the wearer slip in an arrest. Fit checks and the common errors are covered in the note on adjusting a full body harness correctly.
- Pre-use check. Visual and tactile inspection of every item by the user before it goes on, every time: webbing and stitching, connector gates and locking sleeves, device function and rope path, rope surface and sheath.
- Periodic examination. A documented inspection by a competent person at the interval set by the manufacturer and the applicable regulation, with the results recorded against the individual item.
- Retirement. Textiles come out of service on condition or on age, whichever comes first, and immediately after any arrested fall or unexplained shock load. See service life and retirement criteria for textiles.
Applying the principles in order on site
Condensed to a working sequence, before anyone leaves the ground:
- Can the task be done without exposure to a fall? If yes, do that.
- Is collective protection available or installable? If yes, use it.
- Can the work be done in restraint? If yes, define the envelope and fix the lanyard length to it.
- If suspension or arrest is required, find the anchor first — overhead, rated, loaded in the right direction.
- Measure the clearance below the work position and select the lanyard or device against that measurement.
- For suspended work, build two independent systems and protect every rope-to-structure contact.
- Write the rescue method, put the kit on site, and confirm someone competent is there to use it.
- Pre-use check every item, fit and verify the harness, and confirm connector compatibility before clipping in.
Each of these steps has its own technique note. The full set is indexed on the rope access and confined space technique notes hub, and the natural next step from here is the geometry problem most often got wrong in practice: choosing the type of fall-arrest lanyard for the anchor position and clearance actually available.
Frequently asked questions
What is the difference between restraint and fall arrest?
A restraint system is arranged so that the worker physically cannot reach the fall hazard, so no fall occurs and no arrest forces are generated. A fall-arrest system allows a fall to begin and then stops it, which requires an energy absorber, a rated anchor and sufficient clearance below the work position. Restraint is preferred wherever the anchor position and lanyard length make it achievable.
Why should the anchor be positioned as high as possible?
An anchor above the harness attachment point reduces or eliminates the free fall before the system starts taking load, which lowers the arrest forces and the total clearance needed. Anchors at harness height or below allow a longer free fall and a harsher arrest. Positioning the anchor close to vertically overhead also limits swing fall.
What has to be included when calculating fall clearance?
The free fall distance permitted by the lanyard and anchor position, the deployment length of the energy absorber as published for that specific device, displacement of the harness and the distance from the attachment point down to the wearer's feet, and a safety margin below the lowest point reached. All of these are added together; omitting the absorber deployment figure is the most common error.
Why does rope access require two ropes rather than one?
In rope access the worker's weight is on the system continuously as the working method, so the system has to tolerate the loss of any single component. A working line carries the load and a separate safety line with a backup device catches the worker if a device, connector, anchor or rope fails. Wherever practicable each line is attached to its own independent anchor.
Can a work positioning belt be used on its own?
A waist belt to EN 358 can be used alone only where no fall is foreseeable, for example in genuine restraint or in work positioning that is itself backed up. As soon as a fall is possible, the load path must run through a full body harness to EN 361 using a designated fall-arrest attachment point, because a belt does not support the body correctly in an arrest.
Why does a work-at-height plan need a specific rescue method?
A worker suspended in a harness after an arrested fall usually cannot self-rescue, and suspension becomes physiologically dangerous well before an external aerial rescue is likely to be set up. The plan therefore needs a named retrieval method for each access position, the matching rescue equipment present on site, and at least one trained person available who is not the person at height.
Need this as a document you can issue? The template library gives you the risk assessments, permits and inspection logs in editable form — and employer plans cover a whole team with completion records.