Safety / Tips and Tricks / Rope access and confined space
Activity 01 · Rope access
Selecting a Rescue Kit for the Task
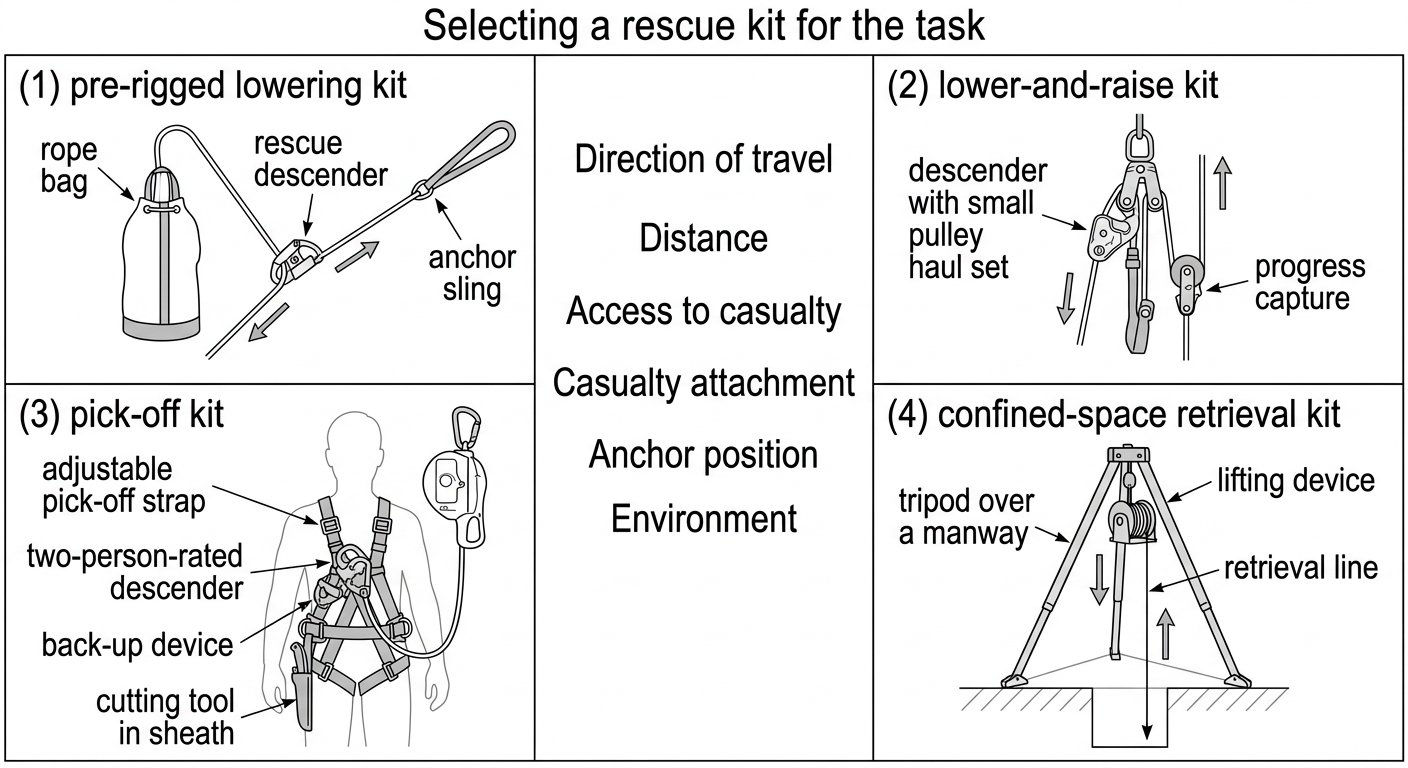
A rescue kit is only useful if it matches the rescue you have actually planned for. The most common failure is not equipment failure – it is a kit that can lower but not raise, a rope that is shorter than the drop, or a retrieval winch bolted to a tripod over a shaft that the casualty will never be pulled straight up through. Selecting a rescue kit for the task means working backwards from a specific, written rescue scenario: where the casualty will be, which direction they need to move, how far, who reaches them, and what the anchor above them can actually do.
This note sets out the questions that decide the kit, and the equipment families that answer each one.
Start from the rescue plan, not the catalogue
Before any hardware is chosen, the rescue plan should state four things in plain language:
- The likely casualty positions. Suspended on a work line? Hanging on an energy-absorbing lanyard below a beam? Collapsed on a platform? At the bottom of a vertical entry? Each produces a different rescue.
- Who performs the rescue. A trained rope-access team on site, a single competent attendant at the top of a manhole, or an external emergency service with a stated response time.
- The time budget. Suspension in a harness is time-critical, and so is any confined-space atmosphere problem. A plan that depends on an off-site team arriving later is not a rescue plan for suspension.
- The anchor and access reality. What exists above, beside or below the work position, and whether a rescuer can physically get to the casualty.
Only once those are fixed does the kit selection become a short set of decisions.
Question 1: which direction does the casualty need to move?
This single question eliminates most of the market.
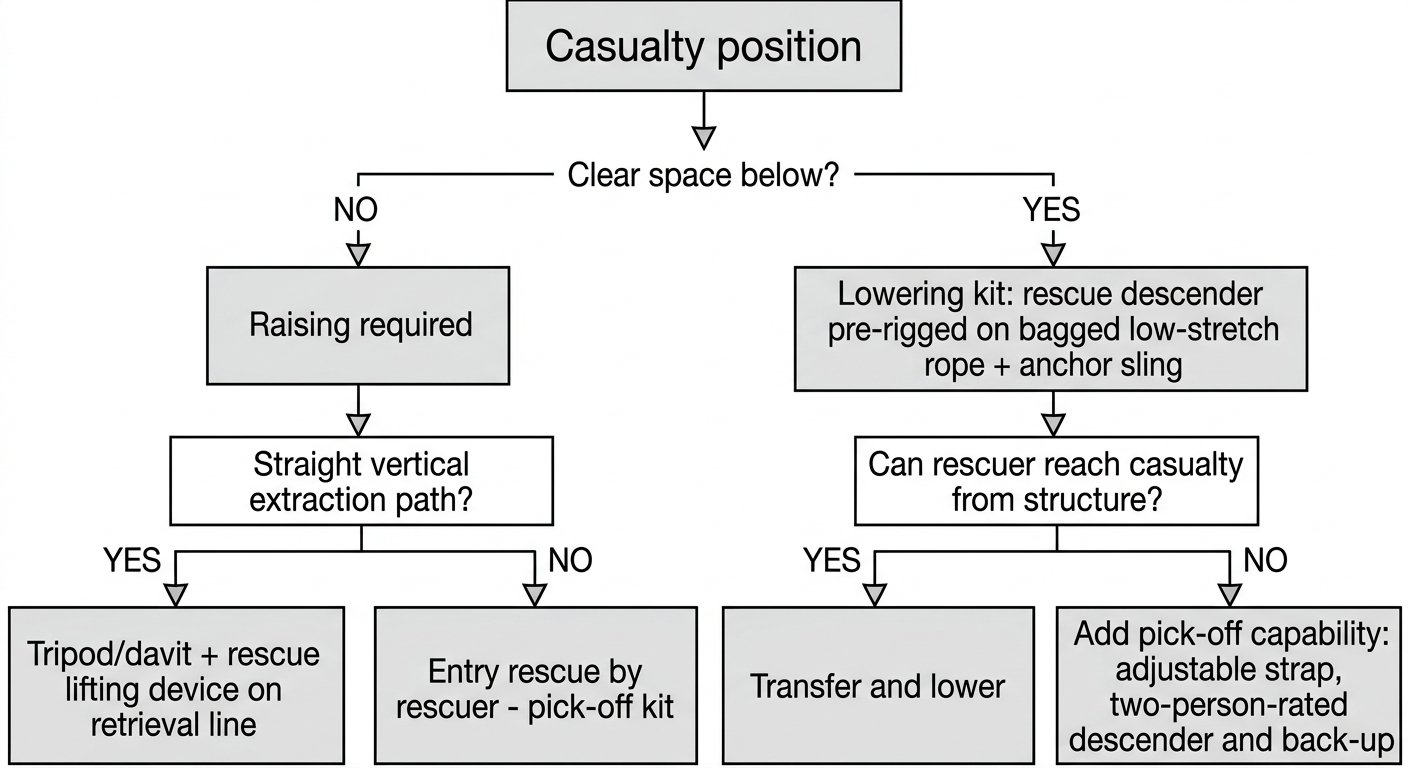
Lowering only
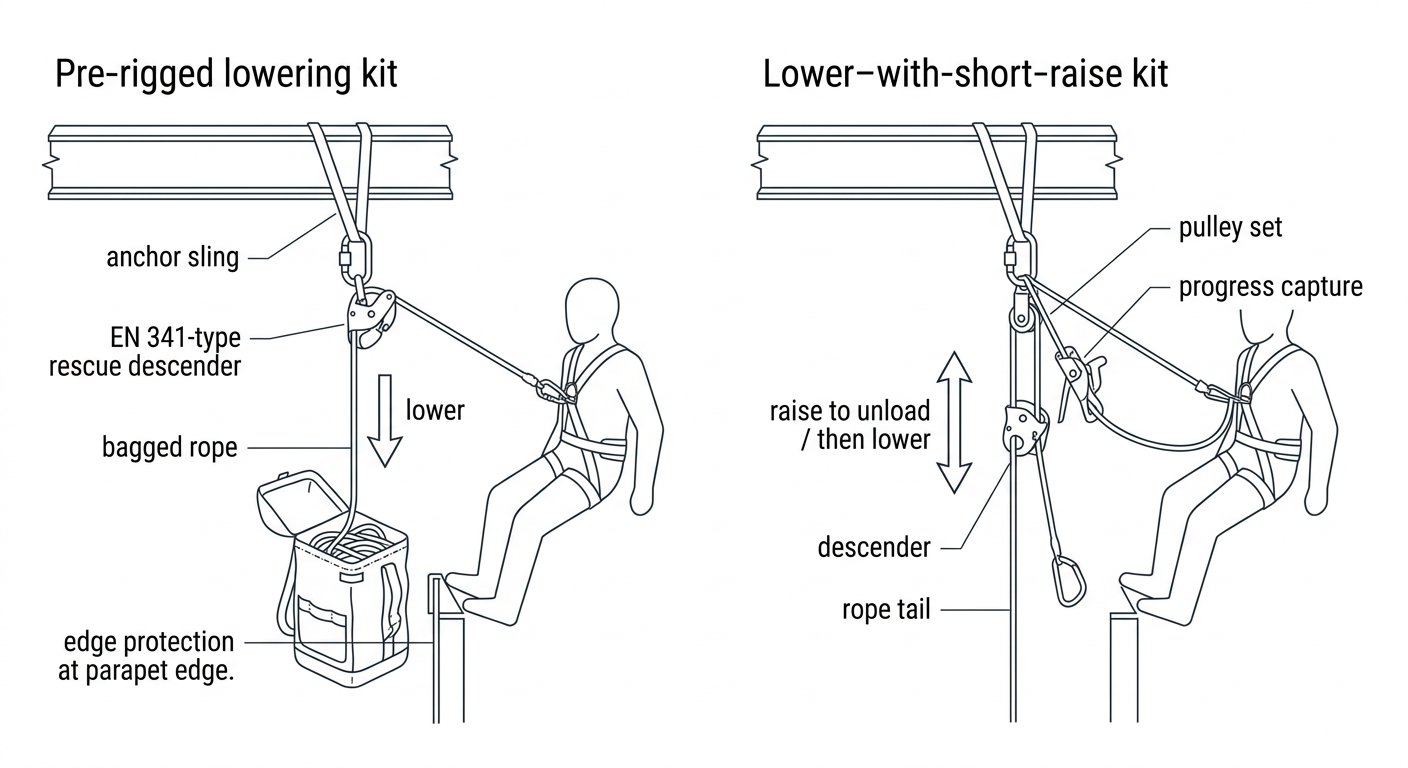
If there is clear, unobstructed space beneath the casualty and a safe landing zone, lowering is almost always the fastest and least equipment-intensive option. A pre-rigged descent kit – a rescue descender pre-installed on a bagged low-stretch rope, with an anchor sling and connectors – can be deployed by one person quickly. Rescue descenders are the subject of EN 341, which covers descender devices for rescue; devices are classified by the descent energy they are rated to handle, so a kit for a tall structure is not necessarily the same device as a kit for a two-storey lower.
Raising only
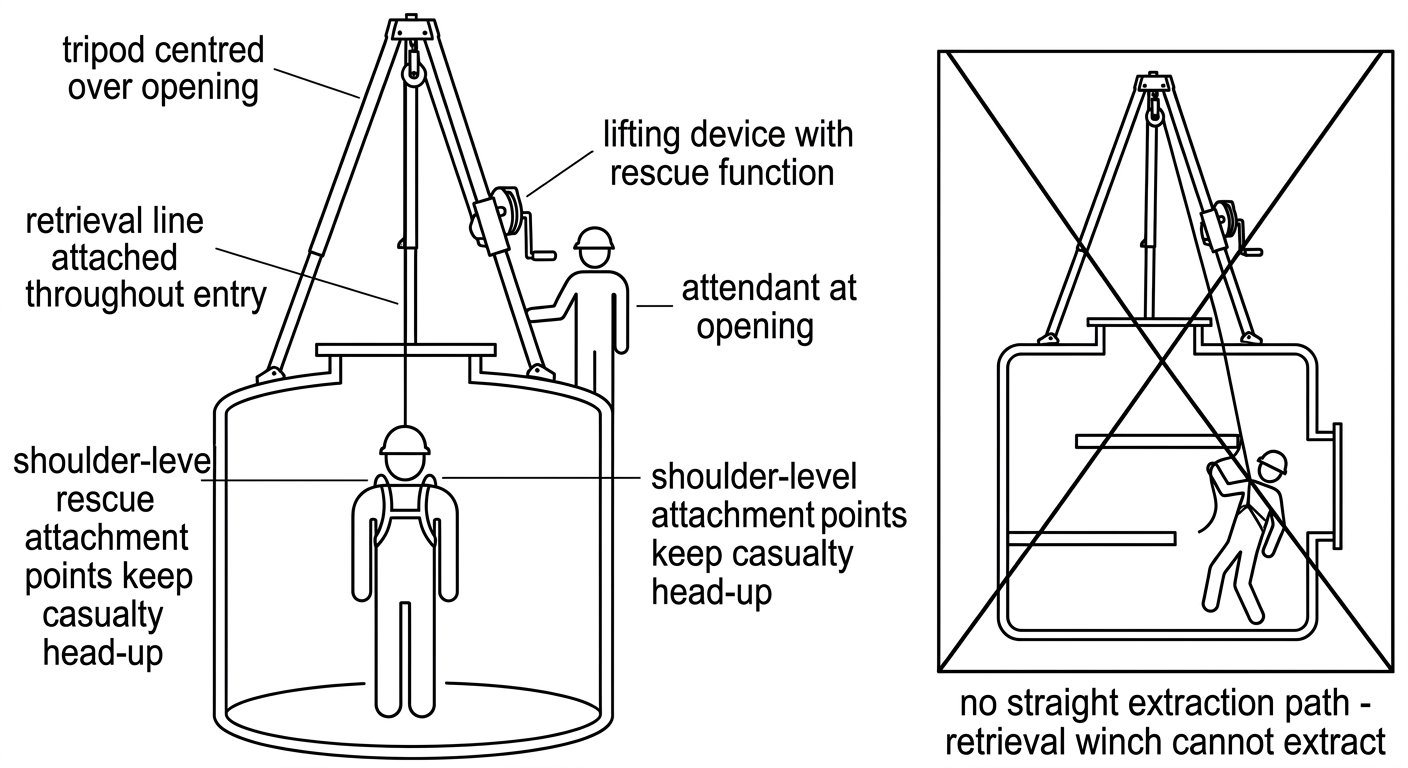
Raising is required when the casualty is below the anchor and there is no way down: a vertical entry into a tank or shaft, a bund, or a pit. Here the kit is normally a fixed anchor structure (tripod, davit or quadpod) plus a lifting device intended for rescue — either a rescue winch or a retractable fall arrester with an integrated retrieval function. Raising is slow and physically demanding, so the mechanical advantage or gearing of the device matters more than its weight.
Both
Most real rescues benefit from the ability to do both. A casualty whose rope grab has jammed, or whose lanyard is snagged, often has to be lifted a short distance to unload the device before they can be lowered. Kits built around a descender that also accepts a haul system, or a lower/raise pulley set with a progress-capture device, cover this. If the plan can only realistically justify one kit on site, a lower-with-short-raise capability is usually the most versatile choice.
Question 2: how far, and on what rope?
Rope length is chosen from the maximum drop to a safe landing, plus a working margin for rigging, deviations and the possibility that the ideal landing zone is unusable. A rope that stops short is a total failure of the kit, so the margin is not a place to economise. Where drops vary greatly across a site, it is often better to hold two or three kits with different rope lengths, clearly labelled, than one long kit that is unwieldy to carry and slow to manage.
Rope diameter has to match the descender, any back-up device and any haul components in the kit. Manufacturers state a working diameter range for each device, and performance at the extremes of that range differs noticeably – thin ropes run fast and can be hard to control under load, thicker ropes are slower but bulkier. The trade-offs are covered in more detail in the note on choosing a low-stretch rope diameter to match devices, loads and wear. Whichever is chosen, the whole kit must be built around one diameter, not mixed.
Question 3: can you reach the casualty, or must you go to them?
If the casualty can be reached from a platform, walkway or the anchor level, the rescue can often be performed with a lowering kit alone: transfer the casualty onto the rescue line, release them from their original system, lower.
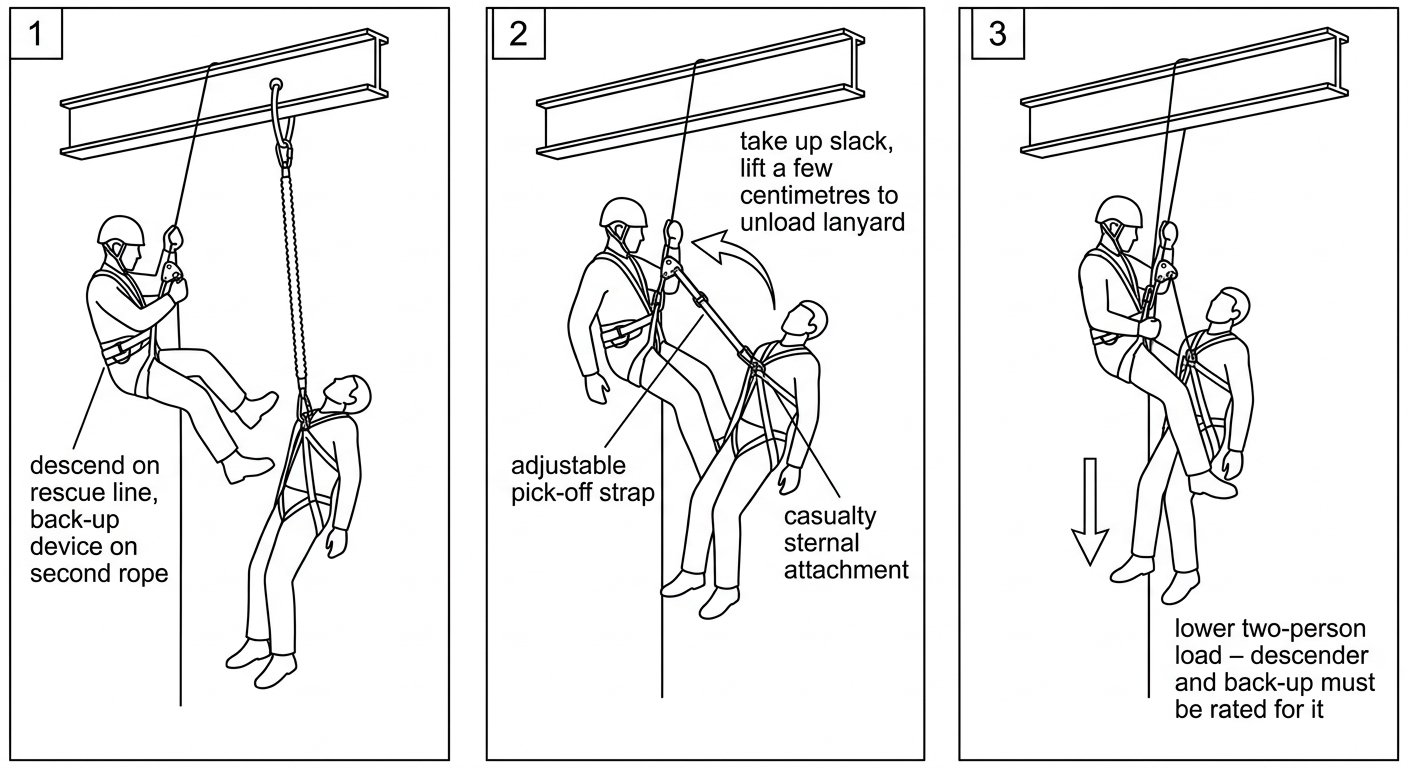
If the casualty is suspended out of reach – mid-rope, part-way down a mast, or below a beam on a shock-absorbing lanyard – the kit must support a pick-off: the rescuer descends or ascends to the casualty and takes them onto their own system. A pick-off kit adds items that a simple lowering kit does not need:
- An adjustable pick-off strap or short adjustable lanyard to attach the casualty to the rescuer’s attachment point and to take up the slack precisely.
- A means of lifting the casualty a few centimetres to unweight their jammed device or taut lanyard — typically a small pulley set or the adjustable strap used as a short haul.
- A knife or cutting tool, controlled and secured, for the case where a lanyard genuinely cannot be released.
- A descender rated to be operated under the combined weight of two people, and a back-up device that will also function at that load.
Two-person loading is the point people most often overlook. Not every descender or back-up device is intended for two-person use, and the kit should be selected with that stated in the manufacturer instructions rather than assumed.
Question 4: how does the kit attach to the casualty?
Attachment is part of the kit, not an afterthought. A conscious rope-access worker can usually be connected at the sternal point of their own harness, which is designed for that use — see the requirements for full body harnesses under EN 361. An unconscious or unresponsive casualty is a different problem: they must be supported in a way that keeps the airway clear and does not depend on their own muscle tone.
This is where rescue-specific attachment points matter. Rescue harnesses under EN 1497 provide attachment points intended for lifting a person during rescue, often a pair of shoulder-level points that hold the casualty upright and head-up during retrieval through an opening. Some work harnesses include integrated rescue attachment points; others do not. If your confined-space plan relies on vertical extraction of an unresponsive entrant, either the entrant’s harness must have suitable rescue attachment points, or the kit must include a rescue harness or rescue loop that can be fitted to them — which, in a tight space, is far harder than it sounds.
Connectors in the kit deserve the same scrutiny as the devices. Anything that will be handled under load, in gloves, possibly one-handed, should have a locking system the rescuer can operate reliably; and connectors used at a descender need the right shape and loading axis so the device cannot cross-load or shift onto the gate.
Question 5: what does the anchor allow?
A kit designed for a structural anchor above the casualty is useless where the only anchor is at foot level. Selection questions to settle on site:
- Is there an anchor above the casualty’s head? If not, the kit needs a way to create one — a portable davit, a beam anchor, or a rigging set with slings long enough to reach a high structural member.
- Can the anchor take a rescue load? A rescue involving two people and a haul system imposes higher forces than one worker on a rope. Anchor selection should account for the load the whole rescue system can generate, not the weight of one person.
- Is the anchor in line with the extraction path? For a vertical entry, the lifting device must be directly over the opening. A tripod off-centre from a manhole will drag the casualty against the rim.
- Is there an edge? Rope over a sharp or abrasive edge needs edge protection or a deviation in the kit. This is a kit component, not an improvisation.
Rope access kits versus confined-space retrieval kits
These are related but genuinely different families, and mixing them up is a common planning error.
Rope-access rescue kits assume a trained rescuer will move on rope to the casualty. They are built around a descender, a back-up device, ascent capability, and a pick-off strap, and they use the same rope diameters and EN 12841 rope adjustment devices that the team already works on daily. Their strength is versatility; their cost is training. They only work if the team practises pick-offs regularly.
Confined-space retrieval kits assume the entrant is on a retrieval line the whole time and can be extracted without a second person entering. They are built around a tripod, davit or quadpod, a lifting device with a rescue function, and a retrieval line that stays attached throughout the entry. Their strength is speed and the fact that they avoid a second entry; their limitation is that they only work where the extraction path is straight and unobstructed. In a vessel with internal baffles, a side entry, or a horizontal crawl, a retrieval winch over the manway will not extract anybody, and the plan has to say so honestly. Retrieval provision is part of the entry authorisation, and should be checked as part of the confined space entry permit sequence rather than assumed to be covered.
Environment: what the kit has to survive
The task environment narrows the choice further:
- Contamination. Ropes and textile components used in a chemical, hydrocarbon or sewage environment may be unrecoverable after a single use. Kits stationed in those areas should be treated as consumable, and the plan should say who decides to quarantine them.
- Heat and sparks. Near hot work or molten metal, textile lanyards and ropes need appropriate protection or substitution; a standard rescue kit hung near cutting operations can be damaged before it is ever used.
- Electrical work. Conductive components and steel cable have obvious implications near live equipment.
- Weather and UV. Kits stored permanently outdoors degrade. If a kit lives on a structure, it needs a sealed container and a defined inspection interval.
- Space to deploy. A large haul kit in a rucksack is worthless if the only route to the anchor is a ladder cage. Sometimes the deciding factor is simply what one person can carry up.
Pre-rigged, bagged and ready – or built on the day?
Pre-rigged kits arrive with the descender already installed on the rope and the rope flaked into a bag. They are fast, they reduce the number of decisions under stress, and they suit sites where the rescuer may be someone who does not rig every day. The trade-off is inflexibility: the rope length and rigging are fixed.
Component kits – a bag of devices, rope, slings and connectors assembled by the team – are more adaptable and suit experienced rope-access teams working across varied structures. They demand more skill and more time on scene.
A useful rule: the less frequently the rescue kit will be used, and the less specialised the person who will use it, the more pre-rigged it should be.
Readiness: the part that decides whether the kit works
A correctly selected kit still fails if it is not usable at the moment it is needed. Build these into the selection decision, because they affect what you buy:
- Location. The kit must be at the work location, not in a store 400 metres away. This often means buying several small kits rather than one comprehensive one.
- Sealing and tamper indication. A numbered seal shows at a glance that the kit is complete and has not been raided for a missing carabiner.
- Inspection. Rescue kits need the same periodic examination as working PPE, plus a check that the contents list is complete. Seals should be logged when broken.
- A contents list inside the bag, with a simple deployment sequence printed on durable card. Under stress, people forget steps they know well.
- Practice. Whichever kit is chosen, the people named in the plan must have deployed it, on the actual structure, within recent memory. A kit no one has rigged is a plan on paper.
Putting it together: a short selection path
- Write the specific casualty scenario for this task.
- Decide the direction of travel: lower, raise, or both.
- Measure the maximum drop or lift and set the rope length with margin.
- Decide whether a rescuer must reach the casualty; if yes, specify a pick-off capability and two-person-rated devices.
- Confirm the attachment method for an unresponsive casualty, including rescue attachment points.
- Confirm an anchor exists in the right position and can take rescue loads.
- Apply environmental constraints and choose pre-rigged versus component form.
- Site the kit, seal it, schedule its inspection, and rehearse it.
If any of those steps cannot be answered for the task in front of you, the answer is not a bigger kit — it is a revised access method that produces a rescue you can actually perform.
For related selection and rigging notes, see the full index of rope access and confined space technique notes.
Frequently asked questions
What is the difference between a rescue kit and a retrieval system?
A rescue kit generally means the equipment a rescuer uses to reach and move a casualty – typically a descender, rope, back-up device and pick-off strap. A retrieval system keeps the entrant attached to a lifting device throughout the work so they can be extracted without a second person entering. Many confined-space plans need both, because retrieval only works where the extraction path is straight and unobstructed.
Does a rescue kit need to be rated for two people?
If the plan includes a pick-off – a rescuer descending to a casualty and taking them onto their own system – then the descender, back-up device, rope and anchor all have to be suitable for the combined load. Not every device intended for one-person use is approved for two. Check the manufacturer instructions rather than assuming, and choose the kit accordingly.
How long should the rope in a rescue kit be?
Set it from the maximum drop to a safe landing at that specific location, plus a working margin for rigging, deviations and the possibility that the preferred landing zone is blocked. A rope that ends short is a complete failure of the kit. Where drops vary widely across a site, holding several clearly labelled kits of different lengths is usually better than one very long one.
Can a standard work harness be used to lift an unconscious casualty?
Not always. Lifting an unresponsive person needs attachment points that hold them upright and head-up without relying on their own muscle tone, which is what rescue attachment points under EN 1497 are intended to provide. Some work harnesses include such points and some do not, so confirm this before the entry rather than during the rescue.
Should rescue kits be pre-rigged or assembled from components?
Pre-rigged kits are faster and reduce the number of decisions under stress, which suits sites where the responder is not rigging ropes every day. Component kits are more adaptable and suit experienced rope-access teams working on varied structures. As a rule of thumb, the less frequently the kit will be used and the less specialised the user, the more pre-rigged it should be.
How often should a rescue kit be inspected if it is never used?
Unused rescue kits still need the same periodic examination as working PPE, because textiles age, moisture and UV cause damage, and contents go missing. Add a check that the contents list is complete and the seal is intact. Kits stored outdoors or in contaminated areas generally need shorter intervals and a sealed container.
Need this as a document you can issue? The template library gives you the risk assessments, permits and inspection logs in editable form — and employer plans cover a whole team with completion records.