Safety / Tips and Tricks / Rope access and confined space
Activity 01 · Rope access
Attaching a Rope to the Harness: Attachment Points, Knots and Connectors
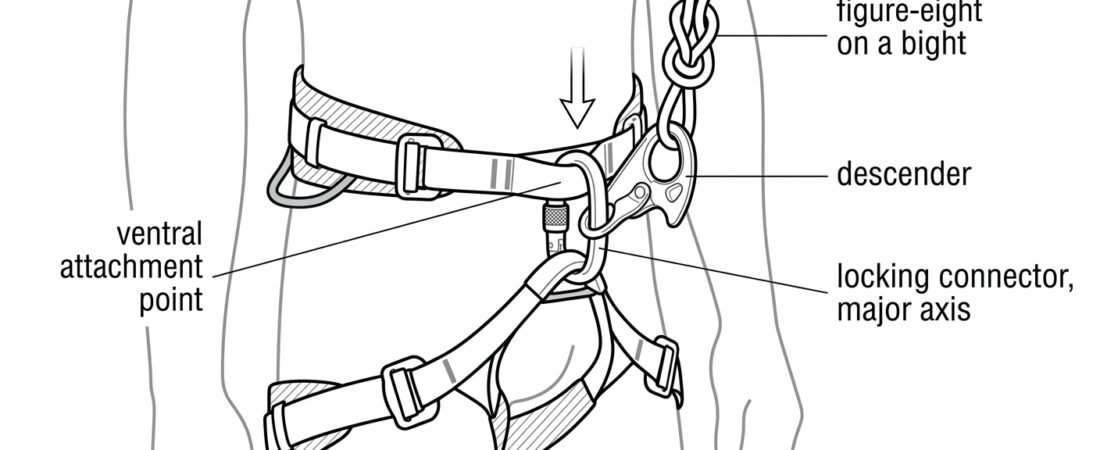
The rope-to-harness connection is the single point where the whole system finally reaches the person. Everything upstream — anchor, rope, edge protection — is undone if the rope arrives at the wrong attachment point, on the wrong axis of a connector, or through a knot that has been dressed carelessly. This note covers the two ways a rope is normally brought onto a harness (through a device, or by a direct tie-in), how to choose the attachment point for the job, and the checks to run before the system is weighted.
Decide what the rope is doing before you clip anything
The attachment method follows the function, not the other way round. In practice the rope arriving at the harness is doing one of a small number of jobs:
- Suspension / progression — the working line, normally reaching the harness through a descender or ascender rather than being tied directly.
- Backup / fall arrest on a second line — the safety line, reaching the harness through a rope grab or guided-type fall arrester.
- Work positioning or restraint — a tensioned or fixed-length line holding the worker in place or preventing them from reaching the fall hazard.
- Rescue and lowering — a line attached to the casualty, or to a rescue harness, for controlled raising or lowering.
These are not interchangeable. A rope tied directly into a ventral point is fine for a controlled lower and wrong for a situation where a fall could develop, because low-stretch rope with no absorber in line does very little to limit the forces on the body. If the function of the line is not clear, stop and settle that first — the sequence of decisions is covered in general principles for work at height.
Choosing the attachment point on the harness
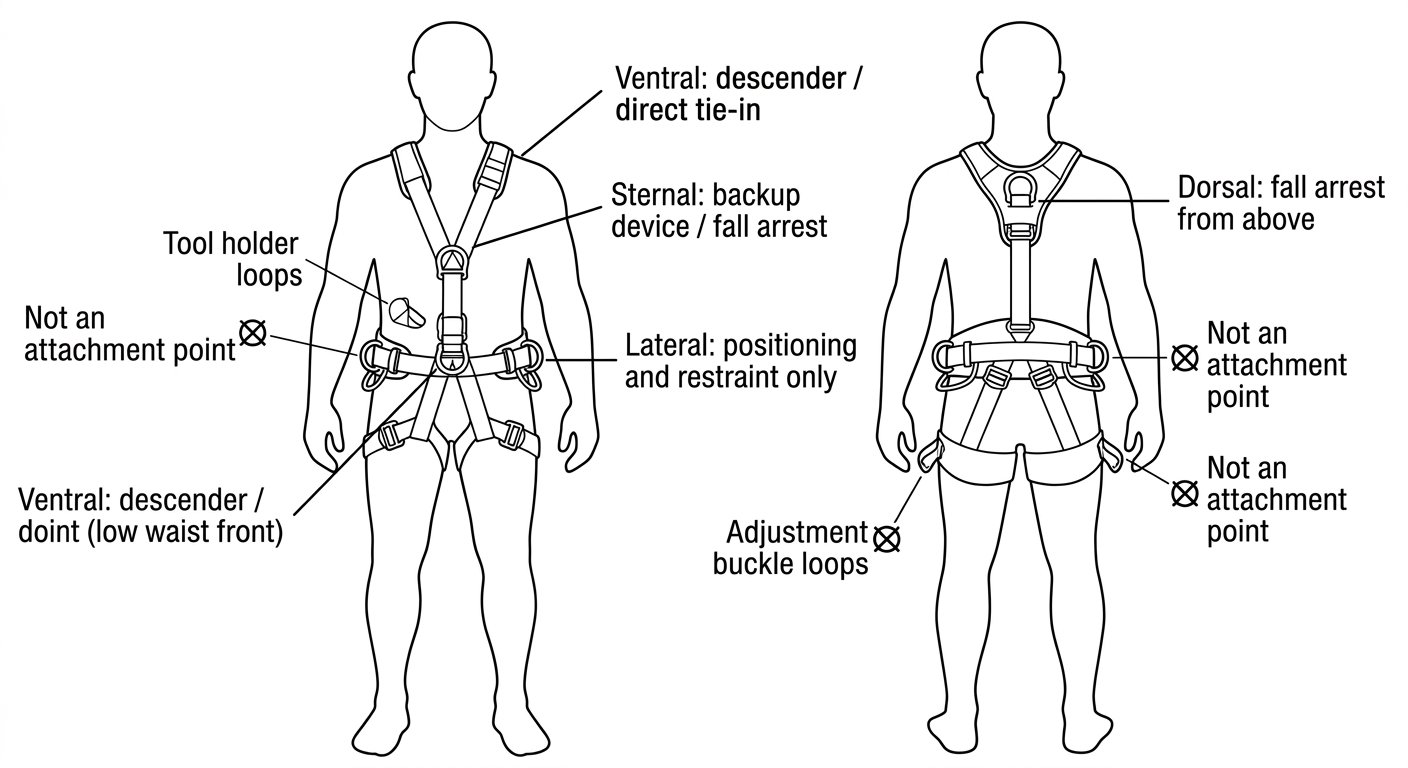
A rope-access harness conforming to EN 361 for full body harnesses gives you a limited set of load-bearing points, and each one is marked and intended for specific uses. The usual pattern:
- Ventral (waist front, low on the belt). The standard point for the descender on the working line, and for direct tie-ins used in suspension, lowering or hauling. It keeps the worker upright and puts the rope where the hands are.
- Sternal (chest). Used for the rope grab on the backup line in many configurations, and as a fall-arrest attachment where the harness is marked for it.
- Dorsal (back). A fall-arrest point. Convenient for a line paid out from above where you do not want the worker fouling it, poor for anything the worker must reach and operate.
- Lateral belt points (waist sides, in pairs). Work positioning and restraint only, under EN 358 for positioning and restraint belts. Never a fall-arrest attachment, and never a place to tie a suspension line.
Anything that is not a marked attachment point is not an attachment point. Equipment loops, tool loops, haul loops, adjustment buckles and the webbing itself are excluded — they are built for carrying gear or for taking up slack, not for holding a person.
If the harness does not sit where it should, no attachment choice will fix it: a low-riding sternal point or a slack waist belt changes the loaded geometry entirely. Run the fit checks in adjusting a full body harness correctly before you start rigging.
Route 1: the rope reaches the harness through a device
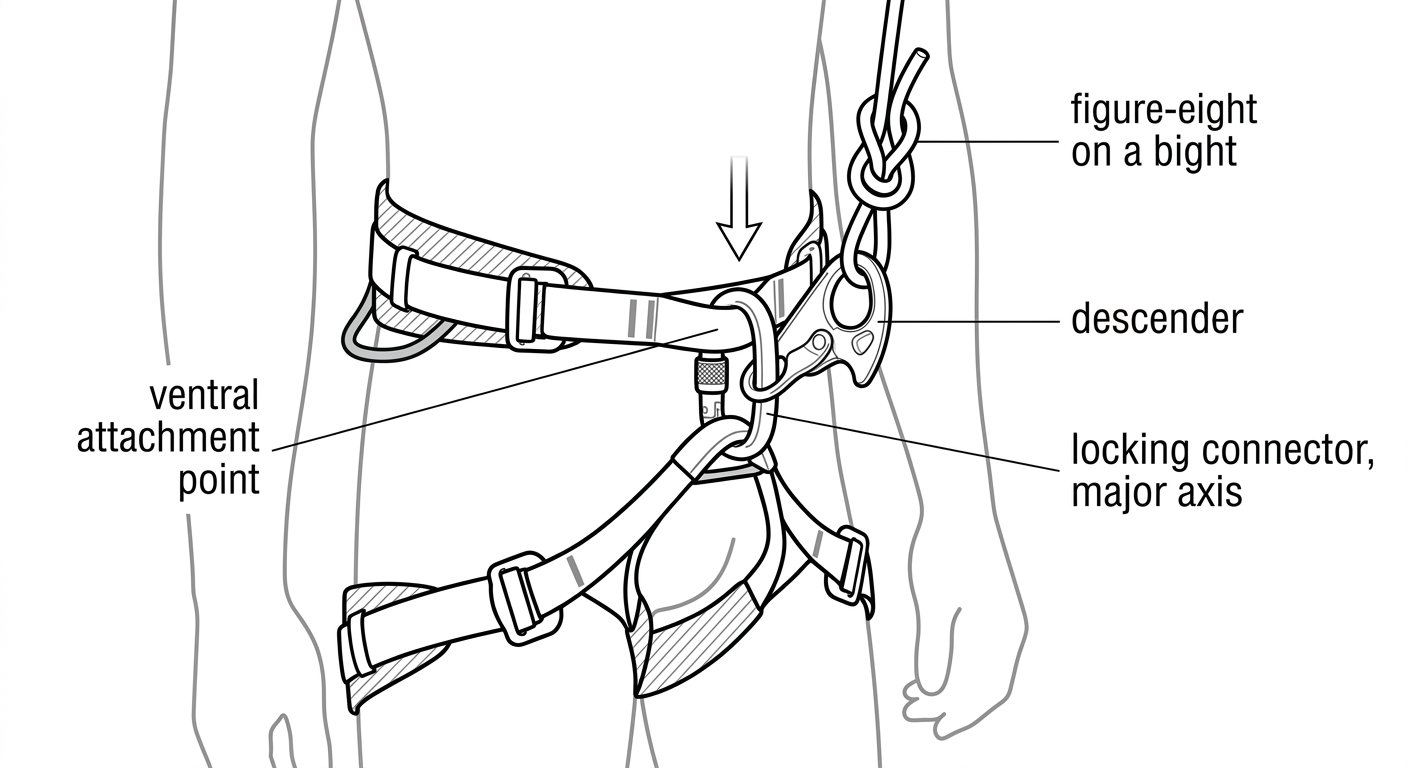
This is the normal case in rope access. The rope is threaded into a descender or an ascender/rope grab, and the device is attached to the harness with a connector. Three things matter.
The connector
Use a locking connector to EN 362 for fall-protection connectors, sized so that the harness attachment point and the device’s attachment hole both sit cleanly in the basket of the connector without stacking on top of each other. Screw-lock is acceptable where it can be checked and is not repeatedly opened; auto-locking closures reduce the chance of an unlocked gate going unnoticed. The trade-offs are set out in connector locking systems compared.
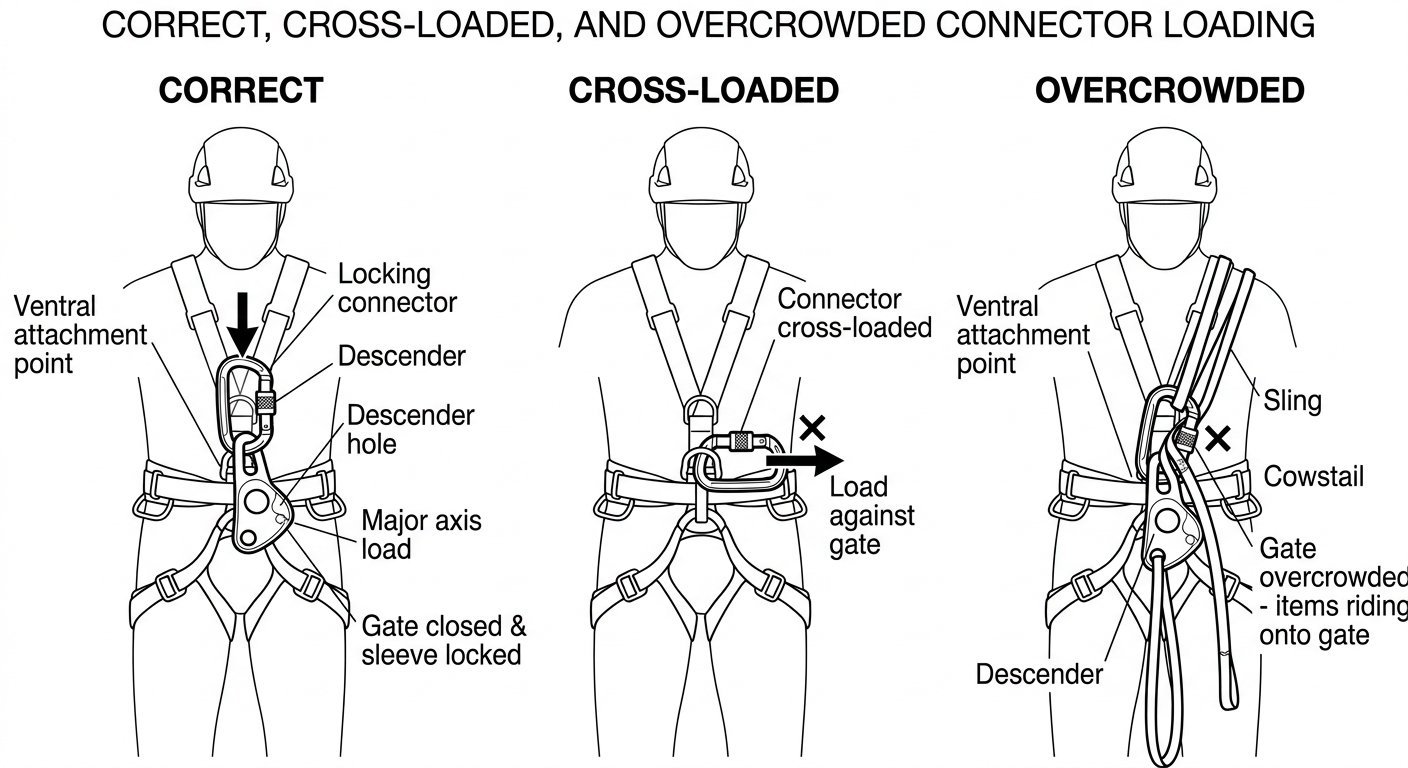
The loading axis
A connector is designed to be loaded along its major axis, spine to gate, with the gate closed and locked. At the harness, the two errors to watch for are cross-loading (the connector lying across the attachment point so that load pulls sideways on the gate) and the connector being levered against the harness webbing or against the descender body. Some descender connectors include a captive bar or keeper precisely to hold the connector in the correct orientation — use it if the manufacturer supplies it. The underlying principles are in connector basics: gates, axes and loading.
The number of items in one connector
Keep the harness connector to two items where possible: the harness point and the device. Adding a third or fourth item (a sling, a cowstail, a haul line) turns a two-way load into a multi-directional one, pushes items onto the gate, and makes it hard to see what is actually loaded. Give additional items their own connector on their own attachment point.
Devices used for rope adjustment on the working line fall under EN 12841 for rope access adjustment devices, which distinguishes type A (backup on the safety line), type B (ascent) and type C (descent). The type tells you which line the device belongs on — a descender is not a backup, and a backup is not a descender.
Route 2: tying the rope directly to the harness
Direct tie-ins are used where no adjustment is needed at the harness: a casualty on a lowering line, a worker on a haul line, a fixed-length positioning line, or a restraint line whose length has been set and will not change. Two ways to do it, both valid:
- Knot plus connector. Tie a figure-eight on a bight (or an overhand on a bight) in the rope end and clip the resulting loop into the harness attachment point with a locking connector. This is the most common approach because it is quick to inspect and quick to release.
- Knot tied directly through the attachment point. A rethreaded figure-eight or a bowline with a secured tail passed through the marked attachment point, removing the connector from the chain. Fewer components, but slower to tie and untie, and only appropriate where the attachment point is a textile loop the manufacturer allows you to thread.
Dressing the knot
Whichever knot you use, the same details apply. Dress it so the strands lie parallel and there are no crossed turns. Leave a tail long enough that it cannot work back through the knot under cyclic loading — a comfortable hand’s width beyond the knot is the usual rule of thumb, and finish with a stopper if the knot family calls for one or if local procedure requires it. Then keep the knot compact and close to the harness: a long loop between the knot and the attachment point is slack in the system, and slack is fall distance.
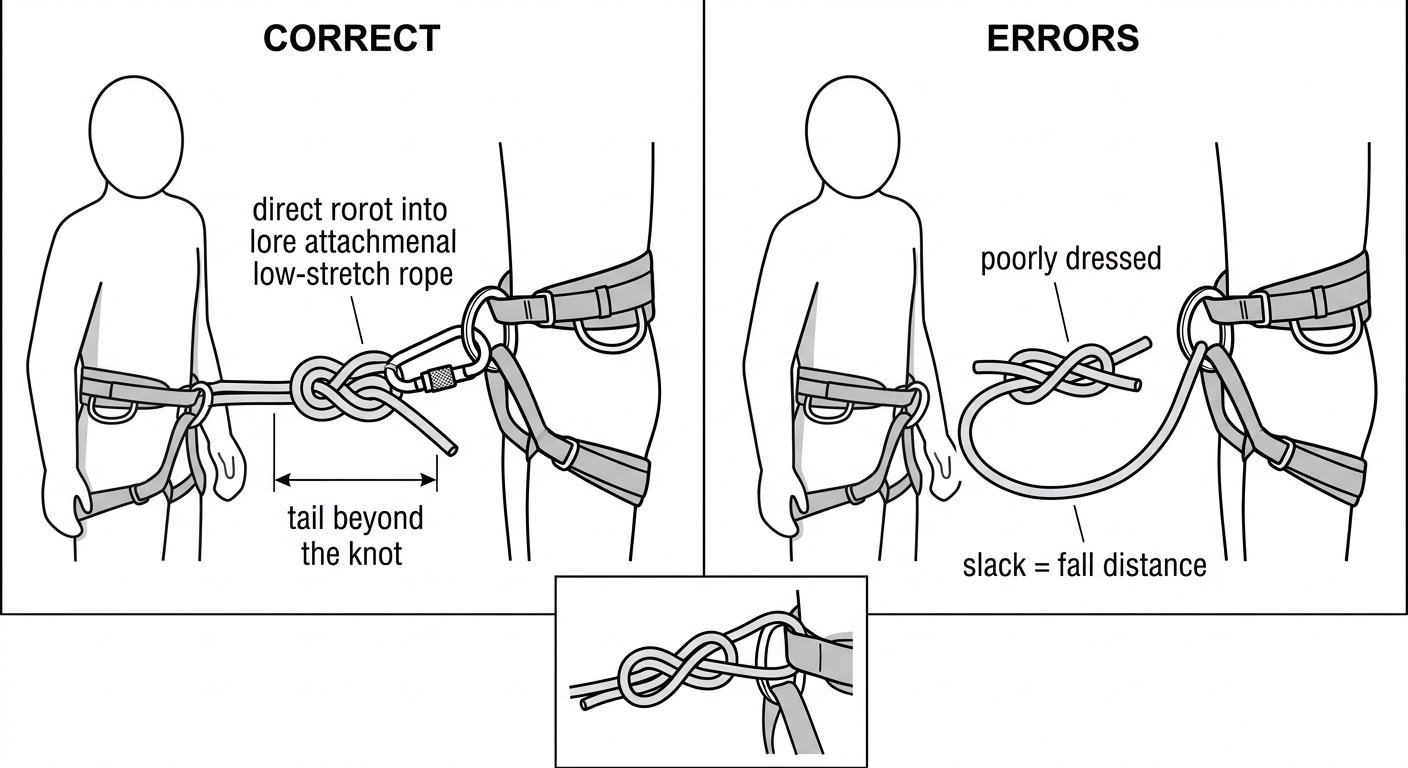
The forces problem with a direct tie-in
Low-stretch rope tied straight into a harness with no shock-absorbing element gives you almost nothing to absorb a fall. That is acceptable where the line is kept taut and the geometry makes a fall impossible — restraint, tensioned positioning, a loaded lowering line. It is not acceptable as a fall-arrest arrangement. If a fall could occur along the line, the system needs a device rated for that job (a guided-type fall arrester, or an energy absorber sized to the available clearance), not a knot. For restraint specifically, the attachment point choice and the geometry that makes restraint actually restrain are covered in which attachment points to use for restraint.
The backup line at the harness
In a two-rope system the second line reaches the harness through its own device, on its own attachment point, with its own connector. Nothing about the backup should share hardware with the working line, because a single failed connector would then take out both.
The point to get right is slack. The backup device should be positioned close enough to the harness — and kept high enough on the safety line — that a failure of the working line produces a short, low-energy arrest rather than a free fall onto a taut low-stretch rope. Manufacturers specify a maximum lanyard length between the backup device and the harness for exactly this reason; do not extend it with an extra sling or connector to gain reach. Which point the device attaches to depends on the configuration and the harness marking, and is discussed in harness attachment point for a rope grab.
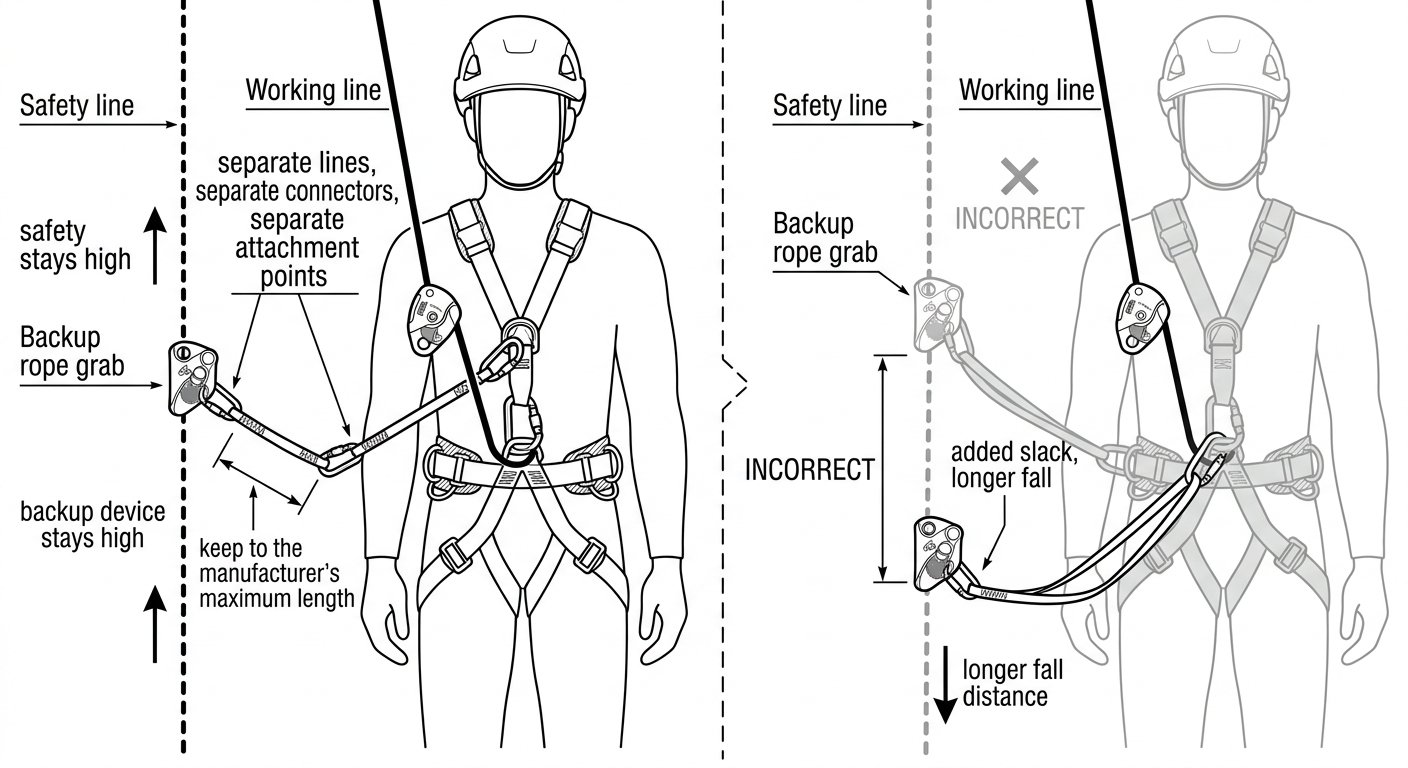
Checks before you commit weight
- Right point. The rope or device is on the attachment point intended for that function, and that point is marked for it.
- Right connector, closed and locked. Gate shut, sleeve fully engaged, marking visible, no visible wear or deformation.
- Right orientation. Connector aligned on its major axis, free to rotate into line under load, not levering against harness or device.
- Knot inspected. Correct knot, dressed, tail adequate, stopper present if used, knot sitting close to the harness.
- Rope path traced. Follow the rope by hand from the harness back to the anchor, confirming it is correctly installed in the device and that the anchor end is as it should be — see attaching a rope to the anchor.
- Weight it low. Take load progressively while still in a safe position, watch the connector align, and confirm nothing shifts, twists or migrates before moving over the edge.
Where a second person is available, this list is a buddy check, not a self-check. Two people tracing the same rope path independently catch the errors that are invisible to the person wearing the harness — particularly the ones behind them.
For the connector side of these decisions in more detail, and for the other technique notes in this series, see the rope access and confined space technique notes.
Common errors
1Clipping into an equipment loop, tool loop or the webbing rather than a marked attachment point.
2A connector cross-loaded across the harness point, or trapped so that load bears on the gate.
3A non-locking connector, or a screw-lock left unscrewed after an adjustment.
4Three or more items crowded into the harness connector.
5A long loop of rope or a long knot tail between the knot and the harness, adding slack.
6Working line and backup line sharing a single connector or a single attachment point.
7A direct low-stretch tie-in used where a fall could develop, with no absorber and no fall arrester.
8Suspension load taken on lateral belt points, which are positioning attachments only.
Frequently asked questions
Which harness attachment point should the descender go on?
In most rope-access configurations the descender goes on the ventral attachment point, low at the front of the waist. That position keeps the worker upright in suspension and puts the device within easy reach of both hands. Always confirm the point is marked for that use on the specific harness.
Can I tie the rope directly into the harness instead of using a connector?
Yes, where the manufacturer allows the attachment point to be threaded and the line needs no adjustment at the harness — a rethreaded figure-eight or a secured bowline is common on lowering, hauling and fixed-length positioning lines. It removes one component from the chain but is slower to tie and untie. It is not a substitute for a fall arrester where a fall could develop along the line.
Why should the working line and the backup line never share a connector?
Because a single failed, unlocked or cross-loaded connector would then compromise both lines at once, which defeats the point of having two independent systems. Each line gets its own device, its own connector and its own attachment point. Keeping them separate also makes it obvious at a glance which line is loaded.
How long should the tail be on a knot tied into the harness?
Long enough that it cannot creep back through the knot under repeated loading and movement — roughly a hand's width beyond the knot is the usual field rule, and many procedures require a stopper as well. Just as important, the loop between the knot and the attachment point should be short, because any extra length there is slack in the system.
Is it acceptable to clip a rope into the lateral belt points of a harness?
Lateral belt points are intended for work positioning and restraint only, used as a pair with a positioning lanyard. They are not suspension points and not fall-arrest points, so a rope taking body weight in suspension does not belong there. Use the ventral point for suspension and a marked fall-arrest point for arrest.
What should I check immediately before putting weight on the system?
Confirm the right attachment point for the function, the connector closed and fully locked, the connector aligned on its major axis and free to rotate under load, and the knot dressed with an adequate tail sitting close to the harness. Then trace the rope by hand from harness to anchor and take load progressively from a safe position before committing over the edge. Where a second person is present, have them repeat the same trace independently.
Need this as a document you can issue? The template library gives you the risk assessments, permits and inspection logs in editable form — and employer plans cover a whole team with completion records.