Safety / Tips and Tricks / Rope access and confined space
Activity 01 · Rope access
Harness Attachment Point for a Rope Grab: Sternal, Dorsal and What Not to Clip Into
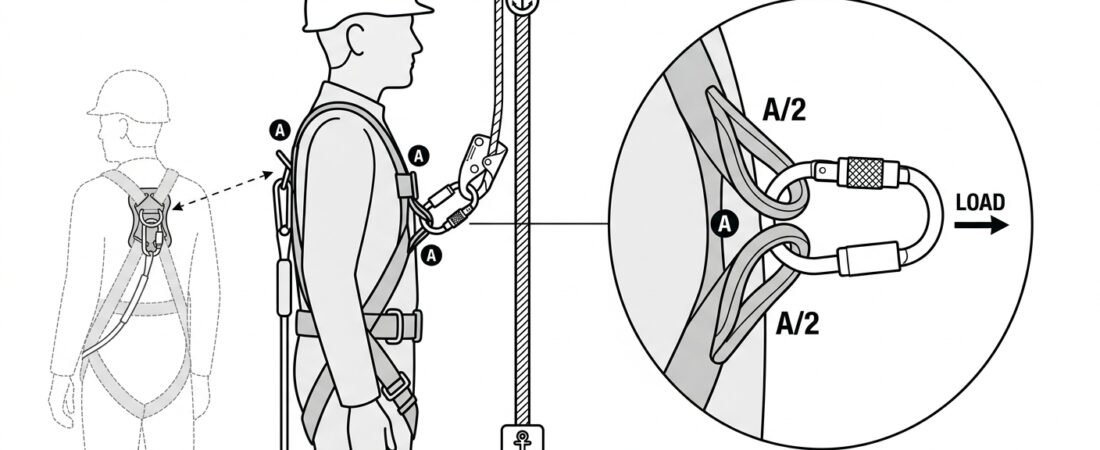
A rope grab — a guided-type fall arrester running on a vertical rope or a mobile back-up device on a safety line — only performs as tested if it is connected to the right point on the harness, by the right connector, with nothing added in between. Clip it to the wrong ring and the device may still slide, still lock, and still look perfectly normal on the way up the line, while the fall it is supposed to arrest ends in a loaded waist belt or a jammed device. This note covers which attachment point to use, how to choose between sternal and dorsal, and the connection errors that quietly add metres to your fall distance.
The rule: a fall-arrest attachment point, marked A
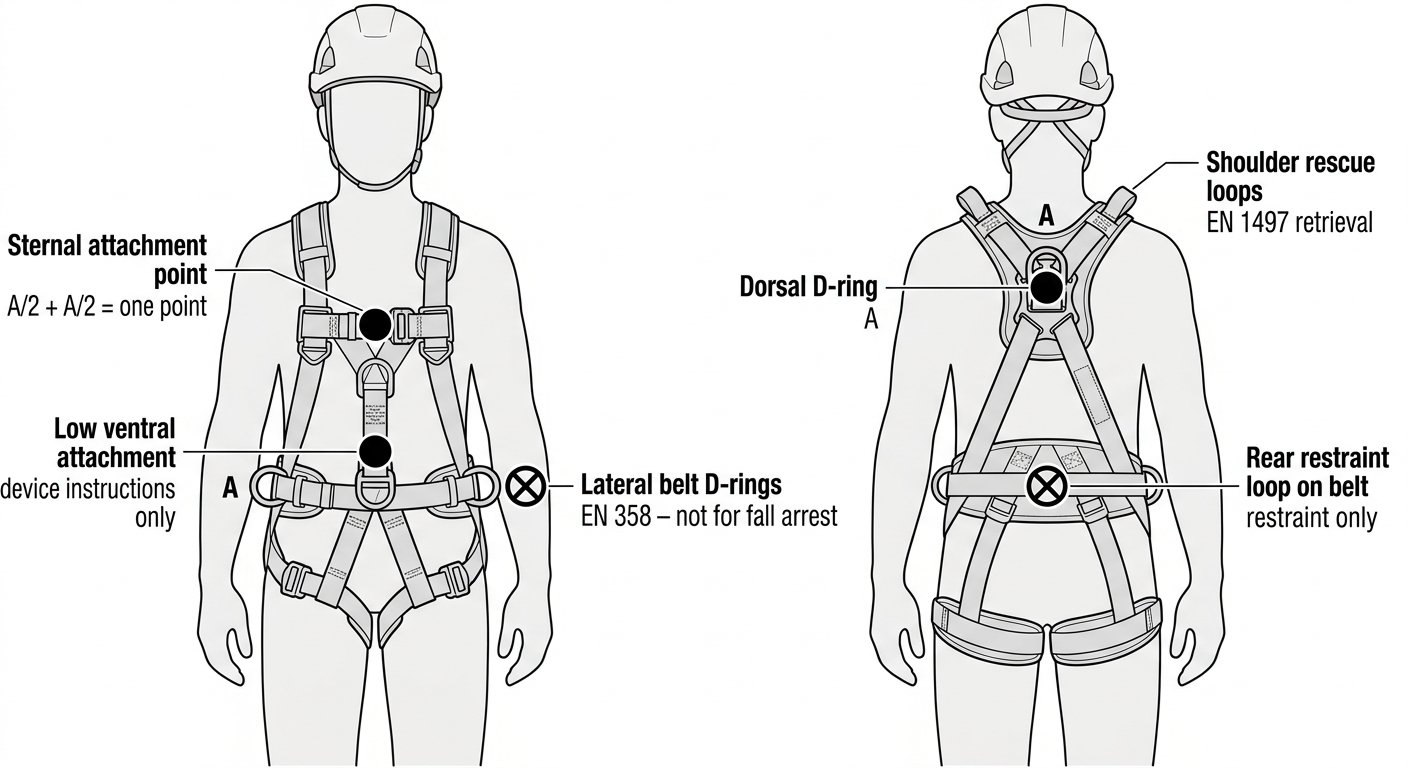
A rope grab is fall-arrest equipment. It connects to a fall-arrest attachment point on a full body harness — nothing else. On a harness certified to EN 361 (Full Body Harnesses), those points are identified with a capital A. Most harnesses used with a vertical line offer two of them:
- Sternal (chest) — on the front of the harness, at the level of the breastbone. On many harnesses this is a pair of textile loops or a metal ring formed where the shoulder straps cross the chest strap.
- Dorsal (back) — the D-ring or textile loop between the shoulder blades.
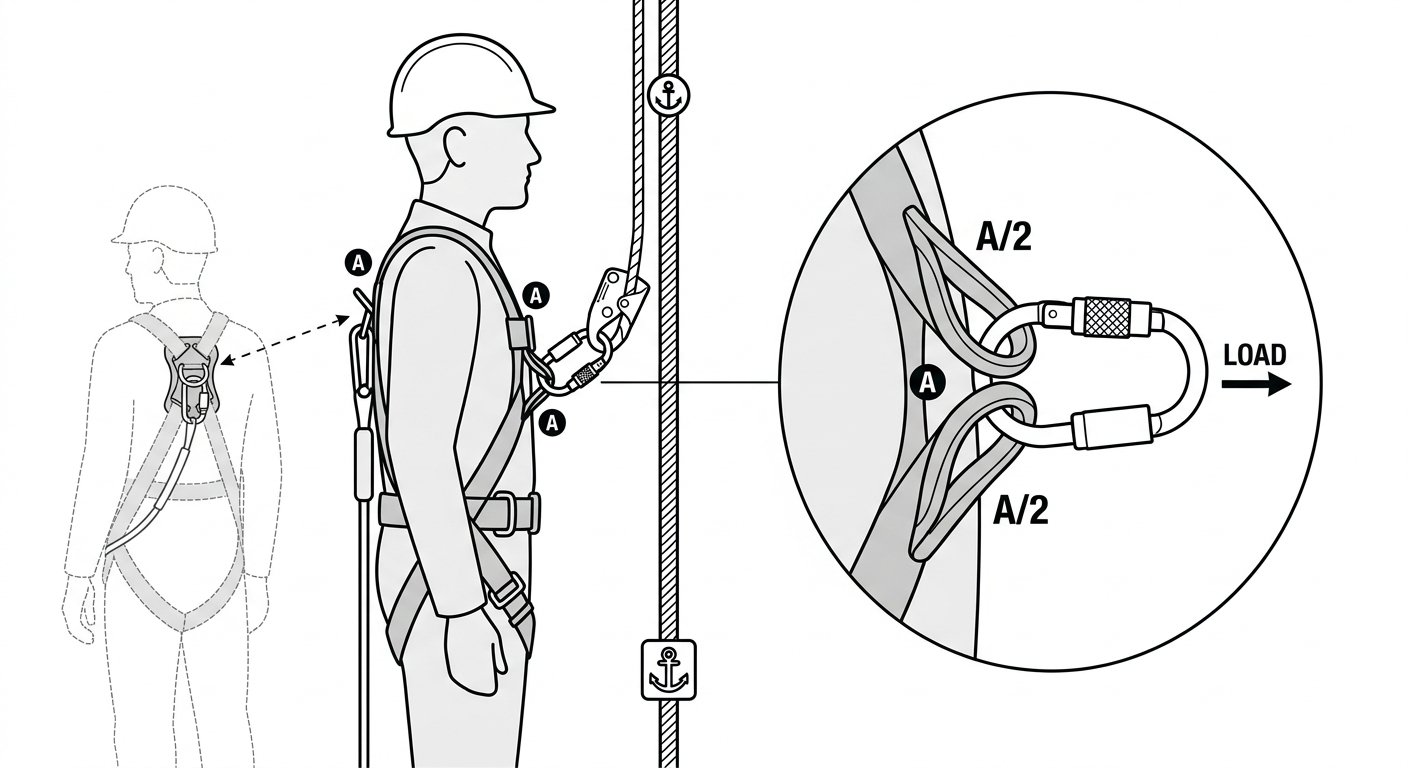
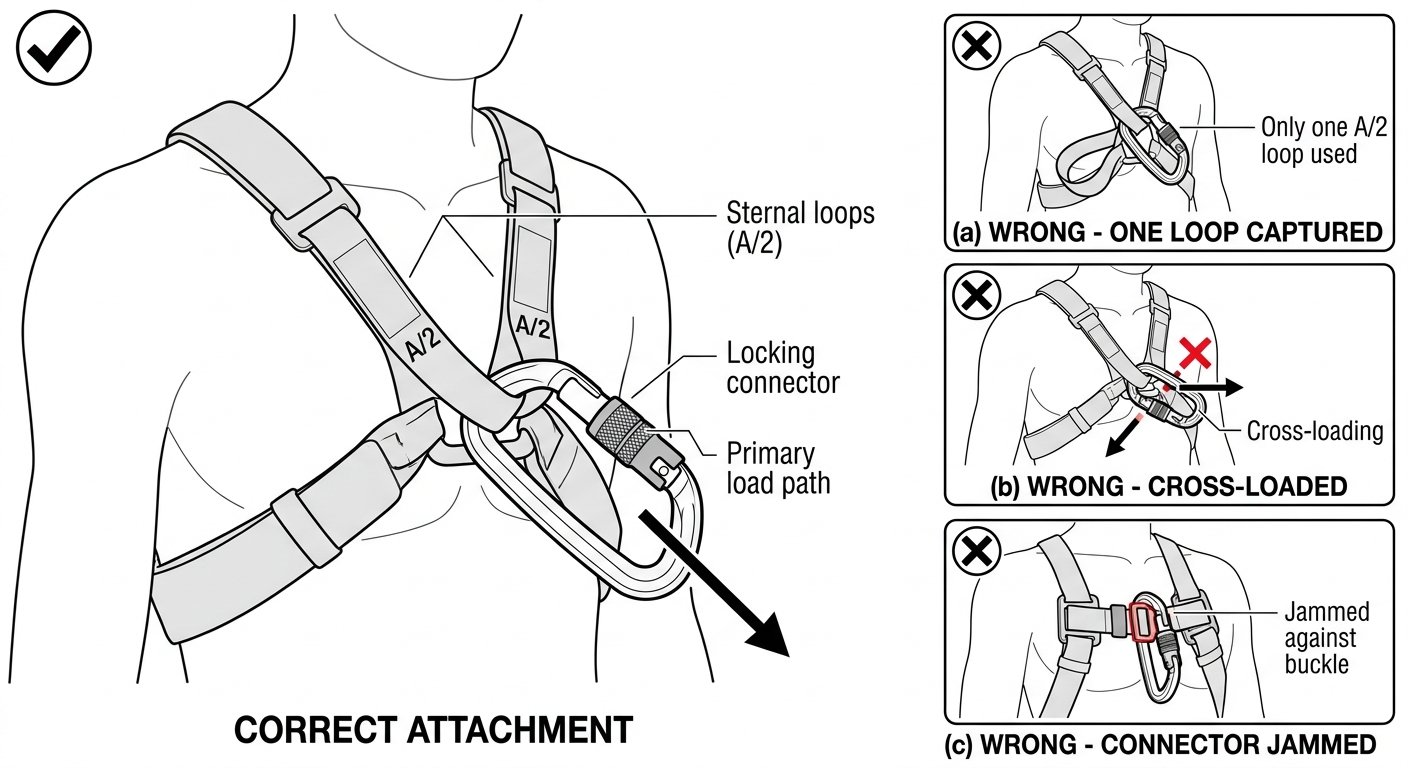
Some harnesses use two half-points marked A/2. These are not alternatives: both must be joined by the same connector to form one complete attachment point. Clipping into one A/2 loop only is a serious error and is easy to make with a gloved hand in poor light.
Points that are not for a rope grab
- Lateral (side) belt D-rings. These belong to a work-positioning or restraint belt to EN 358. They are designed to be loaded horizontally in tension with the feet supported, not to arrest a fall.
- The rear restraint point on a belt. Restraint only — it prevents you reaching the fall hazard; it does not arrest a fall.
- Gear loops, tool loops, and any unmarked webbing. Obvious in a classroom, less obvious at arm’s length on a ladder.
- Rescue loops on the shoulders (points to EN 1497). These are retrieval attachments for lifting a casualty, not fall-arrest points.
The ventral point: read the device instructions
The ventral (low front) attachment on a sit harness is the exception that causes most of the confusion. When a mobile back-up device is used on the safety line of a rope access system under EN 12841 (Rope Access Adjustment Devices), some manufacturers explicitly permit connection to the ventral attachment point, because that is where the rope access work positioning system already sits and where the device can be reached and managed. Whether that is allowed depends entirely on the specific device, its certification, and sometimes the region — so it is a question for the device’s instructions for use, not a general rule. If the instructions describe the connection as sternal or dorsal only, treat it as sternal or dorsal only.
Sternal or dorsal: choosing between them
Where both are permitted by the device manufacturer, the choice is driven by where the anchor line runs and what the worker needs to do.
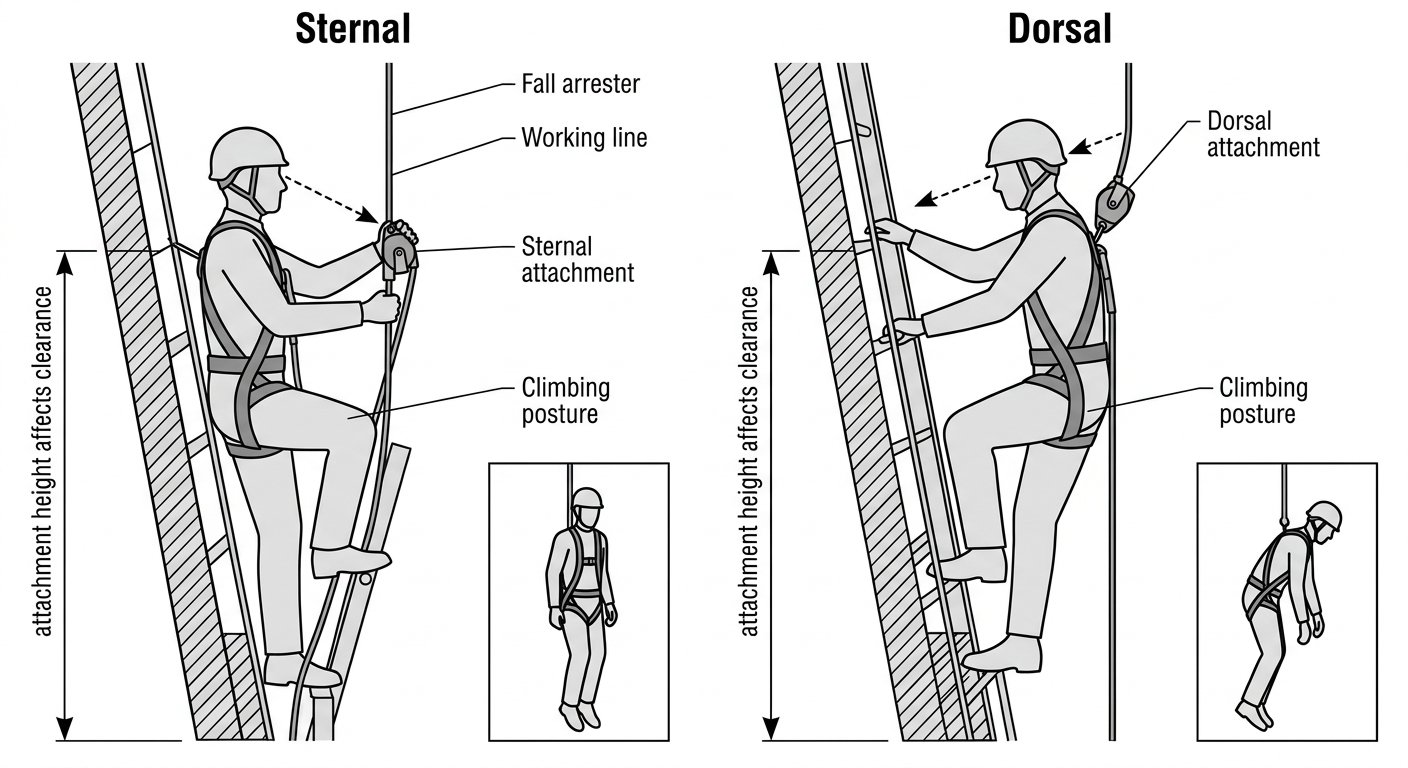
Sternal suits a line that hangs in front of you. Climbing a fixed ladder, ascending a mast, or moving up a vertical rope, the line is in your field of view, and so is the device. You can see whether it is oriented correctly, see whether it has snagged, and reach it to unlock and move it past an intermediate anchor. Sternal connection also gives a more upright suspension posture after a fall, which matters for both consciousness and rescue access.
Dorsal suits a line that runs behind or above you. Working back from a leading edge, or where a chest-mounted device and its rope would foul the task or trap a hand, the dorsal point keeps the connection clear of the work area and reduces the chance of stepping into a slack loop of rope. The trade-off is that you cannot see or easily reach the device, and after a fall the casualty hangs in a forward-leaning posture with limited ability to self-help.
One practical consequence that is often missed: the attachment point height changes required clearance. The dorsal point sits higher on the body than the sternal point, so the same fall arrested on the same device gives a slightly different total fall distance and a different post-arrest suspension height. Clearance figures published by the device manufacturer assume a specific attachment configuration — use their figures for the configuration you are actually rigging, and add margin rather than trimming it.
Keep the connection as short as the manufacturer intended
This is the single most common and most consequential error with rope grabs.
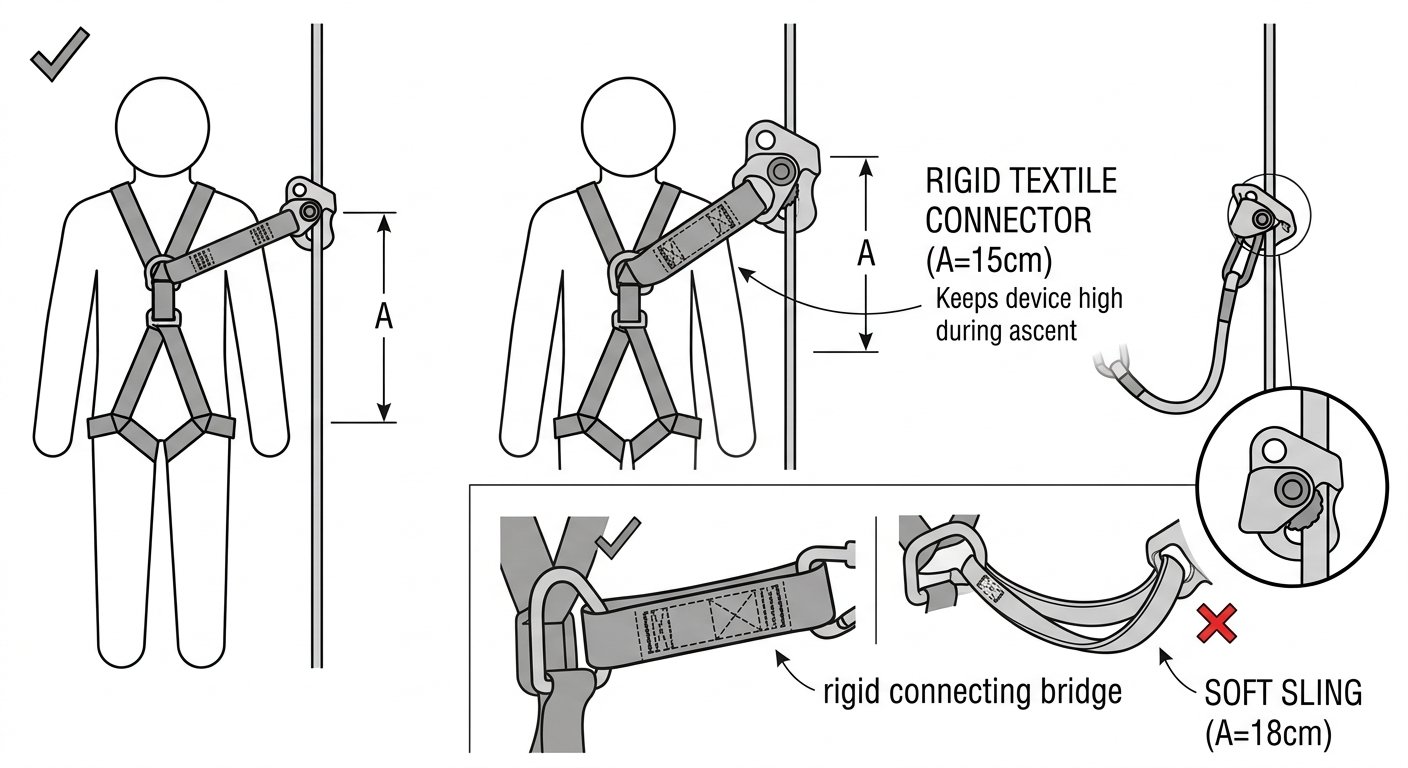
A guided-type fall arrester is tested and certified as a system: the device, the anchor line it is designed for, and the connection element between the device and the harness — whether that is a single connector, a short integral link, or a short energy absorber supplied with the device. Adding anything to that connection changes the system.
- Do not chain two connectors together to “reach” the attachment point. Connector-to-connector links can cross-load, can lever against each other, and add length.
- Do not add a lanyard between the device and the harness unless the device’s instructions specifically allow that lanyard, at that length.
- Do not substitute an energy absorber from another system. If the device came with, or specifies, a particular absorber, that combination is what was tested.
- Remember that added length is doubled in the fall. Every extra centimetre of connection lets the device sit that much lower on the line before the fall begins, and adds to the free fall before it engages.
Extension also causes a subtler failure: if the connection is long or floppy, the device can be dragged at the wrong angle, tipped, or held in a position where its cam cannot rotate onto the rope. Some devices will not lock reliably if pulled sideways or from below.
Making the connection: the connector matters as much as the point
Use a locking connector to EN 362 (Connectors for Fall Protection), of the type and shape the device’s instructions call for. Points to check every time you clip in:
- Both A/2 loops captured, where the harness uses a split sternal point. Look at it; don’t assume.
- Loading on the major axis. The connector should sit so that load runs from the spine of the gate through the body — not across the gate, not levered over a buckle or a hard edge on the harness. See Connector Basics: Gates, Axes and Loading for the failure modes involved.
- Gate locked. Screw-lock sleeves get vibrated open; check them again after any period of movement.
- Free to align. The connector must be able to rotate into line with the direction of pull. If it is pinched between two textile loops and a chest buckle so that it cannot move, it will be loaded in whatever orientation it is stuck in.
- Shape and size compatible with both the harness attachment and the device’s connection hole. A wide-bodied connector in a narrow attachment loop, or a narrow one in a wide ring that lets it slide and rotate, are both worth a second look. The method in Checking Connector Compatibility: A Field Method Before You Clip In takes about twenty seconds on the ground.
Harness fit changes where the attachment point actually is
A sternal attachment point is only at chest height if the harness is adjusted so it stays there. On a loose harness, the shoulder straps ride up under load and the sternal point migrates upward toward the throat, while the whole harness shifts on the body — adding fall distance, worsening the arrest posture, and in the worst case bringing the connector and device up against the wearer’s face.
Before the first climb of the shift, confirm that the chest strap is closed and adjusted, that the shoulder straps are snug, and that the sternal point sits at breastbone level rather than sagging toward the stomach. Adjusting a Full Body Harness Correctly covers the fit check in detail.
Confined space entry: don’t confuse the retrieval point with the fall-arrest point
Vertical confined space entries often run two lines: a rope grab or back-up device on one, and a retrieval line from a tripod winch on the other. These do not share an attachment point. The fall arrester goes to a marked A point — usually dorsal or sternal, and in many entries the dorsal point is preferred so the front of the body stays clear for the ladder or the hatch. The retrieval line goes to the harness rescue attachment (shoulder loops or an extension bar to EN 1497), which is designed to keep the casualty vertical during a lift through an opening.
Two connections, two purposes, and neither is a substitute for the other. If a harness lacks rescue attachments, that harness is not the right harness for the entry — see Which Harness for Which Use? for the selection logic.
Pre-use check, in order
- Identify the marked A points on the harness and confirm which one the device’s instructions specify.
- Confirm the device is rated for the anchor line actually in place — type, diameter and construction.
- Fit and adjust the harness; check the sternal point sits at breastbone level.
- Install the device on the line with the correct end up; confirm the orientation marking.
- Connect the device to the attachment point using only the specified connector or absorber — nothing added.
- Check both A/2 loops are captured, the connector is on its major axis and the gate is locked.
- Load-test by hand: pull down sharply on the device and confirm it locks on the line before committing weight.
The takeaway
A rope grab connects to a fall-arrest attachment point marked A on an EN 361 harness — sternal where the line runs in front and you need to see and manage the device, dorsal where the line runs behind and the front of the body must stay clear — with the connector or absorber the manufacturer specifies and no extension of any kind. Where a device may also be attached to a ventral point in a rope access back-up role, that permission comes from the device instructions, not from general practice.
Further technique notes on connectors, harnesses and vertical systems are collected on the rope access and confined space technique notes hub.
Frequently asked questions
Can a rope grab be attached to the side D-rings of a harness?
No. Lateral D-rings belong to a work-positioning belt under EN 358 and are designed for tensioned, feet-supported positioning, not for arresting a fall. A rope grab must go to an attachment point marked A on an EN 361 full body harness — normally the sternal or dorsal point.
Is the sternal or the dorsal point better for a rope grab?
It depends on where the anchor line runs. Sternal is generally preferred when the line hangs in front of you, such as on a fixed ladder or vertical rope, because you can see and reach the device and you hang more upright after an arrest. Dorsal suits lines running behind or above you, where a chest-mounted device would obstruct the work, at the cost of losing sight of and access to the device.
Can I add a lanyard or a second karabiner to reach the rope grab more easily?
Not unless the device's instructions specifically permit it, at a specified length. A guided-type fall arrester is certified with a particular connection element, and any added length increases free fall and can hold the device at an angle where it does not lock reliably. If you cannot reach the device comfortably, the fix is the correct attachment point or the correct device, not an extension.
What are the A/2 markings on my harness?
A/2 identifies half of a fall-arrest attachment point. Two A/2 elements together form one complete attachment, so both must be captured by the same connector. Clipping into only one A/2 loop leaves you connected to half a point that was never tested to arrest a fall on its own.
Can a back-up device on a rope access safety line go to the ventral attachment point?
Some devices used as a type A back-up under EN 12841 do permit ventral connection, because that is where the rope access system already sits and where the device can be managed. This is device-specific and sometimes region-specific, so it must come from the manufacturer's instructions for use. If those instructions describe only sternal or dorsal connection, use sternal or dorsal.
Does harness attachment point affect required fall clearance?
Yes. The dorsal point sits higher on the body than the sternal point, so the same fall gives a slightly different total fall distance and post-arrest suspension height. Manufacturer clearance figures assume a specific configuration — use the figures for the configuration you are actually rigging, and keep margin rather than working to the minimum.
Need this as a document you can issue? The template library gives you the risk assessments, permits and inspection logs in editable form — and employer plans cover a whole team with completion records.