Safety / Tips and Tricks / Rope access and confined space
Activity 01 · Rope access
Re-Belay Ascent Technique: Passing an Intermediate Anchor Without Losing Two-Point Attachment
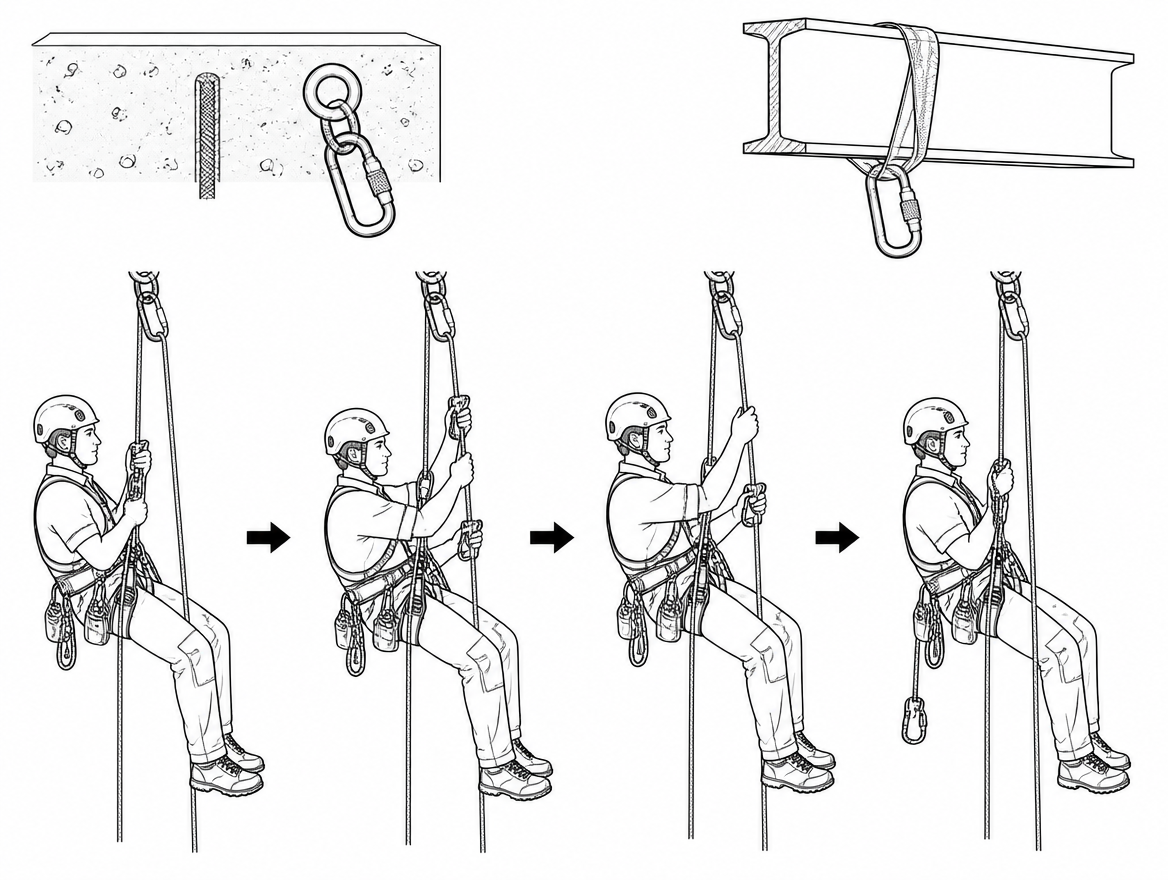
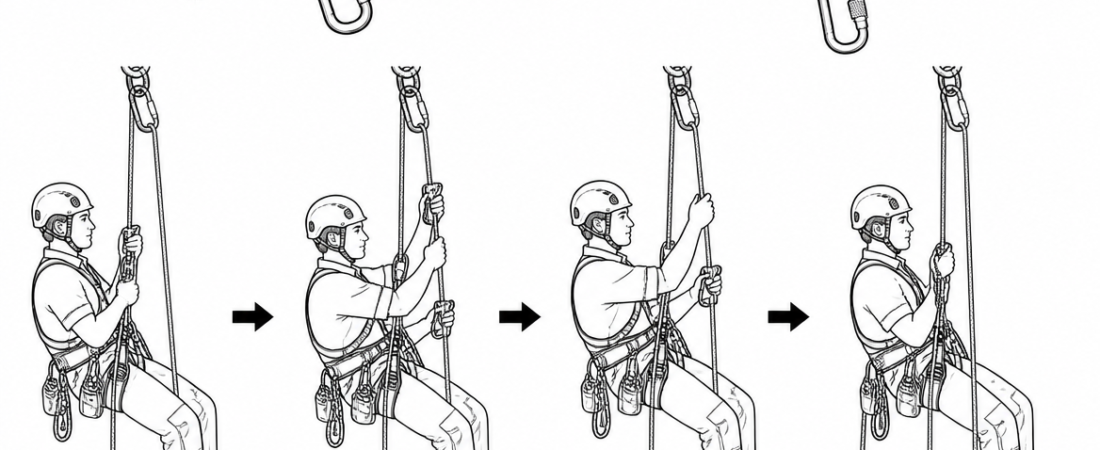
A re-belay is the point on a rope where most ascent incidents have room to happen. For a few seconds, the technician has to take working devices off one rope and put them onto another while suspended, and every error in that sequence — a lanyard clipped into the wrong loop, an ascender jammed against the anchor knot, a metre of unnecessary slack under the anchor — shows up immediately as either a stall or a fall onto a short, stiff connection. This article sets out the order of operations for passing a re-belay on ascent, the attachment points that must remain live at each stage, and the specific errors that a supervisor should be watching for from the ground.
What a re-belay is, and how it differs from a deviation
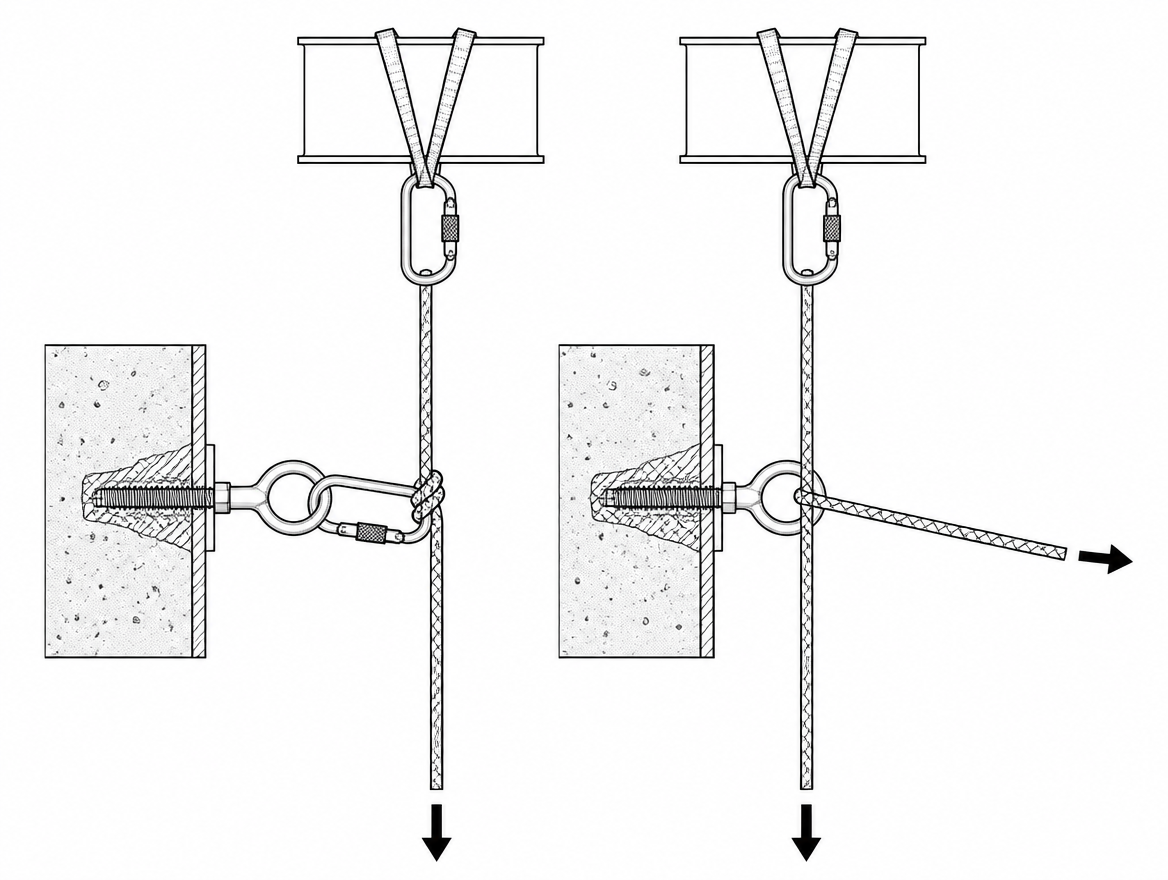
A re-belay is an intermediate anchor at which the rope is terminated and then continues downward from that anchor, usually via a short loop. The rope below the re-belay hangs from the intermediate anchor, not from the top anchor. A deviation, by contrast, simply pulls the rope sideways through a connector or a redirect: the rope is continuous and still hangs from the top anchor.
That difference decides what the technician has to do. A deviation is passed by unclipping and re-clipping the redirect while the devices stay on the same rope. A re-belay requires a full device transfer from the lower rope to the upper rope, because they are separate loaded sections.
Re-belays are installed for reasons worth understanding before passing one, because they tell you what the anchor is doing:
- Rope protection — the rope is lifted clear of an edge, a beam flange, or an abrasive face.
- Reduction of free length — on a long pitch, splitting the rope reduces stretch, bounce and the consequences of a fall or an anchor failure above.
- Route control — the rope is brought into a line that keeps the technician clear of obstructions and reduces swing.
Equipment configuration before you leave the ground
Passing a re-belay is only manageable with a kit that was assembled for it. In an EU industrial rope access context the working configuration is normally two separately anchored ropes — a working line and a safety line — which is the arrangement the work-equipment provisions transposed from Directive 2009/104/EC (Annex II, the section on rope access and positioning techniques) require in general terms for rope access work.
- Harness: a sit harness to EN 813 with an attachment point suitable for suspension, combined with a full body harness to EN 361 where fall arrest attachment is required; a work positioning belt to EN 358 where the task calls for it.
- Working line devices: a chest ascender and a handled ascender with footloop, both rope adjustment devices of type B under EN 12841. Type B devices are ascent devices for use on the working line. They are not fall arrest devices and must not be treated as the fall protection element of the system.
- Safety line device: a back-up device of type A under EN 12841, installed on the separate safety line and kept as high as the device design allows so that slack in the safety line is minimised.
- Lanyards: two lanyards of different lengths on the harness attachment point, terminated with connectors to EN 362. Rope access and caving lanyards are commonly made from dynamic rope to EN 892 rather than low-stretch rope to EN 1891, because a short low-stretch lanyard with no energy absorption transmits high peak forces if it is fallen onto from above its anchor.
- Ropes: low-stretch kernmantel rope to EN 1891 for the working and safety lines.
- Anchors: anchor devices to EN 795, or structural anchor points verified by a competent person. Check the number of persons the specific anchor is rated for in the manufacturer’s instructions before two people occupy the same station.
All of this is a system in the sense of EN 363, and its component compatibility is not optional: an ascender that will not accept the rope diameter in use, or a connector whose gate is fouled by the anchor plate, turns a routine transfer into an improvised one.
Reading the anchor before you commit to it
Stop far enough below the re-belay to look at it properly. Three things need to be established before anything is clipped:
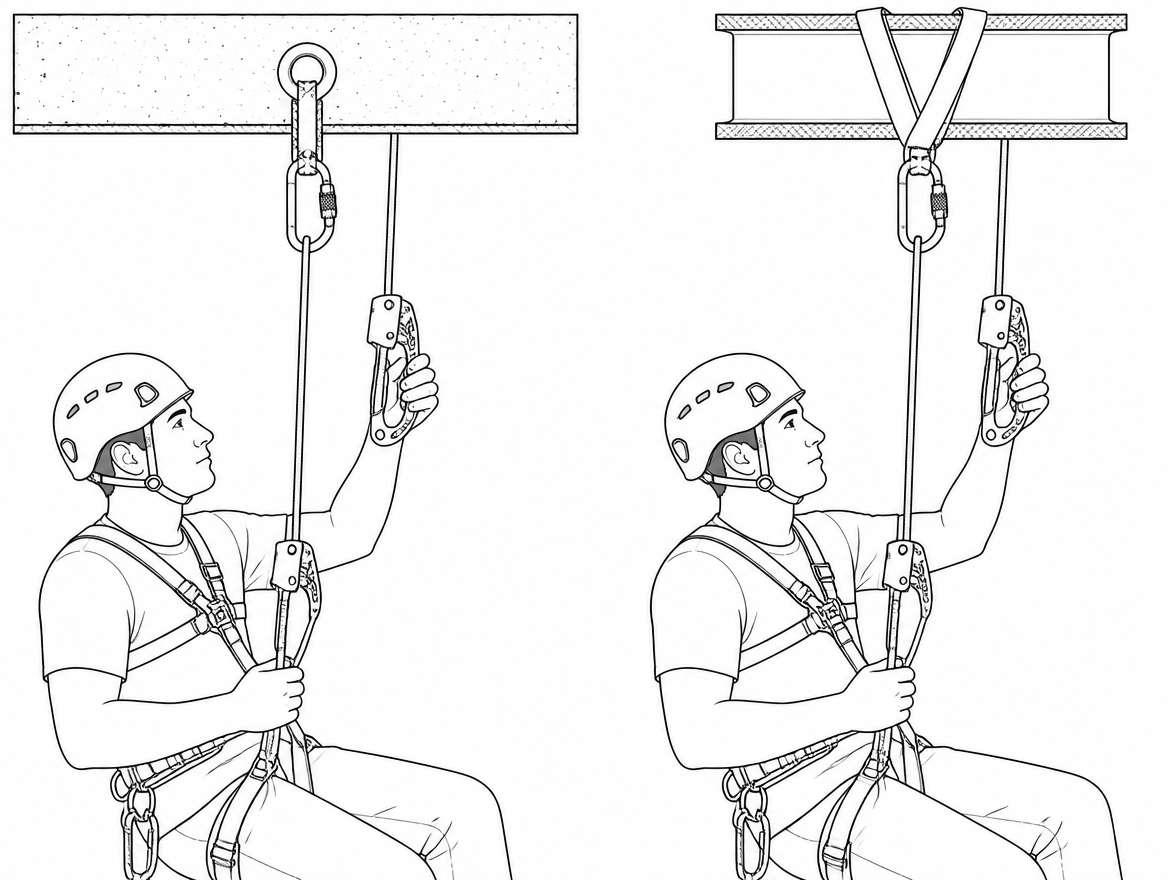
- Which loop is which. At a re-belay there is the upper rope arriving from above, the anchor point itself, and the loop that continues down to the rope you are on. In poor light, or where a re-belay is tied with a bunny-ears style knot into two anchor points, these are easy to confuse. Trace the loaded rope you are hanging on with your eyes to the anchor before you unclip anything.
- Where the connector will sit. The lanyard connector must load along its major axis, with the gate closed and locked, and clear of the anchor plate, hanger or rock lip. Do not clip so that the connector is loaded across the gate or across three directions at once.
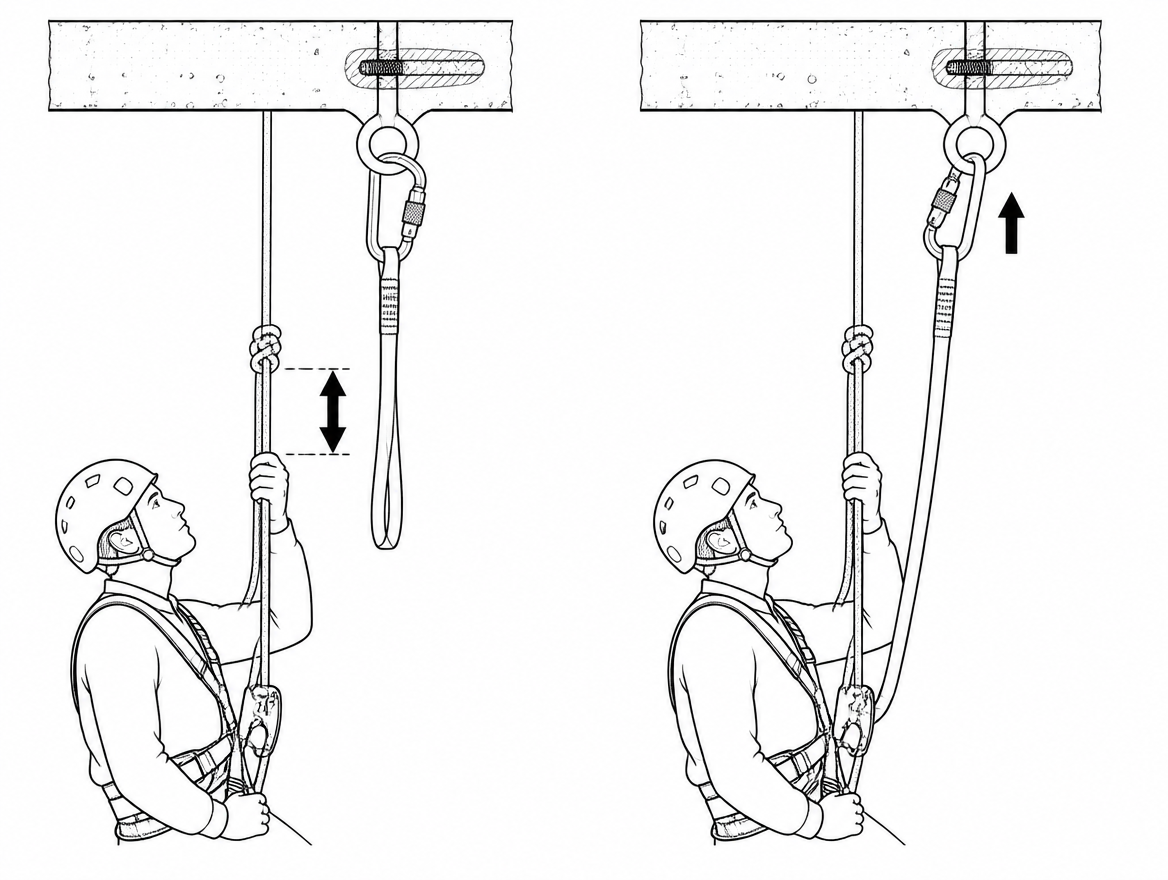
- Whether the loop length gives you room. A well-rigged re-belay puts the anchor within reach when the chest ascender is close to the anchor knot. If the loop is long, you will have to climb higher above the anchor, and the potential fall onto the lanyard grows accordingly.
The ascent transfer sequence, step by step
The governing rule throughout is that two independent attachments hold you at all times, and that only one attachment is moved at any moment. The following sequence assumes a two-rope system with a working line re-belay and a safety line re-belay at the same station.
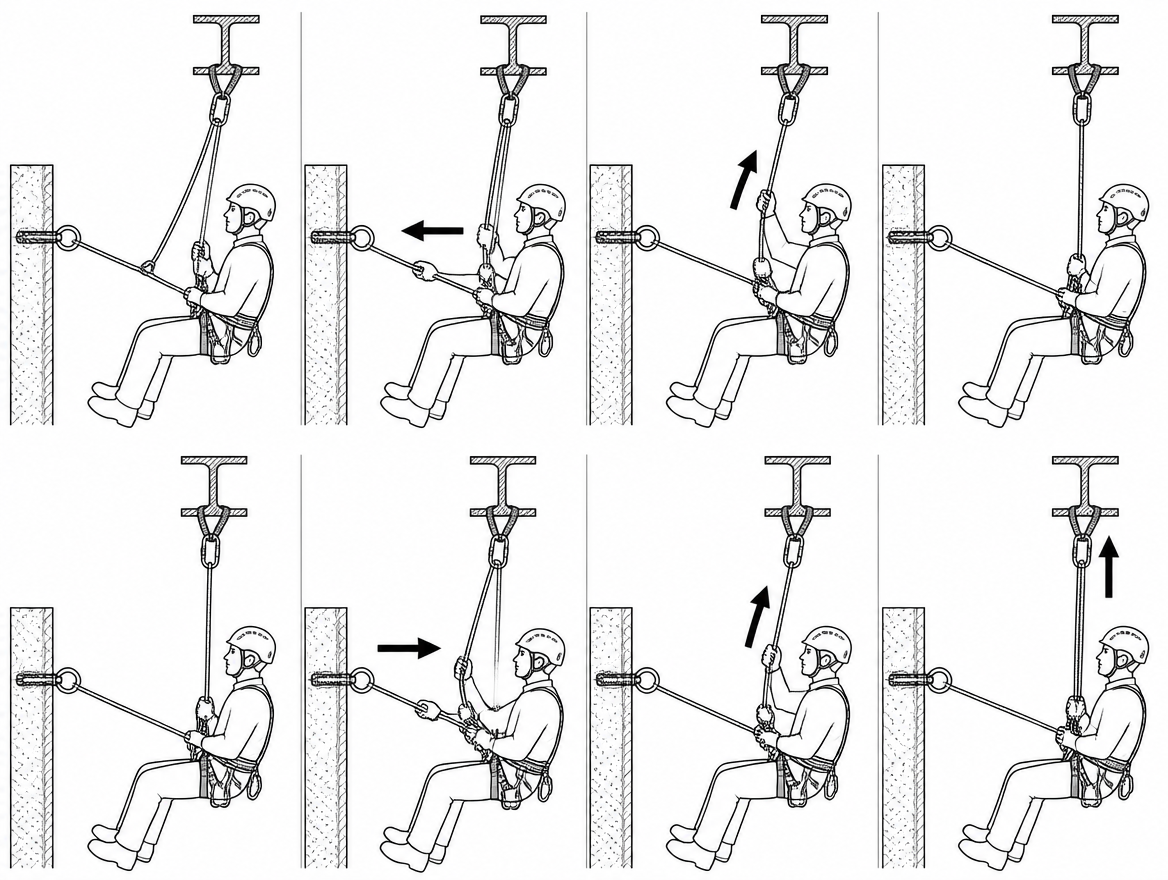
- Arrive and stop short of the knot. Ascend until the anchor is comfortably within reach, leaving roughly a hand’s width of rope between the chest ascender cam and the re-belay knot. An ascender driven hard into a knot under body weight is difficult to unweight and remove.
- Clip the short lanyard into the anchor. Connector locked, correctly oriented, into the intended anchor attachment point — not into the rope loop below it, and not into a sling that has not been identified.
- Gain height in the footloop. Stand up on the handled ascender to unweight the system enough to work above the anchor.
- Move the handled ascender to the upper rope. Place it as high as you can comfortably reach, with the rope running straight into the device and the cam engaged. At this point the chest ascender on the lower rope and the handled ascender on the upper rope are both live, with the lanyard as the third connection.
- Stand up and transfer the chest ascender. Weight the handled ascender on the upper rope, unweight the chest ascender, open it, remove it from the lower rope, and close it onto the upper rope above the anchor knot. Confirm the cam has closed on the rope before you sit back.
- Sit back and verify. Load the chest ascender on the upper rope. Check that the rope is not twisted through the anchor, that nothing is trapped between device and harness, and that the lower rope loop is hanging free.
- Transfer the back-up device onto the upper safety line. Move the type A device across its own re-belay as a separate, single operation — before or after the working line transfer, but never at the same time as it. Reset it as high as the device permits to remove slack.
- Final check, then unclip. Both devices on the upper sections, correctly oriented, lanyard now the only remaining connection to the anchor. Unclip it, stow it on the harness so it cannot snag, and resume the ascent.
Slack control: why the height you climb to matters
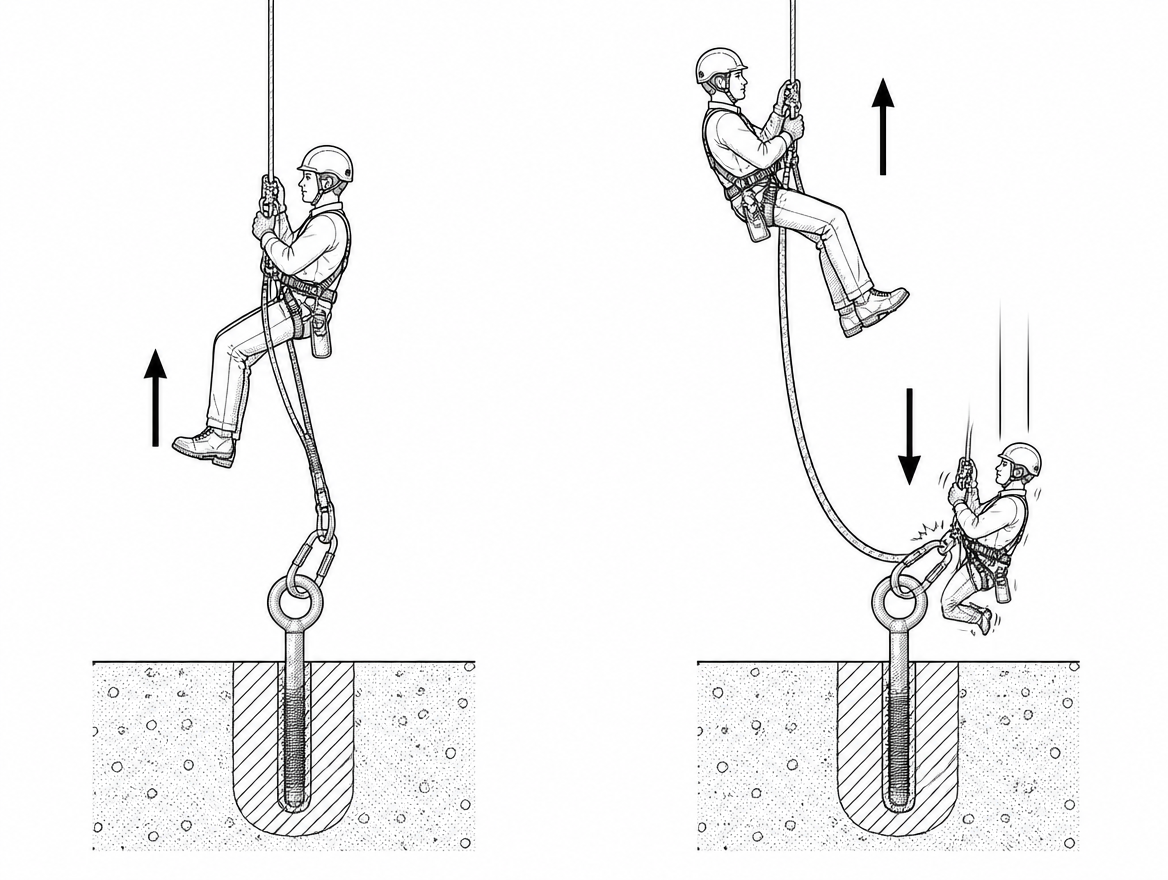
Every centimetre you ascend above the re-belay anchor while still clipped to it with a short lanyard is potential fall distance onto that lanyard, and the fall factor over a very short connection can be severe. The lanyard is a secondary attachment for the duration of a transfer, not a work positioning solution to hang from while you sort out a tangle.
Two practical consequences follow. First, climb only as high as the transfer needs. Second, if a re-belay is rigged with such a long loop that passing it forces the technician well above the anchor, that is a rigging defect to be reported and corrected at the rigging stage, not a technique problem to be worked around on the rope. The same applies to a re-belay knot positioned where a chest ascender cannot be unweighted — for example hard against a ledge.
Common errors seen at re-belay stations
- Both attachments moved at once. Removing the chest ascender before the handled ascender is established on the upper rope leaves the lanyard alone. It is a secondary attachment, not the plan.
- Chest ascender jammed into the anchor knot. Caused by ascending too far in step 1. Recovery requires standing in the footloop to unweight the device, which is awkward in a confined station.
- Lanyard clipped into the lower rope loop. Clipping into the loop that hangs to the rope you are already on gives no independent protection at all.
- Back-up device left low on the safety line. Slack above a type A device increases the fall distance the safety line has to absorb. Reset it before continuing.
- Cross-loaded or gate-loaded connectors. Most common where the anchor is a plate or hanger flush to a wall and the connector cannot rotate freely.
- Handled ascender placed on a twisted or fouled upper rope. Look at the rope entering the anchor, not just the device.
- Two people at a single-person station. Check the anchor’s rated number of users before a second technician clips in during a pass.
Single-rope contexts and the same principles
In cave and mine environments, and in some rescue applications, ascent is carried out on a single rope with re-belays used as the primary means of managing rope wear and fall consequences rather than as an addition to a separate safety line. The transfer sequence at the anchor is essentially the one above, minus the back-up device step, and the lanyard to the anchor carries proportionally more importance because it is the only redundancy during the device swap. Where such work is carried out as employment rather than sport, the two-rope requirement and the risk assessment that justifies any deviation from it need to be settled before the job, not on the pitch.
Competence, inspection and rigging responsibility
Passing a re-belay is a trained manoeuvre, practised at low level under supervision before it is used on a working pitch. Under EN 365, personal fall protection equipment requires periodic examination by a competent person at intervals of not more than 12 months, and more often where the manufacturer’s instructions or the conditions of use call for it — ascender cams, footloop attachments and lanyard terminations are all wear points that a re-belay pass loads and unloads repeatedly. Pre-use checks by the user remain a separate obligation each time the kit goes on.
Organisationally, the quality of re-belay rigging is a competence and planning question of the kind ISO 45001 addresses through its requirements on competence (clause 7.2) and on eliminating hazards and reducing risk during planning. Most re-belay difficulties encountered on ascent were created by decisions made when the rope was rigged: loop length, anchor selection, knot position and clearance around the anchor.
Takeaway
Stop a hand’s width below the knot; clip the short lanyard to the anchor; move one attachment at a time, handled ascender first, then chest ascender, then the back-up on the safety line; verify the load path before unclipping. If a re-belay cannot be passed in that order without climbing well above the anchor or jamming a device, the rigging is the item that needs changing.
The companion manoeuvres worth practising in the same session are passing a deviation on ascent, and passing the same re-belay on descent — the sequence reverses, and the slack management problem moves from above the anchor to below it. Before either, read the instructions for use supplied with the specific ascender, back-up device and anchor in service, and confirm they are rated for the rope diameter and the number of users at the station.
Frequently asked questions
What is the difference between a re-belay and a deviation?
A re-belay is an intermediate anchor at which the rope is terminated and then continues downward from that anchor, usually via a short loop, so the rope below hangs from the intermediate anchor rather than the top anchor. A deviation simply pulls a continuous rope sideways through a connector or redirect, and that rope still hangs from the top anchor. Because of this, a deviation is passed by unclipping and re-clipping the redirect while the devices stay on the same rope, whereas a re-belay requires a full device transfer from the lower rope to the upper rope, as they are separate loaded sections.
Why are re-belays installed?
For three reasons given in the article: rope protection, where the rope is lifted clear of an edge, a beam flange or an abrasive face; reduction of free length, because splitting a long pitch reduces stretch, bounce and the consequences of a fall or an anchor failure above; and route control, where the rope is brought into a line that keeps the technician clear of obstructions and reduces swing.
What devices and equipment are needed to pass a re-belay on ascent?
The working configuration is normally two separately anchored ropes, a working line and a safety line, in low-stretch kernmantel rope to EN 1891. On the working line, a chest ascender and a handled ascender with footloop, both type B rope adjustment devices under EN 12841; on the separate safety line, a type A back-up device kept as high as the device design allows to minimise slack. The harness is a sit harness to EN 813 with a suspension attachment point, combined with a full body harness to EN 361 where fall arrest attachment is required, and a work positioning belt to EN 358 where the task calls for it. Two lanyards of different lengths are attached to the harness attachment point, terminated with connectors to EN 362, and anchors are anchor devices to EN 795 or structural anchor points verified by a competent person.
Why are rope access lanyards often made from dynamic rope rather than low-stretch rope?
Because a short low-stretch lanyard with no energy absorption transmits high peak forces if it is fallen onto from above its anchor. For that reason, rope access and caving lanyards are commonly made from dynamic rope to EN 892 rather than low-stretch rope to EN 1891.
What should be checked before clipping into a re-belay anchor?
Stop far enough below the anchor to look at it properly and establish three things. First, which loop is which: trace the loaded rope you are hanging on with your eyes to the anchor before unclipping anything, since the upper rope, the anchor point and the loop continuing down are easy to confuse in poor light or where a bunny-ears style knot is tied into two anchor points. Second, where the connector will sit: it must load along its major axis, with the gate closed and locked, clear of the anchor plate, hanger or rock lip, and never loaded across the gate or in three directions at once. Third, whether the loop length gives you room, because a long loop forces you to climb higher above the anchor and the potential fall onto the lanyard grows accordingly.
Need this as a document you can issue? The template library gives you the risk assessments, permits and inspection logs in editable form — and employer plans cover a whole team with completion records.