Safety / Tips and Tricks / Rope access and confined space
Activity 01 · Rope access
Atmospheric Testing Before Entry: Sequence, Remote Sampling and What Stops the Job
A confined space can look, smell and sound completely normal and still be lethal on the first breath. The pre-entry atmospheric test is the only step in the entry sequence that tells the team what is actually inside the space before anyone commits a body to it. Done properly, it takes a few minutes and is performed entirely from outside the opening. Done badly — wrong order, unpurged tubing, one sample at the lid — it produces a clean-looking reading that means nothing, and the paperwork still says the space was tested.
This note covers the mechanics: what the test has to establish, the order the sensors are read in and why, how to draw a representative sample without entering, how to interpret the numbers against action levels, and when the test has to be repeated.
What the pre-entry test has to establish
A pre-entry test answers three separate questions, in this order of dependency:
- Is there enough oxygen, and not too much? Clean air is about 20.9 % oxygen by volume. Displacement by inert gas, consumption by rust or biological activity, or absorption by wet organic material can pull it down; a leaking cutting set or a purge line can push it up. Enriched atmospheres are a fire hazard, not a bonus.
- Are flammable gases or vapours present? Reported as a percentage of the lower explosive limit (%LEL), not as a concentration.
- Are toxic contaminants present? Typically hydrogen sulphide and carbon monoxide as standard channels, plus whatever the space, the product it held, the surrounding process and the planned work could credibly produce — solvent vapours, ammonia, chlorine, sulphur dioxide, welding fume products.
The third question is the one that most often needs a decision before the instrument is chosen. A four-gas detector does not detect what it has no sensor for. If the space held a solvent, or a coating is about to be applied inside it, the hazard assessment has to name the substance and the team has to bring an instrument that can see it — a photoionisation detector, a specific electrochemical cell, or colorimetric tubes.
Test in order: oxygen, then flammables, then toxics
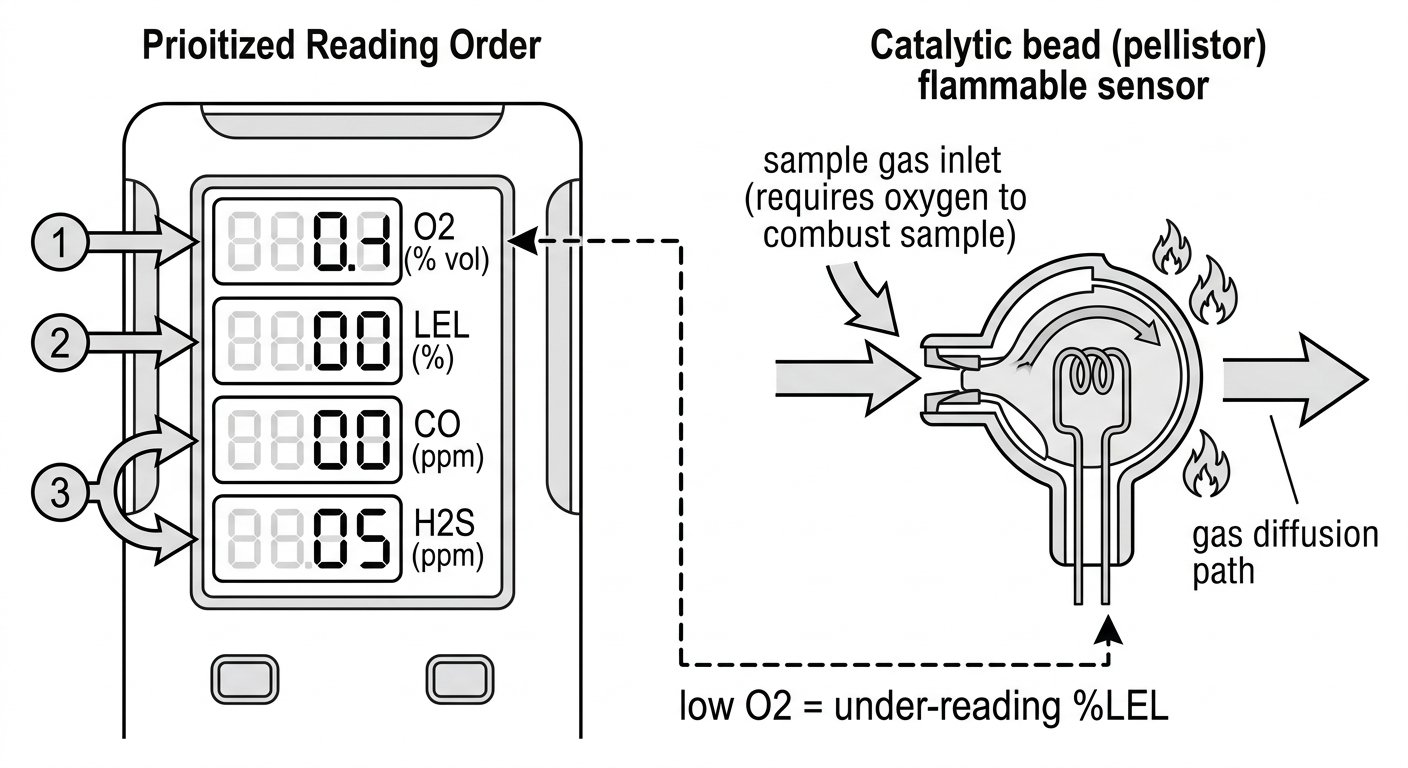
Most modern multi-gas instruments display all channels simultaneously, but you still read and evaluate them in a fixed order, because the earlier readings determine whether the later ones can be believed.
Oxygen first. The common flammable sensor is a catalytic bead (pellistor), which works by burning the sample gas on a heated element. It needs oxygen to do that. In an oxygen-deficient atmosphere a pellistor under-reads, and in a strongly deficient or inerted space it can read near zero while the space is full of fuel. Infrared flammable sensors are not oxygen-dependent, but they have their own blind spots — notably hydrogen. Either way, the oxygen number tells you how much weight to put on the %LEL number.
Flammables second. A flammable atmosphere is an immediate stop: it kills the entry and usually the hot work permit alongside it, and it dictates ventilation and ignition-source control before anything else is discussed.
Toxics third. Toxic channels are read last not because they matter least, but because a space that has already failed on oxygen or %LEL is not going to be entered regardless of the toxic result.
Two sensor-behaviour points worth knowing, because they explain readings that look wrong: high concentrations of hydrogen sulphide and silicone-bearing vapours can poison a catalytic bead permanently, and a %LEL channel that has seen a rich atmosphere may need time and a clean-air check before it settles. If a channel behaves oddly, treat the instrument as suspect rather than the space as safe.
Draw the sample from outside the space
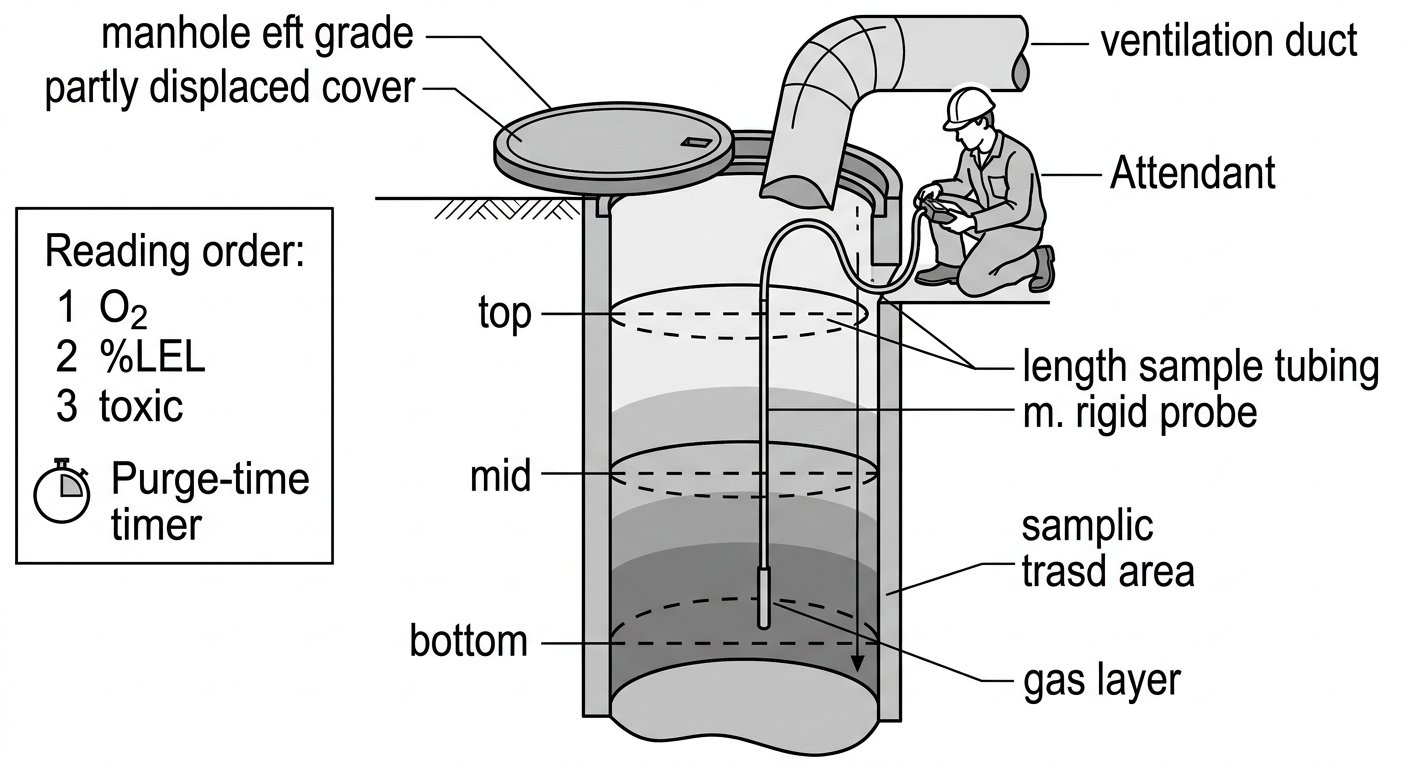
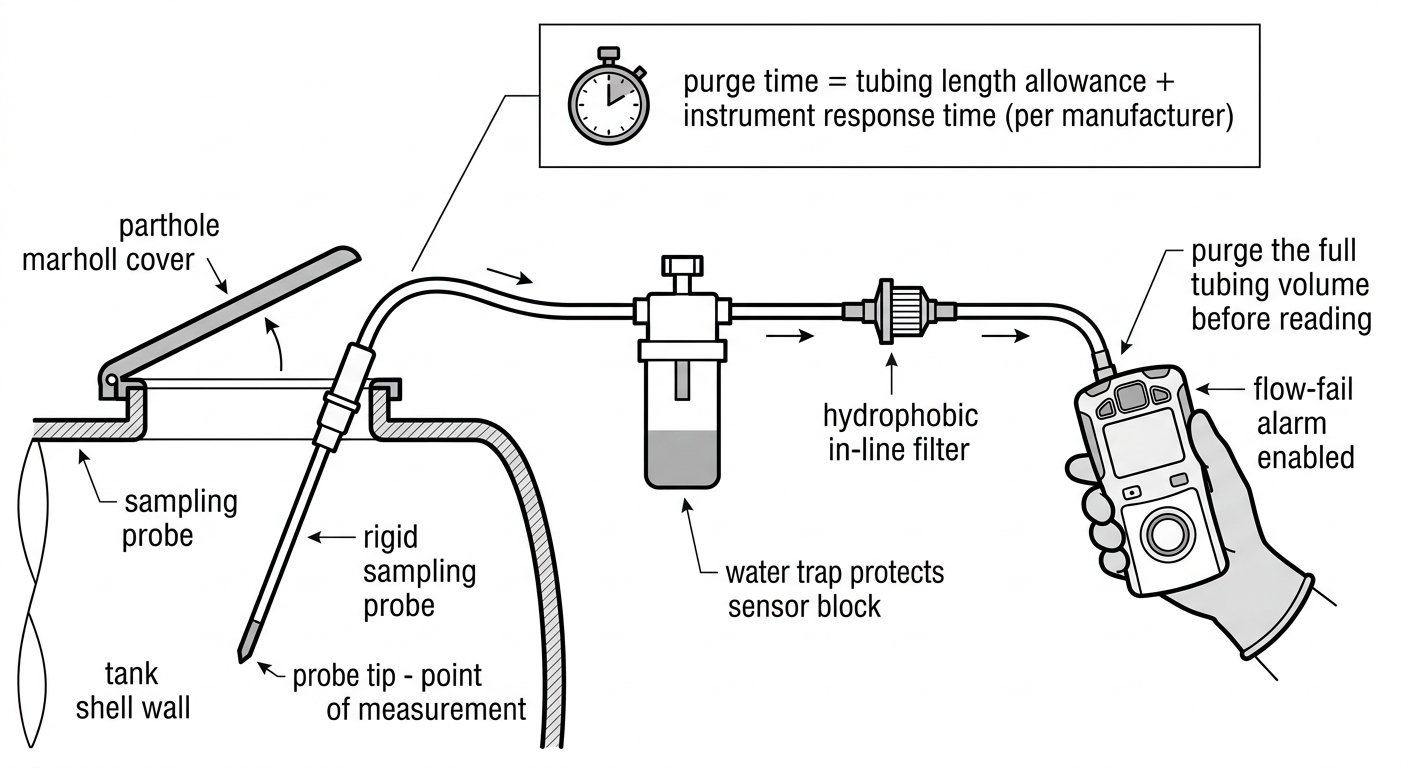
Nobody’s head goes past the opening to take a reading. The sample is drawn through the smallest practical opening — a vent, an inspection port, a partly opened cover — using a pump and a length of sample tubing with a rigid probe on the end.
The details that make or break the sample:
- Purge the line. The tubing is full of ambient air when you start. The instrument cannot report what is at the probe tip until that volume has been drawn through the sensors. Manufacturers state a purge allowance per unit length of tubing — commonly quoted as a couple of seconds per foot — and it is added to the instrument’s own response time. Use the figure in the manual for your pump and tubing, wait it out, and then read. Reading too early is the single most common way a pre-entry test produces a false pass.
- Keep the tubing short and dedicated. Long lines increase purge time and adsorption losses; this matters most for sticky compounds and for reactive gases. Do not splice mismatched tubing or reuse a line contaminated from a previous job.
- Protect the sensors from liquid. A hydrophobic filter and a water trap belong on the sampling train whenever the space may contain water, sludge or product. Drawing liquid into a sensor block ends the test and often the instrument.
- Check pump flow. A blocked filter, a kinked line or a loose fitting can drop flow below the pump’s alarm threshold; most instruments flag this, but only if the flow-fail alarm is enabled and audible.
Gases stratify: test top, middle and bottom
A single reading taken just inside the lid describes a thin layer of air at the top of the space and nothing else. Contaminants sort themselves by density and by where they were generated: hydrogen sulphide and many solvent vapours pool low, methane and hydrogen collect high, and oxygen-deficient inert gas can sit as a discrete layer with breathable air above it.
The practical method for a vertical space is to lower the probe in stages — commonly at roughly one-metre intervals, or at least at top, mid-depth and bottom — pausing at each level for the full purge and response time before moving on. Lower slowly; a probe dropped fast smears the layers together and the profile disappears. For horizontal spaces such as ducts, tanks with internal baffles or sewers, sample at intervals along the length as well, and remember that a pocket behind a baffle or in a sump may never be reached by the sample probe at all — which is an argument for ventilation and continuous monitoring rather than for optimism.
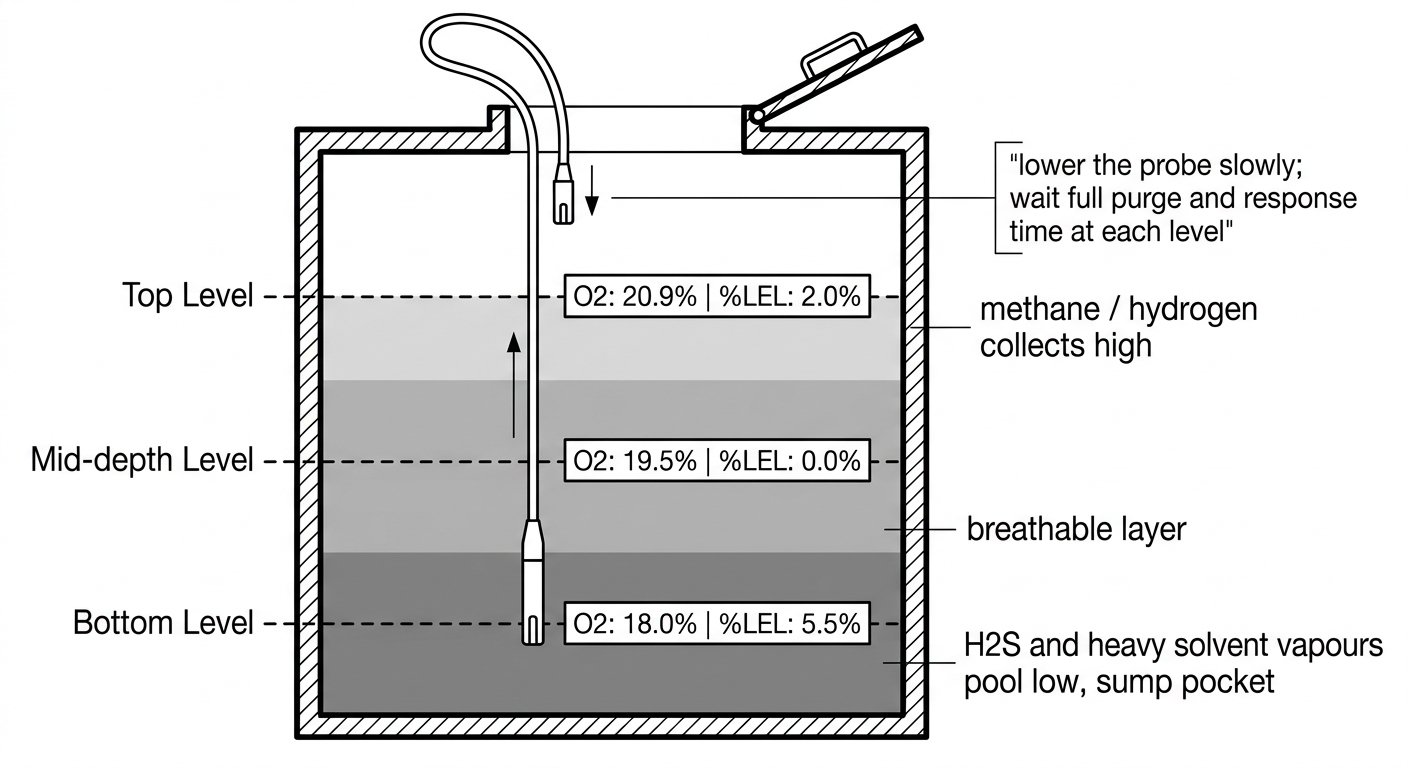
Record the profile, not just the worst number. A space that reads clean at the top and 40 % LEL at the bottom tells the team exactly where to aim the ventilation duct and where the residual risk sits during the work.
Alarm setpoints and entry action levels
Two different sets of numbers are in play, and conflating them causes arguments on site.
Instrument alarm setpoints are configured in the detector. Oxygen alarms are set both low and high. Flammable alarms are set as a fraction of the LEL. Toxic alarms are set from the applicable occupational exposure limits in your jurisdiction, and instruments typically also track short-term and time-weighted averages against those limits. Because exposure limits differ between countries and are revised periodically, the setpoints come from your own national limit list and internal standard — not from a default the instrument shipped with.
Entry action levels are what the permit says you will do at a given reading. The widely used reference points, reflected in US OSHA’s permit-required confined space rule (29 CFR 1910.146), are an acceptable oxygen range of 19.5 % to 23.5 % and a flammable limit of 10 % LEL. Many European operators work to equivalent or tighter internal figures. What matters is that the numbers are written on the permit before the test, so the decision is made in advance rather than negotiated in front of an open manhole.
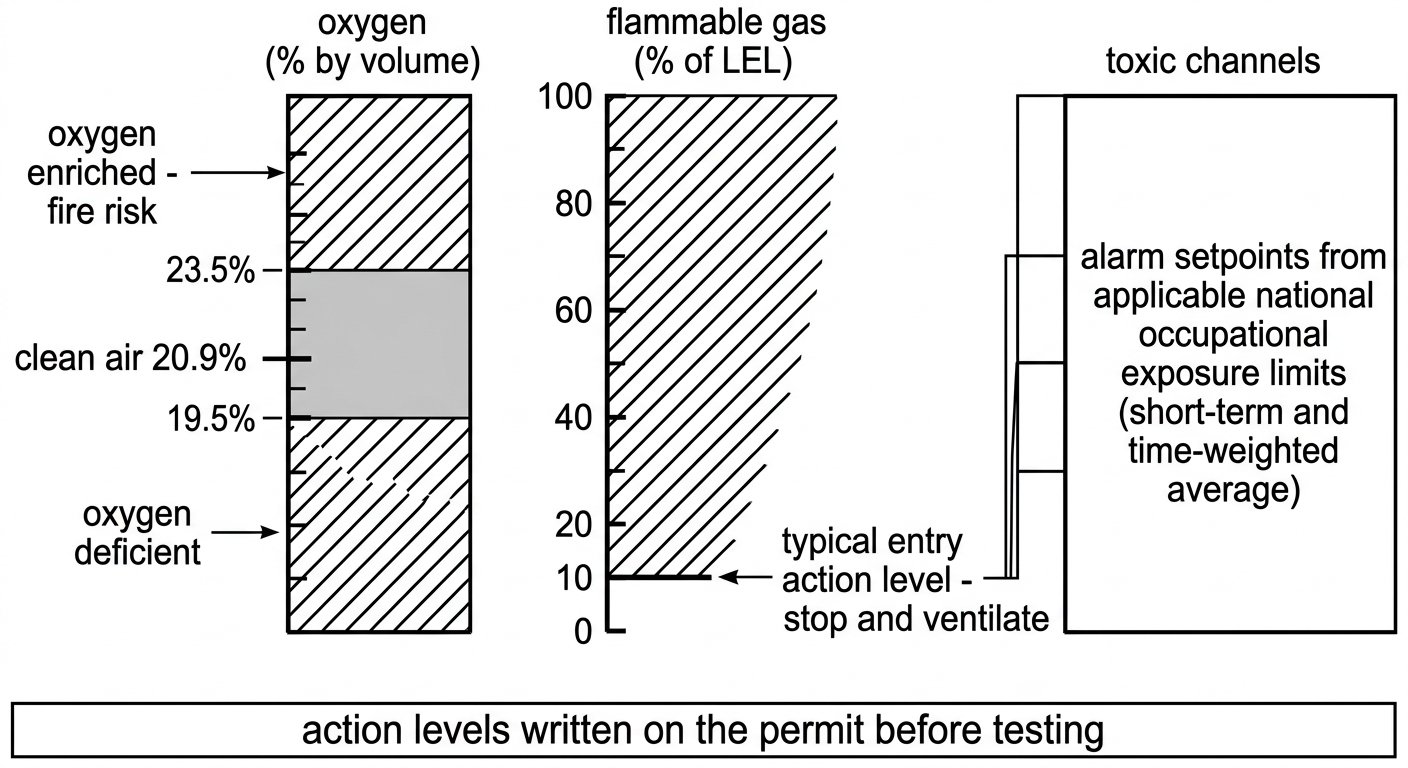
If the space fails, the answer is ventilation and re-testing, not a faster entry. Mechanical ventilation runs for a stated period, the space is re-tested through the full depth profile with the fan still running, and the readings must hold. A reading that only passes with the fan running and drifts back when it stops is telling you there is a live source inside.
Zero and bump test the instrument first
A detector that has not been function-checked is a prop. Before the pre-entry test:
- Zero and fresh-air check in genuinely clean air — upwind of the space, away from exhausts, running plant and the generator you just started. Oxygen should read about 20.9 %, flammable and toxic channels zero.
- Bump test with a known certified gas mixture, at the interval set by your procedure and the manufacturer, and before any entry where the consequence of a dead sensor is fatal. The bump test confirms that gas reaches the sensors, that each channel responds, and that the audible and visual alarms actually fire.
- Check calibration currency, sensor age and battery. Electrochemical cells have a finite life and can fail without the instrument saying so between calibrations.
- Bump test with the sampling train fitted if that is how you will use it, so the pump, filter and tubing are part of the verified path.
When the test has to be repeated
The pre-entry test is a snapshot. It is superseded by continuous monitoring during the work, and it has to be repeated outright when:
- The space has been left unattended, or all entrants have exited and the permit is being resumed after a break or shift change.
- Ventilation has been stopped, moved, restarted or reconfigured.
- Any alarm has sounded and the space has been evacuated.
- The work itself changes the atmosphere — hot work, coating, solvent cleaning, grinding, running a combustion engine anywhere near the intake.
- Anything changes in the surrounding process: a line broken, a valve moved, an adjacent tank opened.
During entry, the monitor travels with the entrant in the breathing zone, at the working level. A detector clipped to the tripod at the top of a shaft monitors the top of the shaft.
Where the test sits in the entry sequence
Atmospheric testing is one authorisation step among several, and it does not stand alone: it comes after isolation and lock-out, alongside ventilation, and before the attendant confirms access and rescue provision. The full running order is covered in the permit sequence for confined space entry. A pass on the gas test does not remove the need for a workable retrieval plan — selecting a rescue kit for the task and choosing a harness with a suitable attachment configuration for hauling out of a vertical space, as set out in this harness selection note, both belong in the same pre-entry brief. Head protection compatible with a tight opening and a respirator is dealt with in the note on selecting a helmet for confined space work.
Practical takeaway: write the depth levels, the purge wait and the action levels onto the permit before the instrument comes out of the case, then record the actual readings level by level. Further technique notes are collected on the rope access and confined space hub.
Common errors
1Reading before the tubing has purged.
2One sample at the lid, no depth profile.
3Zeroing the instrument in air that is not clean, which builds an offset into every subsequent reading.
4Assuming a four-gas detector covers a named process contaminant it has no sensor for.
5Trusting a %LEL reading taken in an oxygen-deficient or inerted atmosphere.
6Ventilating, then testing after the fan has been switched off and the space has had time to re-accumulate.
7Recording “OK” on the permit instead of the actual numbers, times and levels sampled.
Frequently asked questions
Why is oxygen always tested first?
Because the flammable gas reading depends on it. The common catalytic bead (pellistor) LEL sensor burns the sample gas on a heated element and needs oxygen to do so, so it under-reads in an oxygen-deficient or inerted atmosphere. Knowing the oxygen value first tells you whether the %LEL figure can be believed.
How long should I wait before reading a pumped sample?
Long enough for the entire volume of sample tubing to be drawn through the sensors, plus the instrument's own response time. Manufacturers publish a purge allowance per length of tubing for their pump; use that figure from the manual rather than a habit. Reading too early is the most common cause of a falsely clean pre-entry result.
Is one reading at the entry hatch enough?
No. Contaminants stratify by density and by where they are generated, so a reading at the lid describes only the air just inside the opening. Lower the probe in stages – at minimum top, mid-depth and bottom for a vertical space – pausing at each level for the full purge and response time, and sample along the length of horizontal spaces as well.
What is the difference between a bump test and a calibration?
A bump test applies a known gas to confirm that each channel responds and that the alarms fire; it is a functional check, done frequently and before high-consequence entries. Calibration adjusts the instrument's response against a certified gas concentration and is done at the interval set by the manufacturer and your procedure. A bump test does not replace calibration.
Does a standard four-gas detector cover every confined space?
No. It detects oxygen, flammables and the specific toxic gases it has sensors for, typically carbon monoxide and hydrogen sulphide. If the hazard assessment identifies solvent vapours, ammonia, chlorine or another process contaminant, the team needs an instrument that can actually see it – for example a photoionisation detector or a specific sensor – or the test is incomplete.
When does the atmosphere have to be re-tested after a passing pre-entry result?
Whenever conditions could have changed: after all entrants have exited and the permit is resumed, after any change to ventilation, after any alarm and evacuation, when the work itself alters the atmosphere such as hot work or coating, and after any change to the surrounding process or adjacent isolations. Continuous monitoring in the entrant's breathing zone runs throughout the work regardless.
Need this as a document you can issue? The template library gives you the risk assessments, permits and inspection logs in editable form — and employer plans cover a whole team with completion records.