
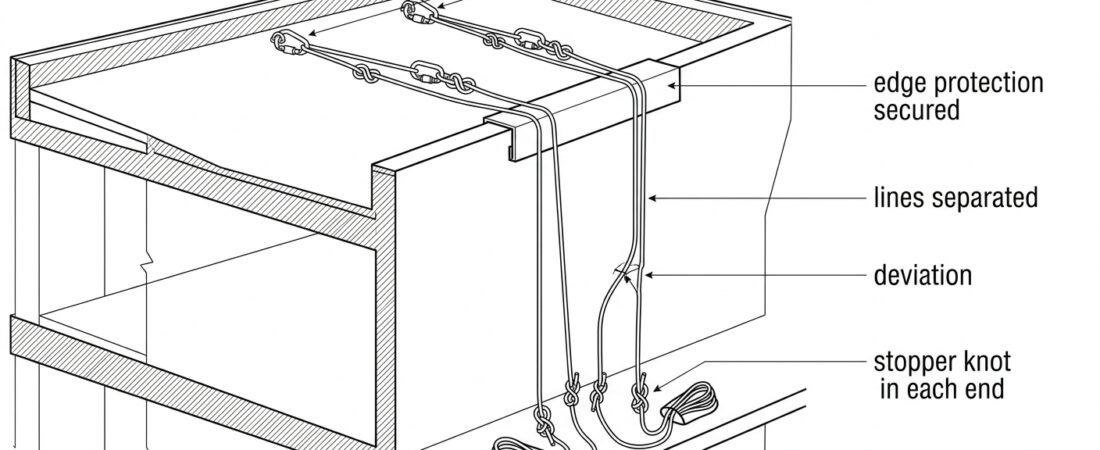
Most problems on a descent are created before anyone leaves the edge. A rope that is a few metres short of the landing, a working line resting on a sharp coping stone, two lines clipped into the same single anchor point, or a rope bag that pays out into a tangle halfway down – all of these are rigging decisions, and all of them are cheap to fix from standing on a floor and expensive to fix while hanging. This note covers the practical sequence for installing ropes for a descent: choosing and loading the anchors, rigging two independent lines, deploying the rope cleanly, protecting it where it bears on the structure, and the checks to run before committing weight.
It assumes a rope-access or industrial descent on low-stretch (semi-static) kernmantle rope, with a descender on the working line and a backup device on a separate safety line. It does not replace the training and supervision that this kind of work requires.
Decide the access method before you decide the rigging
Rope installation is the last step in a chain of decisions, not the first. The line of descent, the anchor positions and the edge treatment are all consequences of where the work actually is, how the operative gets to the anchors, and how a casualty would be recovered. Working the other way round — rigging where it is convenient and then discovering the work position is three metres to the left — produces pendulums, rope-on-edge contact and awkward re-rigs at height. The order of decisions before you rig is worth settling on paper first.
Three questions decide almost all of the rigging:
- Where does the rope need to hang? Plumb the line of descent from the intended work positions, not from the anchor.
- How does the rope get to the ground, and does it reach? Measure or estimate the drop and compare it against the actual rope length on the reel or in the bag.
- How is a stuck or injured operative recovered? Rescue provisions shape whether the anchor is rigged releasable, whether a haul can be built on it, and how much tail rope you leave.
Anchors: independent, correctly loaded, in the right direction
Standard practice for rope access is two lines — a working line and a safety line — each attached to its own anchor, so that failure of one anchor or one rope does not put the operative on the ground. Where a single structural element genuinely has to serve both, it is treated as a single point of failure and normally requires a deliberate engineering justification rather than an assumption.
When assessing the anchors, check the direction of pull as well as the strength. Many anchors are rated for loading in one direction and are considerably weaker sideways; eyebolts, for instance, are usually intended to be loaded in the plane of the eye. Anchor ratings also distinguish between test loads and working loads, and between systems designed for restraint and those that may see fall-arrest forces — see anchor strength requirements, test loads and direction of pull.
Practical points at the anchor:
- Keep the two lines physically separate at the anchor, over the edge and down the drop. Lines that cross or twist around each other transmit a cut or a shock from one system to the other and make backup device operation awkward.
- Use connectors suited to rigging — large, locking, and loaded along the major axis. Screw-gate connectors are common at anchors precisely because they are not being opened repeatedly; guidance on shape and closure is covered in choosing connectors for anchor rigging.
- Watch for cross-loading and lever effects. A connector pressed against a structural face, or a maillon sitting across a beam flange, can be loaded in a way it was never designed for.
- Position the anchors so the rope leaves the edge cleanly, ideally high enough that the operative can reach the edge and pass it without unloading and reloading the system awkwardly.
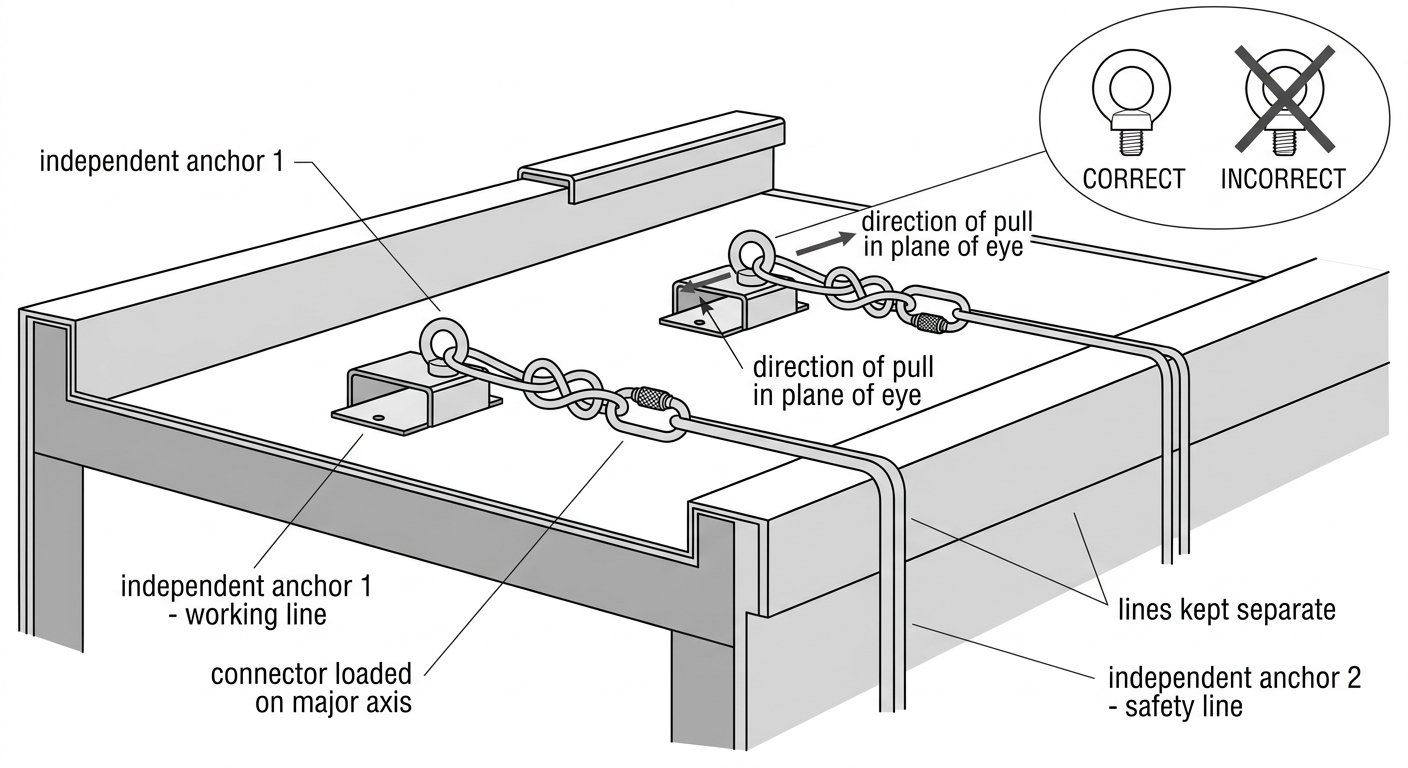
Working line and safety line on separate anchors, each loaded in an acceptable direction and kept physically apart over the edge.
Rigging the lines: knots, releasable anchors and slack management
The rope is normally attached to the anchor with a well-dressed knot appropriate to the rope and the anchor hardware — commonly a figure-eight on a bight into a locking connector, or a knot appropriate to a wrapped anchor sling. Whichever knot is used, the same three habits apply: dress it so all strands lie fair and parallel, tighten it before it is loaded so it does not consume rope under load, and leave a tail long enough that it cannot creep back through as the knot beds in.
Fixed versus releasable rigging
A rope can be rigged "dead" (knotted directly to the anchor) or releasable, with the load held on a descender or lowering device at the anchor so the operative can be lowered from the top without ascending. Releasable rigging is often chosen where self-rescue would be difficult — long drops, confined shafts, work near machinery, or where the operative may be lowered to a landing rather than raised. It costs a little more rope and one more device, and it demands that the anchor-side device is correctly locked off and attended or protected against accidental release.
Tails and stored slack
Whatever is rigged, the excess rope has to go somewhere deliberate. Tails left loose at the anchor snag on feet, get walked on, and can be pulled into a device. Tails hanging at the bottom pick up dirt, water and traffic. Bag the surplus, tie it off short at the anchor, or flake it into a rope bag hung clear of the working area.
Getting the rope down cleanly
How the rope goes down matters as much as what it is tied to. Throwing a coil off an edge is fast and usually wrong: coils open into tangles, snag on scaffolding and railings, and drop through areas where people are working. Where practicable, deploy from a rope bag.
- Flake the rope into the bag from the far end first, so that the anchor end is on top and pays out without the bag having to be emptied.
- Lower the bag on the rope or carry it down where access allows, letting the rope feed out under control rather than falling in loops.
- Warn and control the area below. A dropped bag, a swinging rope end and a falling connector are all foreseeable hazards; exclusion below the drop is part of the rigging, not an afterthought.
- Check the rope as it runs out. Deployment is a free inspection of the whole length: run it through gloved hands and look for glazing, cuts, sheath damage, core deformation and contamination. Ropes are also progressively affected by service and cleaning, which is why new and used ropes behave differently in slip, stretch and diameter.
Rope choice is upstream of all this: diameter has to suit both the devices in use and the wear the job imposes, and every descender and rope grab has a marked diameter range that is not advisory. See why the marked rope diameter range on a descender matters and the note on choosing a low-stretch rope diameter.
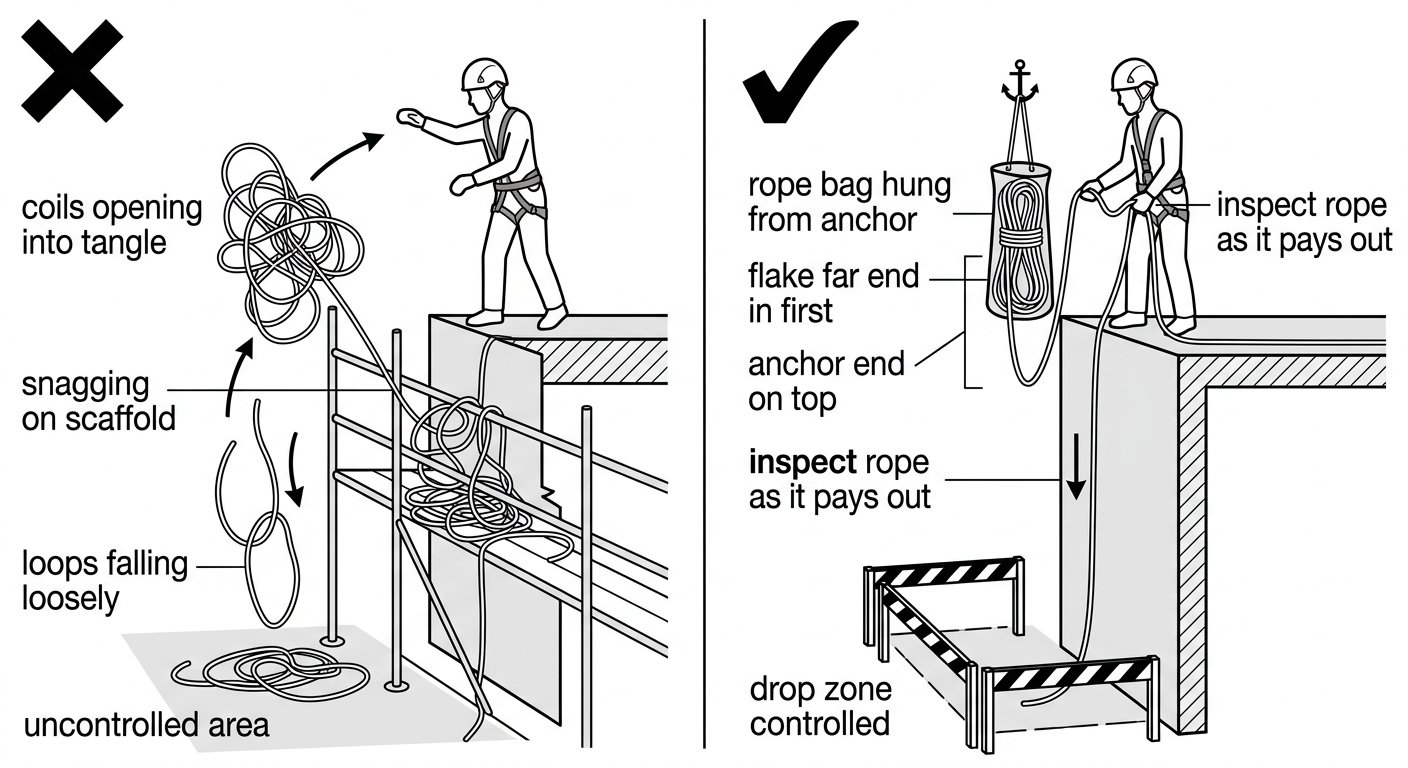
Deploying from a bag flaked far-end-first pays out under control and lets the whole rope be inspected on the way down.
Edge protection and rub points
The single most common way to damage a rope on a descent is to load it across an edge. A loaded, moving rope over concrete coping, sheet-metal flashing, a beam flange or a rusted grating can be cut or abraded quickly — and the damage is concentrated at exactly the point that is hardest to see once the operative is over the side.
Two strategies, used together where possible:
- Get the rope off the edge. Raise the anchor, use a high directional, or rig a deviation so the rope hangs free rather than bearing on the structure. Removing the contact is always better than padding it.
- Protect the contact that remains. Purpose-made rope protectors, edge rollers, canvas sleeves or hinged edge guards, positioned so they stay put as the rope moves and as the angle changes during the descent. Protection that slides out of place during the first few metres is worse than none, because it gives false confidence — tie or clip protectors in position.
Check both lines separately. It is common for the working line to be nicely protected and the safety line to be lying quietly on a sharp lip a half-metre away. Re-check edge protection after any change in the operative’s position that alters the rope angle, and after passing the edge on re-ascent.
Also look for rub points below the edge: pipe brackets, window ledges, cladding fixings, sharp bolt ends. Chemical and thermal hazards count as well — hot surfaces, welding, exhaust plumes and spills all affect synthetic rope, sometimes without obvious external signs. The temperature and chemical limits for textiles are worth knowing before rigging past that kind of exposure.
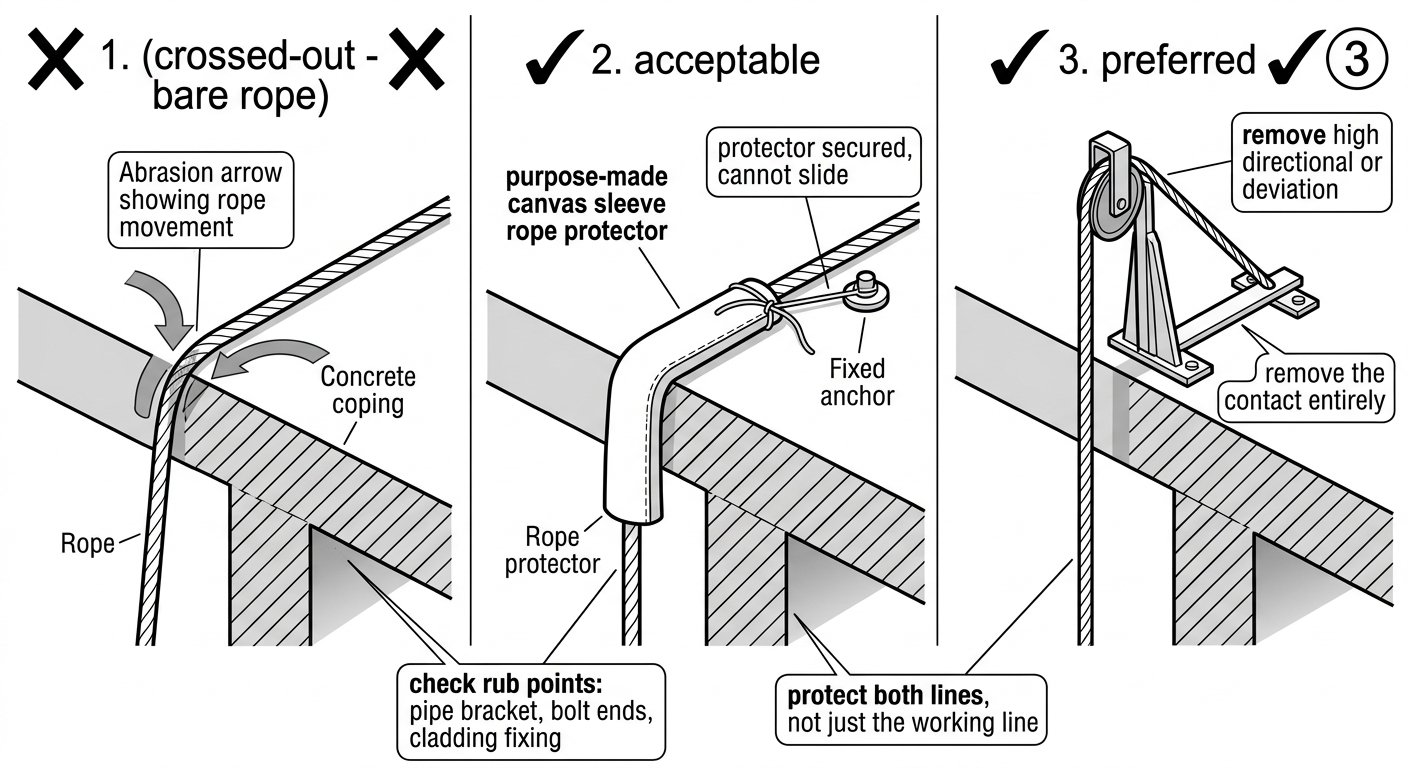
Getting the rope off the edge is better than padding it; where contact remains, protectors must be tied in place so they cannot migrate.
Deviations and redirects to place the line where the work is
Where the plumb line from the anchor does not match the work position, or where the rope would otherwise bear on the structure, a deviation pulls the rope sideways using a connector or sling at an intermediate anchor. A small deviation angle produces a modest load on the deviation anchor; the steeper the deflection, the higher the load, and the more the operative will swing if the deviation fails or is passed. Keep deviation angles shallow unless the anchor is genuinely rated for the resulting pull, and remember that both lines usually need to be deviated together so they stay parallel and clear of each other.
Deviations also have to be passed, twice per rope trip. Rig them where the operative can reach them comfortably and where there is enough room to transfer both the descender line and the backup line without generating slack or a shock load.
The ends of the rope
The bottom end of the rope is a routine cause of serious incidents, and the fixes are trivial:
- Confirm the rope reaches the landing, with surplus, before anyone descends. Estimated drops are frequently wrong, especially in shafts and on structures with intermediate levels.
- Put a knot in the free end of both the working line and the safety line, so that a descender or backup device cannot run off the end. A figure-eight on a bight is normally used because it is bulky, easy to check and easy to untie.
- Keep the tails out of trouble. Loose tails on the ground get driven over, dragged into machinery, contaminated by spills, or pulled taut by someone tidying up. Bag them or tie them back.
- Do not tie the working line off at the bottom under tension unless the system is designed for it; tensioning changes how devices behave and can prevent lowering.
The device side matters too. The descender and the backup device must both be rated and marked for the rope in use — rope-access adjustment devices are covered by EN 12841, which classifies rope adjustment devices as type A backup, type B ascender and type C descender — and the connector between harness and descender needs to be the right shape, closure and orientation, as set out in choosing a connector for a descender.
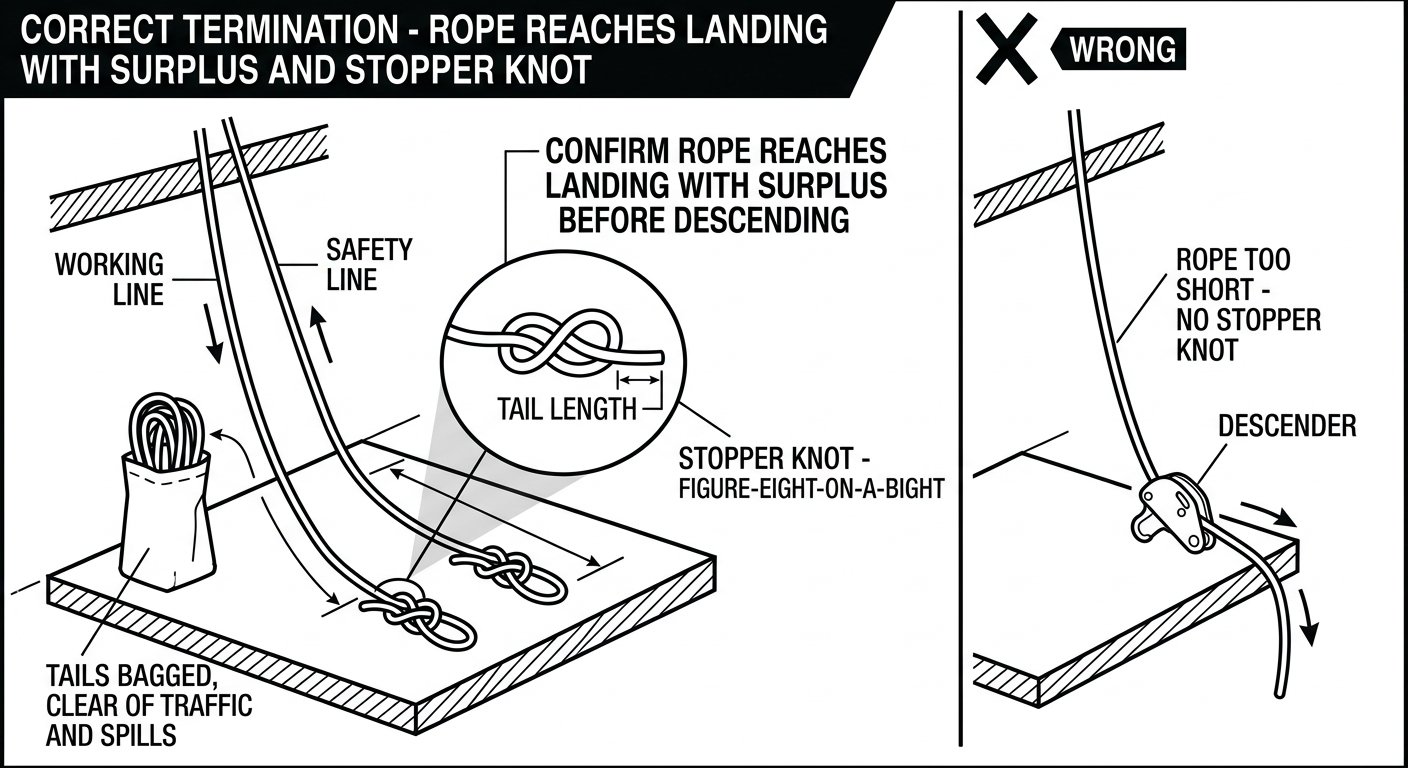
Both free ends knotted, both ropes confirmed to reach the landing with surplus, and the tails bagged out of the way.
Checks before committing weight
Run these from a position where a slip cannot become a fall — behind a barrier, in restraint, or attached to the system already.
- Anchors: two independent points, both suitable and loaded in an acceptable direction; connectors closed, locked, and loaded on the major axis.
- Knots: correct, dressed, tightened, adequate tails; nothing capable of working loose.
- Line separation: working line and safety line not twisted, crossed, or sharing hardware they should not share.
- Edge: protection in place on both lines and fixed so it cannot migrate; rub points below the edge identified.
- Rope condition and length: whole length inspected during deployment; rope reaches the landing with surplus; stopper knot in each free end.
- Devices: descender and backup correctly threaded and loaded, in the right direction, on rope within their marked diameter range; a function test with the system weighted at the edge before the edge is passed.
- Harness and attachment: correct attachment point, harness adjusted and buckles closed — the fit checks and common errors are covered in adjusting a full body harness correctly.
- Rescue: the planned recovery method is actually possible with the rigging as installed — releasable anchor available if that is the plan, and a rescue kit matched to the task on site and reachable.
- Below: the drop zone is controlled and communications with the ground are working.
Then weight the system fully at the edge, in a position where you can still step back, and confirm everything behaves as expected before descending.
Takeaway
Installing ropes for a descent is mostly a discipline of doing four things properly every time: two independent anchors loaded in a direction they can take; two separated lines rigged with dressed knots and the surplus under control; the rope off the edge or reliably protected where it is not; and both free ends knotted, on the ground, with length to spare. If a descent is rigged in a shaft or vessel entered under permit, the rigging sits inside the wider entry controls described in the confined space entry permit sequence. For related technique notes, see the rope access and confined space index.
Frequently asked questions
Do I always need two ropes for a descent?
Standard rope-access practice uses two lines: a working line carrying the descender and a separate safety line carrying a backup device, each on its own anchor. The point is that no single rope, anchor or device failure puts the operative on the ground. Single-line working is a special case that needs specific justification, equipment and training rather than being a default.
What knot is normally used to attach the rope to the anchor?
A figure-eight on a bight clipped into a locking connector is the common choice for rope-to-anchor attachment because it is easy to tie, easy to inspect visually and easy to untie after loading. Whatever knot is used, it should be dressed so the strands lie fair, tightened before loading, and left with a tail long enough that it cannot creep back through as the knot beds in.
Why does a stopper knot matter if the rope obviously reaches the ground?
Because “obviously” is often based on an estimate, and because the descent may not end where it was planned to end — a re-route, a deviation or a change of work position all consume rope. A stopper knot in each free end prevents a descender or backup device running off the end at any point, and costs nothing to tie.
Is a rope protector enough where the rope crosses a sharp edge?
It is a mitigation, not a first choice. Where the rope can be lifted clear of the edge with a higher anchor, a high directional or a deviation, that removes the hazard rather than padding it. If contact remains, the protector must be positioned and tied or clipped so it stays put as the rope angle changes during the descent, and both lines need protecting, not just the working line.
When should the anchor be rigged releasable rather than tied off dead?
Releasable rigging — the load held on a lowering device at the anchor — is generally chosen where self-rescue or a raise would be difficult, for example long drops, confined shafts, or where the planned recovery is to lower the operative to a landing. It requires the anchor device to be correctly locked off and protected against accidental release, and it consumes extra rope, so it is a planning decision made with the rescue plan rather than an afterthought.
How much does a deviation load the intermediate anchor?
It depends on the deflection angle: a shallow deviation produces a relatively modest sideways load, and the load rises as the rope is pulled further out of line. Keep deviation angles small unless the intermediate anchor is genuinely rated for the resulting pull, and consider the swing that would follow if the deviation released. Both lines usually need to be deviated together so they remain parallel and separated.