
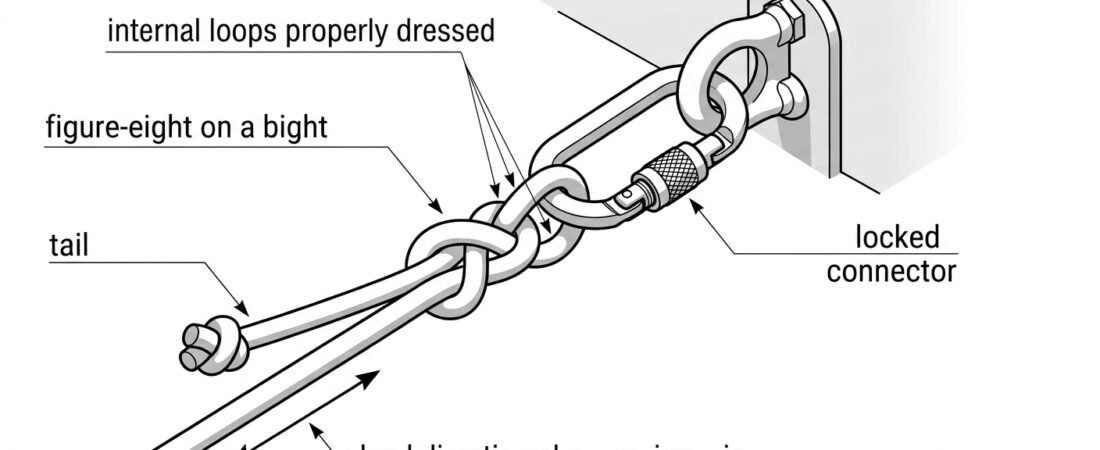
The connection between the rope and the anchor is the point where every load in the system ends up. Everything below it — descender, backup device, harness, the person — is only as good as that termination. A rope attached with a badly dressed knot, a connector loaded across its gate, or an unnecessary loop of slack between the anchor and the knot will usually still hold a static working load, which is exactly why the errors survive long enough to be found on the day something shock-loads the line. This note covers how to make that attachment cleanly: what method to use, how to position it, how to load the connector, and what to check before anyone commits weight to the rope.
What the attachment has to do before you choose a method
Before deciding between a knot and a connector, be clear about what the termination is being asked to resist:
- Direction of pull. The rope will load the anchor in the direction it leaves it — which, for a descent over an edge, is rarely straight down. Anchors and anchor devices are rated for particular directions of loading, and a sideways or upward pull can be well outside what the installation was designed for. See anchor strength requirements, test loads and direction of pull for how that assessment is made.
- Static working load versus potential dynamic load. In a rope access system the working line normally carries a person’s weight plus tools; the safety line normally carries nothing until it has to arrest a fall or take over a failed working line. Both terminations need to be made to the same standard.
- Adjustability. Some attachments are set once and left for the shift. Others need to be released, re-tensioned or re-rigged — for example when repositioning a line, or when the rope has to be lowered to release a casualty. A knot that can be untied after loading matters more in the second case.
Three ways to terminate the rope at the anchor
1. Knot direct onto the anchor point
The rope is passed around or through the anchor point and finished with a knot. This removes a component — no connector to cross-load, no gate to check — but only works where the anchor point has no sharp edges, no corrosion and enough radius that the rope is not bent hard over a small-diameter bar. It also makes the attachment slower to release and harder to inspect visually, because part of the rope is hidden against the structure.
2. Knot into a connector, connector onto the anchor
This is the most common arrangement in rope access and confined-space work. A loop knot — typically a figure-eight on a bight — is tied in the end of the rope and clipped into a locking connector at the anchor. It is fast, easy to inspect, easy to release, and keeps the rope off the structure. The trade-off is that the connector becomes a component whose orientation and loading you now have to manage. A screw-lock or auto-lock connector of an appropriate shape is used here, not a snap hook intended for a lanyard end; see choosing connectors for anchor rigging.
3. Factory-sewn termination
Many low-stretch ropes are available with a sewn eye at one end, often with a protective sleeve. Sewn terminations are consistent, compact and take up less rope than a knot, but they are fixed — you cannot move them along the rope, and if the eye or its stitching is damaged the whole termination is retired. Inspect the stitching and the thimble or sleeve as carefully as you would inspect a knot.
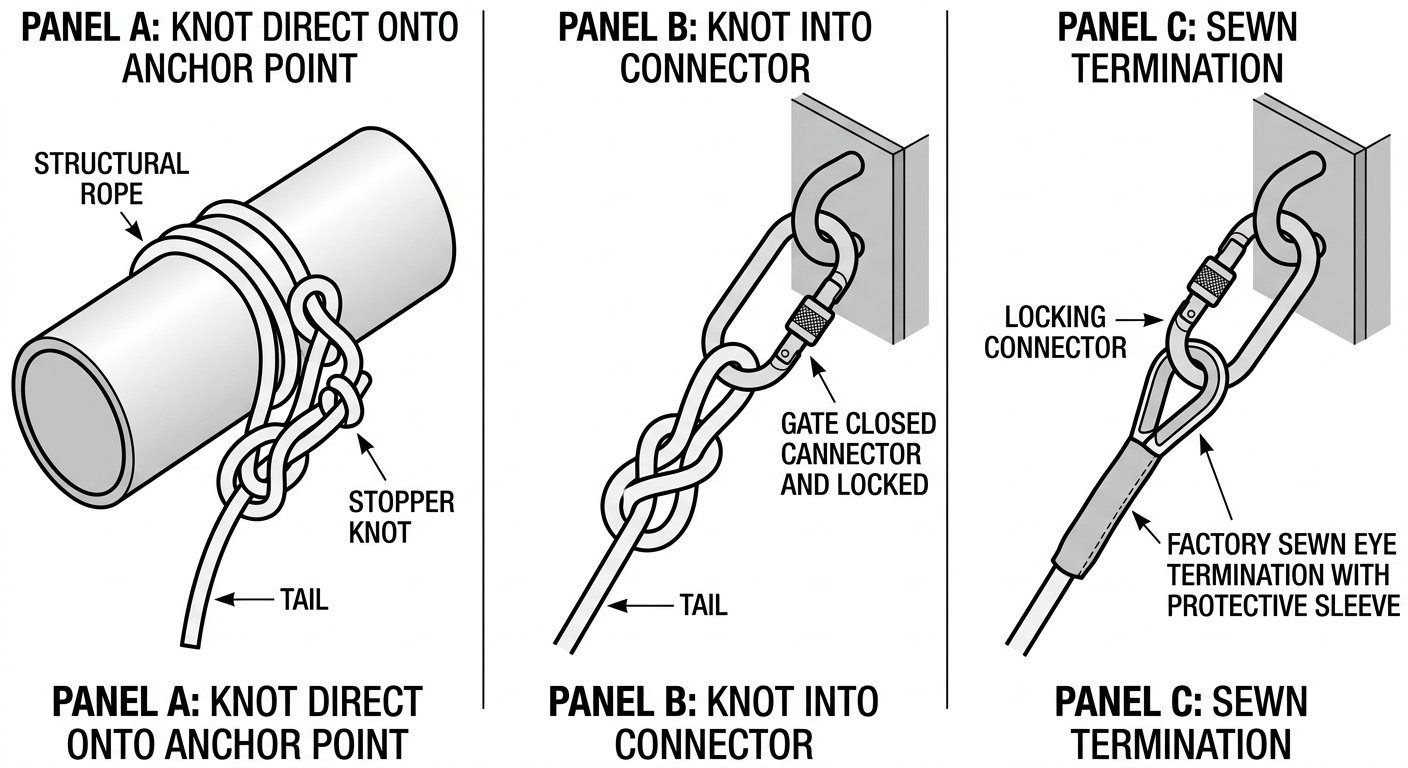
Three standard terminations at the anchor: knot direct, knot into a connector, and a factory-sewn eye.
Choosing and dressing the knot
For attaching a rope to an anchor, a figure-eight on a bight is the standard choice in most rope access systems: it is easy to tie, easy to recognise as correct or incorrect at a glance, and reasonably straightforward to untie after being loaded. Alternatives such as a bowline variant with a locking finish, or an overhand loop, are used in some sectors and training schemes; whichever your procedures specify, the requirements are the same:
- Dressed. The strands lie parallel and follow each other through the knot with no crossed or twisted legs. A crossed figure-eight is weaker and much harder to inspect.
- Set. The knot is snugged down by hand so it does not have to tighten under the first load, which is where slack appears from.
- Adequate tail. Leave a generous free end — commonly quoted guidance is a tail of roughly a hand’s width or more beyond the knot, and many teams add a stopper knot on the tail as a visual check rather than as a strength component. Follow whatever tail length your training and equipment instructions specify.
- Inspectable. The knot should be positioned where a second person can look at it without dismantling anything.
Bear in mind that a knot reduces the strength of the rope at that point; this is normal, accounted for in system design, and not a reason to substitute an improvised termination. It is a reason not to tie extra unnecessary knots into a loaded line.
Keep the knot at the anchor, and keep the slack out
A frequent field error is a long loop of rope between the anchor point and the knot — the rope wrapped once around a beam, then a metre of tail brought back to a connector. Every centimetre of that loop is potential fall distance if the rope shifts, and it puts the knot somewhere awkward to inspect. Tie the termination so that the knot sits close to the anchor connector, with the load line leaving in the intended direction of pull.
The same principle applies to the rope’s path immediately below the anchor. If the line has to pass over an edge, the anchor should ideally be positioned high enough and far enough back that the rope leaves the knot in a controlled line rather than being dragged sideways across masonry the moment it is loaded. Rope deployment, anchor placement and edge protection are covered together in installing ropes for a descent.
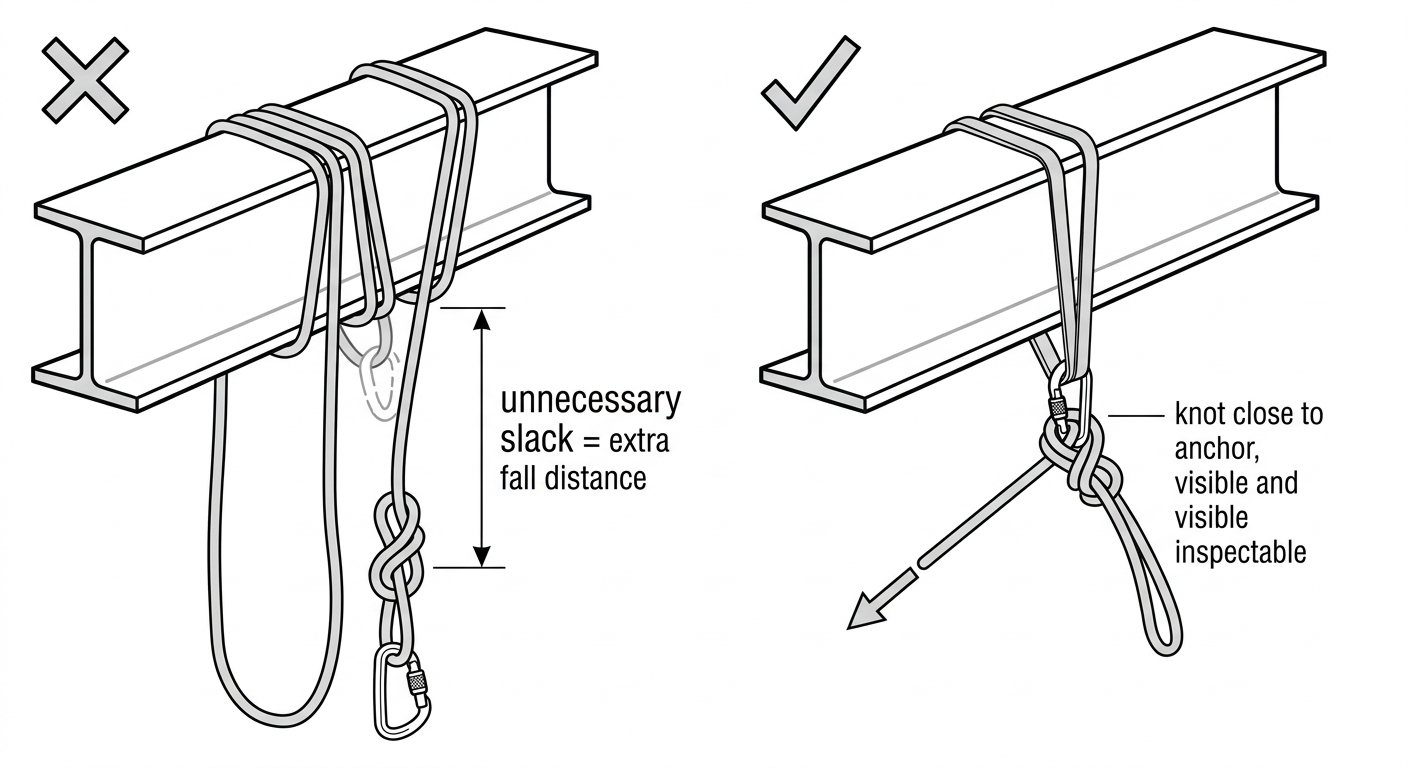
Keep the knot close to the anchor: a slack loop between anchor and termination is added fall distance and hides the knot from inspection.
Loading the connector correctly
Where a connector is used at the anchor, most of the things that go wrong are geometric rather than material:
- Load along the major axis. Connectors are strongest loaded lengthwise, spine to gate, with the gate closed and locked. Their rated strength drops substantially when loaded across the minor axis or with the gate open — which is why the marked values on the body matter. See connector basics: gates, axes and loading.
- No cross-loading or three-way loading. A connector holding a rope termination, a backup, and a sling all at once will be pulled in directions it was never designed for. Where several attachments meet at one anchor, use a rigging plate or separate connectors so each one is loaded in a single line.
- Nothing pressing on the gate. Check that the gate does not bear against the structure, a bolt head, or the sling, and that the connector cannot rotate under load into a position where it does. Levered loading over an edge or a fixed eye is a known failure mode.
- Locked closure, verified by hand. Screw-lock sleeves are fully closed — not finger-tight against a thread that has not engaged — and automatic sleeves are confirmed to have returned to the locked position. The differences and their field implications are set out in connector locking systems compared.
- Shape and size suited to the interface. The connector must fit the anchor eye or sling without being pinched, and must be wide enough at the basket to hold the knot without deforming it. Connectors for fall protection are covered by EN 362.
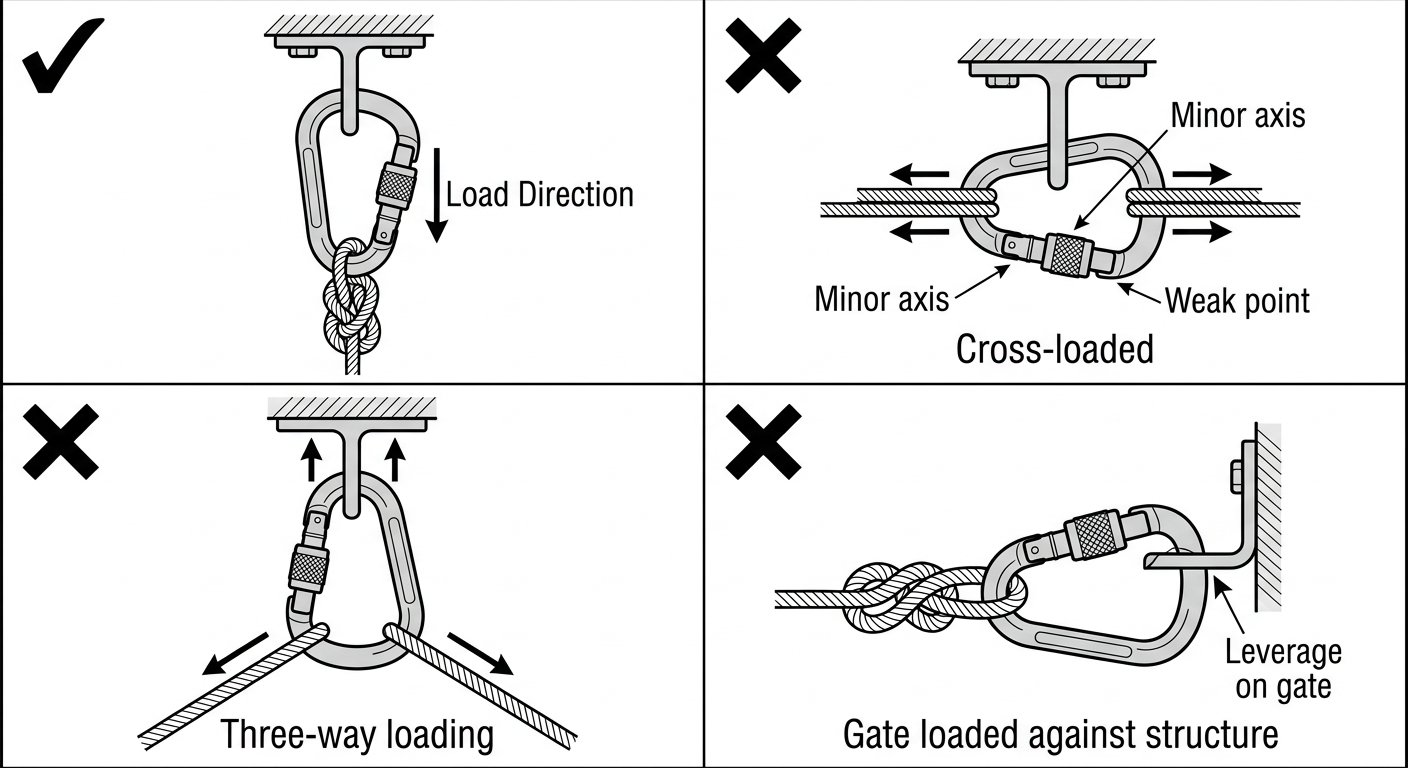
At the anchor the connector must be loaded along its major axis, with nothing bearing on the gate.
Working line and safety line: separate terminations, separate anchors where possible
In a two-rope rope access system the working line and the safety line are independent, and that independence has to survive at the anchor. Two ropes knotted into the same connector, or two connectors on the same single-point anchor, reintroduce a common failure point at the top of the system — the place where a failure has the longest consequences.
Standard practice is to terminate each rope separately, on independent anchor points where the structure allows it. Where two ropes genuinely must share one structural anchor, that anchor and its rigging need to be assessed accordingly, and the terminations should still be separate connectors so a single connector error cannot release both lines. Keep the two lines identifiable at the top — by colour, tag or position — so nobody puts a descender on the safety line.
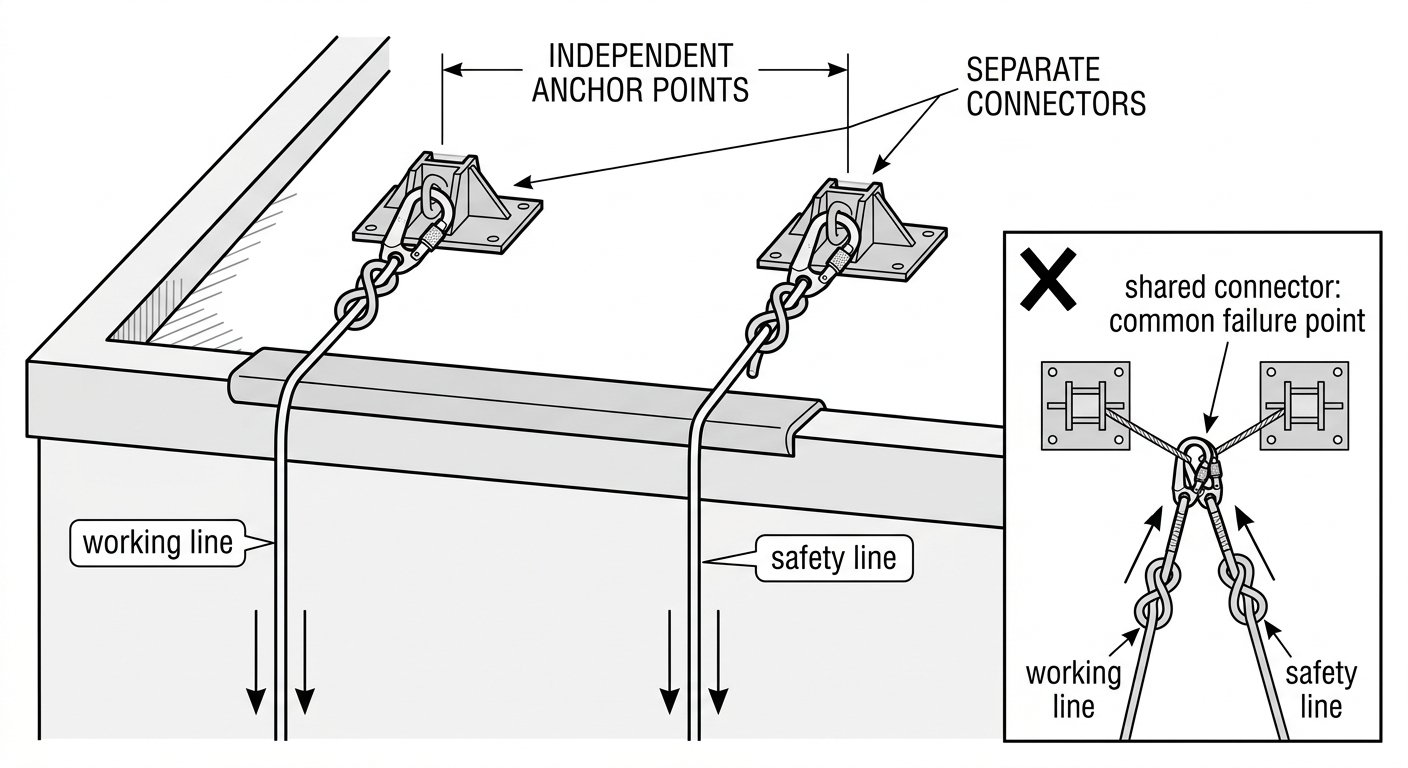
Working line and safety line are terminated independently; a shared connector or single point reintroduces a common failure point at the top of the system.
Checks before the rope is loaded
Run these in order, at the anchor, before anyone weights the line:
- Anchor point itself is sound, correctly installed and suitable for the direction of pull.
- Sling or anchor strap, if used, is undamaged, correctly routed, not twisted and not loaded over an edge.
- Knot is the intended knot, correctly dressed, set, with the specified tail.
- Knot sits close to the anchor; no unnecessary slack loop between anchor and termination.
- Connector is loaded on its major axis, gate closed and locked, nothing bearing on the gate, free to align under load.
- Working line and safety line terminated independently and identifiable.
- Rope below the anchor runs clear, with edge protection where it contacts structure, and the free end is managed — knotted or bagged — so it cannot run through a device.
- A second competent person confirms the above. Anchor rigging is the classic place for a buddy check.
Common errors worth naming
- Figure-eight tied with crossed strands, which passes a glance but not an inspection.
- Tail cut too short, or trimmed after the knot has been loaded and tightened.
- A long slack loop between anchor and knot, adding fall distance.
- Both ropes in one connector, or both connectors on one anchor point without that being assessed.
- Connector rotated so the gate rests against a structural anchor eye or bracket.
- Rope taken directly around a sharp or small-radius steel edge because it was the quickest place to reach.
- Attachment made where it cannot be seen or reached again once work has started.
Takeaway
Attaching a rope to the anchor is a short task with a narrow set of correct outcomes: a recognised knot, well dressed and set with an adequate tail; positioned tight to the anchor with no slack loop; loaded through a locking connector along its major axis with nothing on the gate; and independent from the other line in the system. Anything that cannot be inspected after rigging should be re-rigged so it can be. For the wider sequence this fits into — anchor selection, rope deployment and edge management — continue with the other rope access and confined space technique notes.
Frequently asked questions
Which knot is normally used to attach a rope to an anchor?
A figure-eight on a bight is the usual choice in rope access work, because it is easy to tie, easy to inspect visually, and can generally be untied after loading. Some sectors and training schemes specify alternatives such as a locked bowline variant or an overhand loop. Whichever your procedures require, it must be correctly dressed, set snug, and left with an adequate tail.
Is it better to tie the rope directly to the anchor point or to use a connector?
A connector is the more common arrangement because it keeps the rope off the structure, is faster to release and easier to inspect. Tying direct removes a component but only works where the anchor point is smooth, sound and of a large enough radius not to bend the rope sharply. If you use a connector, it must be a locking connector loaded along its major axis.
How long should the tail be after the knot?
Long enough that the knot cannot capsize or work loose, which in common guidance means a free end of roughly a hand’s width or more beyond the knot. Many teams add a stopper knot on the tail as a visual check. Follow the tail length specified in your own training and in the rope manufacturer’s instructions.
Can the working line and safety line share the same anchor?
Standard practice is to terminate each rope separately on independent anchor points where the structure allows it, so no single failure releases both lines. Where one structural anchor genuinely has to carry both, that anchor and its rigging need to be assessed for the combined loading, and the terminations should still use separate connectors. Keep the two lines clearly identifiable at the top.
Does tying a knot weaken the rope?
Yes — a knot reduces the rope’s strength at that point, which is normal and accounted for in the design of a properly rigged system. It is not a reason to improvise a different termination, but it is a reason to avoid tying unnecessary extra knots into a loaded line and to keep knots away from edges and abrasion.
What should be checked at the anchor before anyone loads the rope?
Confirm the anchor point is sound and suitable for the direction of pull; the sling is undamaged and correctly routed; the knot is the intended knot, dressed, set and with the correct tail; the knot sits close to the anchor with no slack loop; the connector is closed, locked and loaded on its major axis with nothing on the gate; and the free rope end is managed. Have a second competent person verify it.