
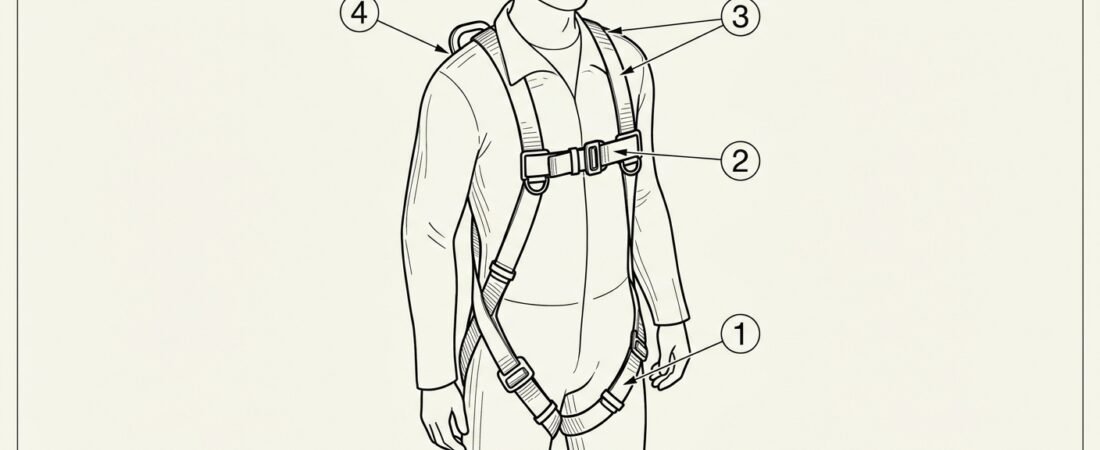
A full body harness only performs as designed if it is adjusted to the person wearing it. The same harness, on the same worker, can be either a functioning fall arrest system or a loose assembly of webbing that shifts under load, depending on five minutes of setup at the start of the shift. Adjustment is not a comfort preference; it determines where the load lands on the body, whether the wearer stays upright after arrest, and whether the attachment point is still in the right place when it is needed. This article covers how to adjust a full body harness so it does its job, what the common misadjustments look like, and how to confirm the result before committing to work at height.
What “correctly adjusted” actually means
Full body harnesses intended for fall arrest are covered by EN 361, which sets the requirements for the harness as a body-holding device in a fall arrest system. The standard governs the equipment; the fit is the user’s responsibility, and the target is straightforward to describe even if it takes practice to achieve.
A correctly adjusted harness is snug enough that it cannot migrate on the body under load, and loose enough that the wearer can walk, climb, kneel and reach without the webbing binding or cutting off circulation. Those two conditions are not in tension as often as workers assume. Most harnesses that feel uncomfortably tight are tight in the wrong places – a shoulder strap taking up slack that belongs at the leg loop, for example – rather than genuinely over-tightened.
Practical reference points for a harness on a standing worker:
- Leg loops: snug around the upper thigh, with roughly a flat hand’s thickness of space between webbing and leg. They should not be able to slide down towards the knee, and they should not ride up into the groin.
- Shoulder straps: even on both sides, lying flat on the shoulders without slack looping behind the arms and without pulling the chest strap upwards.
- Chest strap: across the mid-chest, tensioned enough to hold the shoulder straps in position.
- Dorsal attachment point: centred between the shoulder blades, not sitting low over the lumbar region or drifting to one side.
- Excess webbing: stowed in the retainers provided, not left flapping where it can snag on structure or feed back through an adjuster.
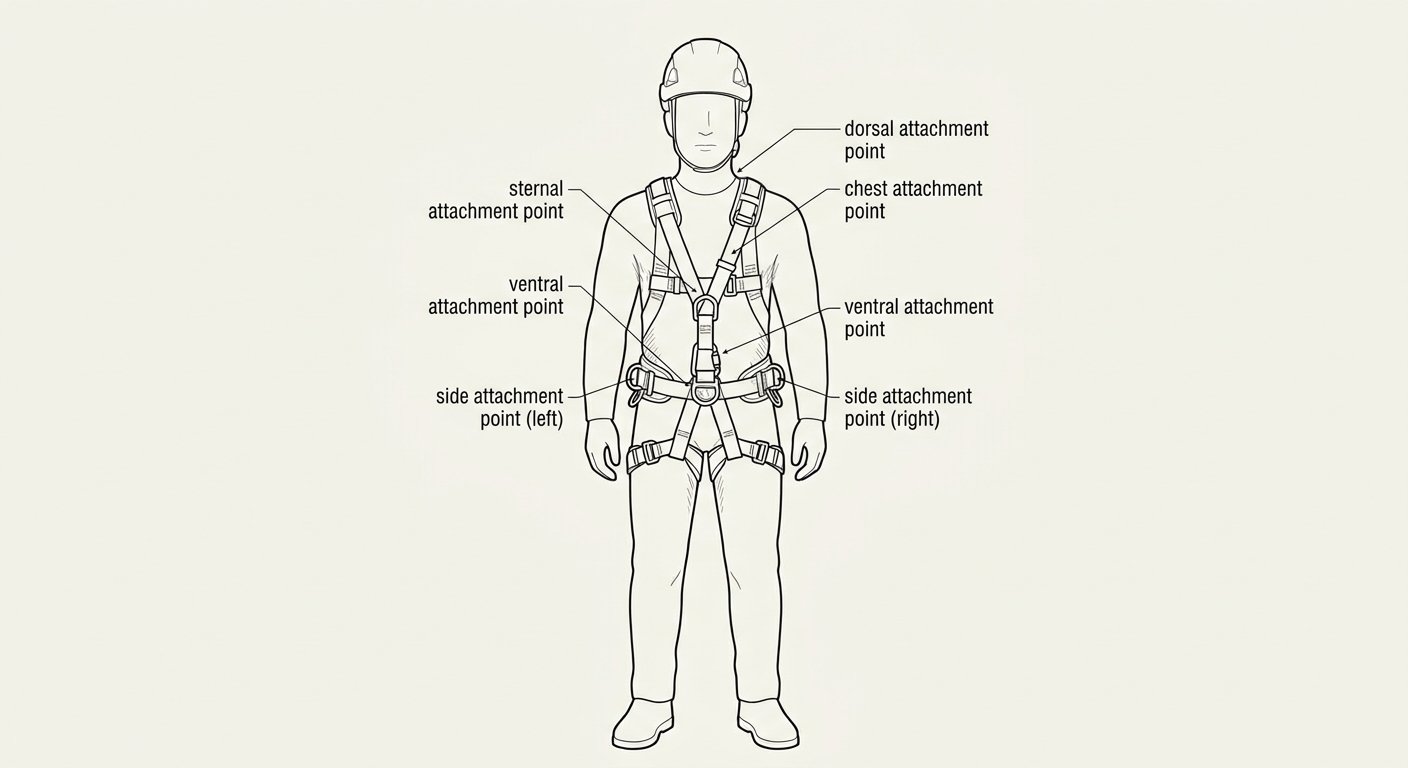
A correctly adjusted harness: leg loops snug on the upper thigh, shoulder straps even, chest strap at mid-chest and loose webbing stowed.
A working sequence for putting the harness on
Adjusting in a consistent order avoids the usual problem: correcting one strap, which loosens another, which pulls the first back out of position. A sequence that works for most modern harness designs:
- Hold the harness by the dorsal D-ring and shake it out. Twists are far easier to find before the harness is on the body than after. Confirm that all webbing runs flat through its buckles and adjusters.
- Put the shoulder straps on like a jacket, keeping the dorsal plate behind the back rather than under an arm.
- Close and set the leg loops first. The leg loops define where the harness sits vertically on the body. Setting them last means every earlier adjustment gets undone.
- Set the waist or hip webbing if the model has it, so the harness is seated on the hips rather than hanging from the shoulders.
- Take up shoulder strap slack evenly, a little at a time on each side, until the dorsal attachment point rises to sit between the shoulder blades.
- Close the chest strap last and adjust it to mid-chest height.
- Stow all loose webbing ends and check every buckle is fully engaged.
On harnesses that combine fall arrest attachment points with a work positioning belt to EN 358, the belt is adjusted after the harness itself is seated, not used as a substitute for correct leg loop and shoulder adjustment. A belt tightened to compensate for a loose harness leaves the fall arrest attachment points in the wrong place.
The chest strap: mid-chest, not throat and not stomach
The chest strap is the component most often worn wrong, and the error is almost always the same direction: too low. A strap sitting across the stomach or at the base of the ribs is easy to fasten and feels unrestrictive, which is exactly why it drifts there.
Its function explains why the position matters. The chest strap holds the two shoulder straps together so they cannot slip off the shoulders and so they load symmetrically. During a fall arrest and in the suspension that follows, that connection is a significant part of what keeps the wearer oriented upright rather than tipping backwards or sliding within the harness. A strap positioned low across the abdomen has poor leverage for that job, and in a worst case it allows enough shoulder strap movement for the wearer to rotate out of position. Worn too high, against the throat, it becomes a choking and neck-injury risk and is likely to be loosened or unfastened by the wearer within the hour.
Mid-chest – roughly level with the sternum – is the position that both restrains the shoulder straps and stays clear of the airway. It should be tight enough that it does not slide down on its own during movement, and it should be re-checked after any change of clothing layers, because a harness set over a winter jacket will sit differently once the jacket comes off.
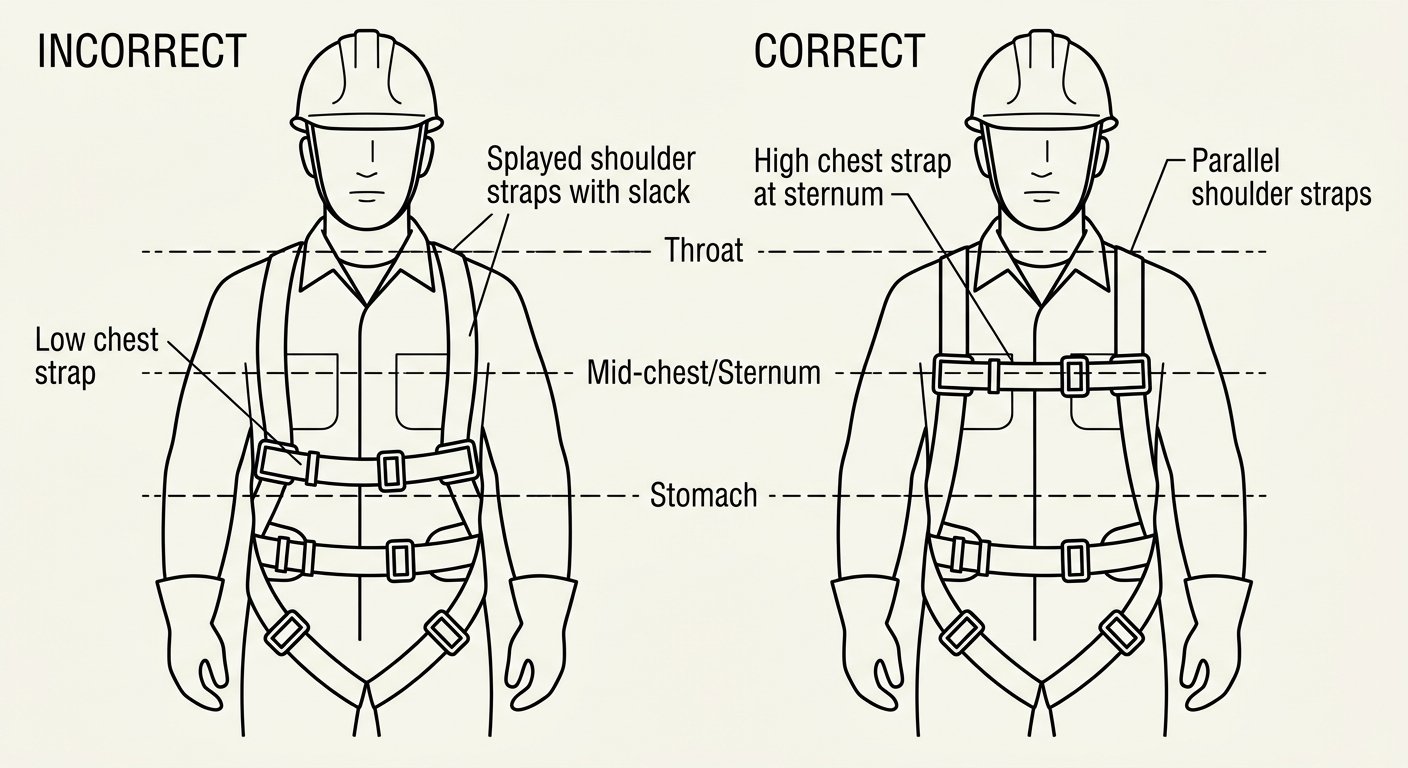
The most common misadjustment: a chest strap worn low on the abdomen (left) instead of at mid-chest (right).
Dorsal attachment point: centred between the shoulder blades
The dorsal D-ring or attachment plate is the primary fall arrest connection on most harnesses, and its position is a direct consequence of how the rest of the harness has been adjusted. Correctly set, it sits centred between the shoulder blades, high enough on the back that the wearer would hang slightly head-forward and upright from it.
When the dorsal point has slipped low – typically towards the mid or lower back – the usual cause is shoulder strap slack, sometimes combined with leg loops set too loose so the whole harness has dropped. A low dorsal point changes the body’s orientation during arrest and suspension and makes self-rescue and rescue attachment harder. When the point sits off to one side, the shoulder straps have been adjusted unevenly, which also means the arrest load will not be shared evenly across the torso.
The correction is readjustment before use, not a mental note to fix it later. Once the harness is loaded, nothing about its geometry can be improved. This is also the moment to look at the webbing itself: it should run flat and untwisted through the dorsal plate and through every adjuster, since a twisted strap concentrates load on part of its width and makes accurate tensioning impossible.
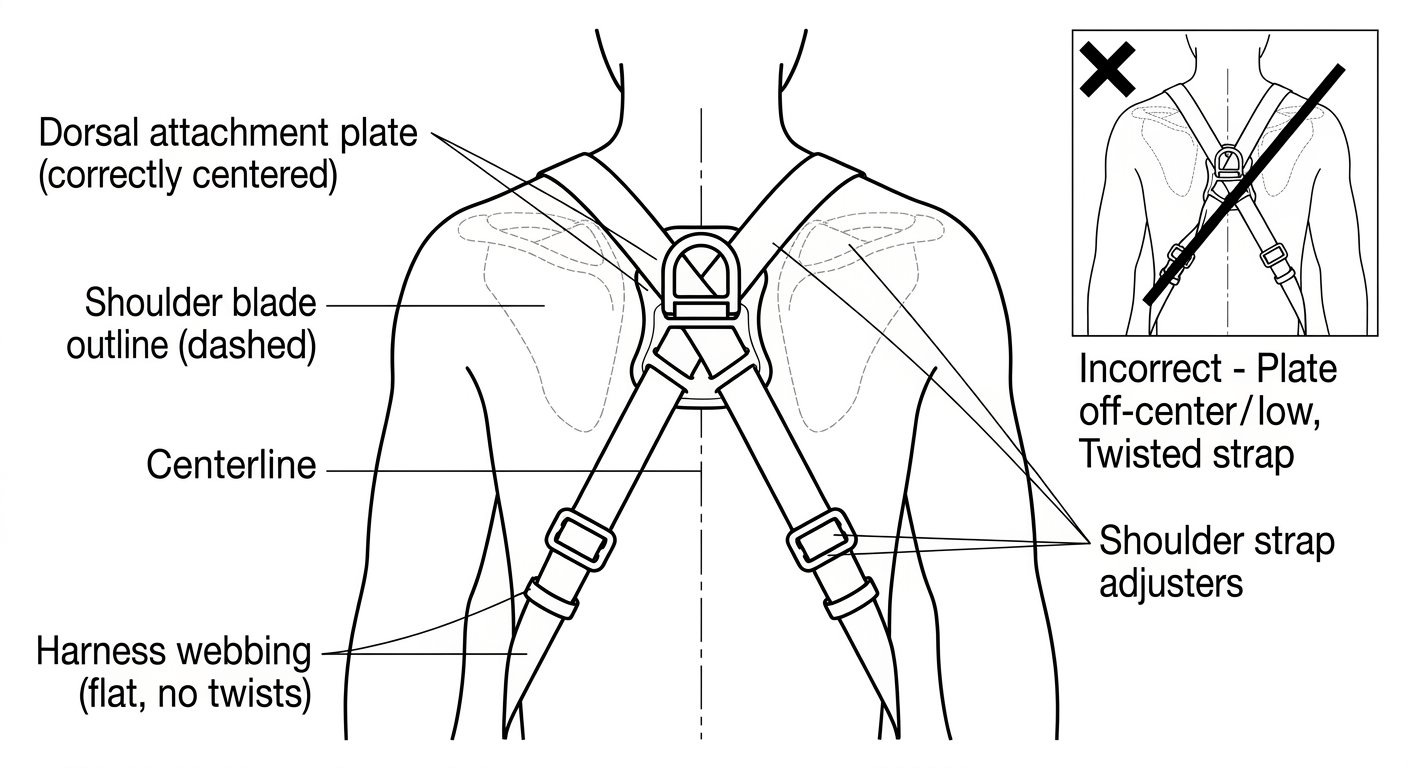
The dorsal attachment point belongs centred between the shoulder blades, with webbing running flat through every adjuster.
A second pair of eyes is the practical solution here, because the dorsal area is the one part of the harness the wearer cannot see. Buddy checks are routine in rope access and confined space teams for exactly this reason, and they take less time than the discussion about whether the harness is probably fine.
The pre-use hang check
A harness that feels correct standing on the ground can still reveal problems the moment it takes weight. The pre-use hang check – briefly suspending in the harness at a low, safe height, with the ground or a platform immediately below, before committing to real work – is a recommended practice rather than an excess of caution. It surfaces issues that a standing inspection cannot:
- Leg loops that ride up or shift because they were set too loose.
- Shoulder strap slack that only becomes visible when the harness is loaded and the dorsal or sternal point pulls upward.
- A chest strap that migrates downwards under load.
- Pressure points, pinching or numbness that would become intolerable after twenty minutes in suspension.
- Attachment points that are not where the wearer expected them to be relative to their body once hanging.
In rope access work the hang check doubles as a functional check of the rest of the system: the connectors joining the harness to the rope, which fall under EN 362, and the rope adjustment devices covered by EN 12841. Loading the system at a height where standing up is still an option is the cheapest opportunity to find a mis-threaded device or an unlocked gate.
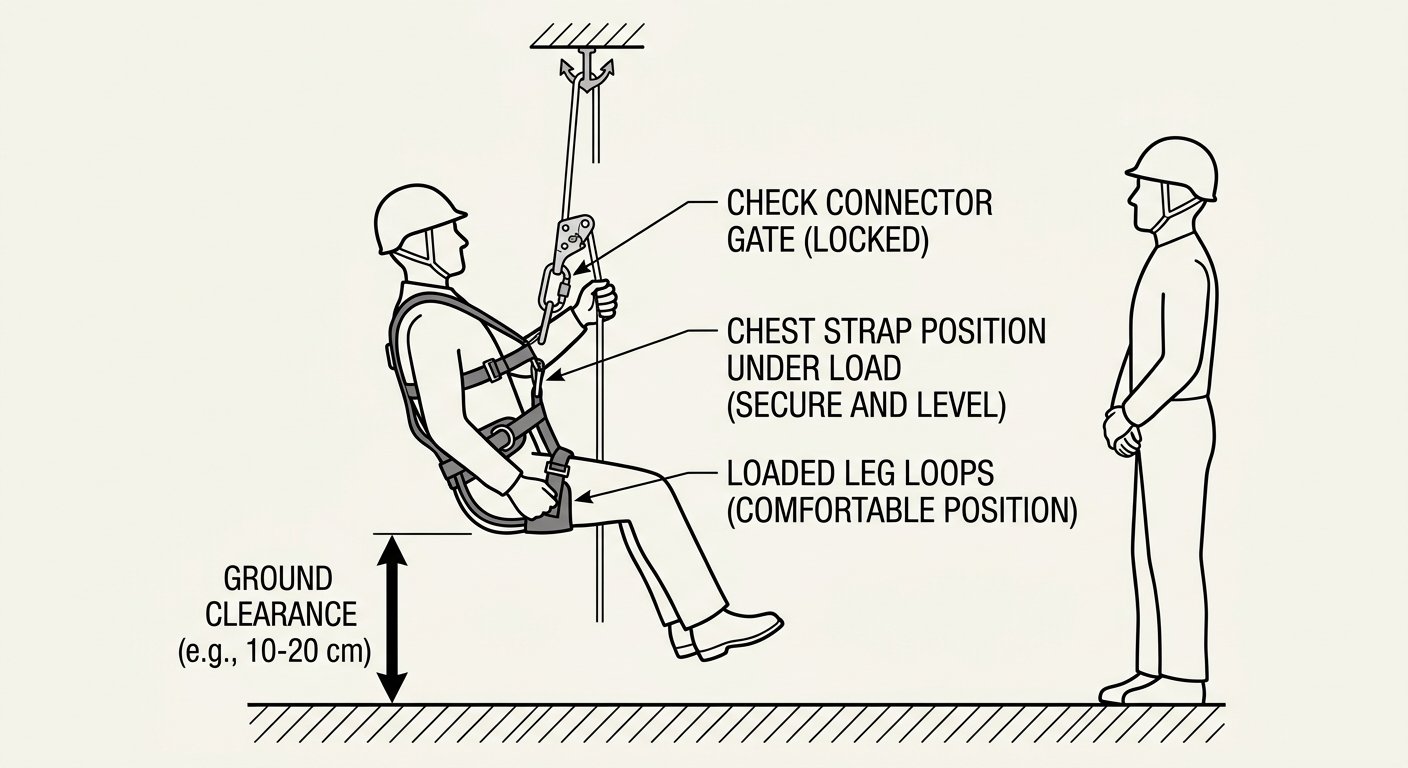
A pre-use hang check loads the harness at a height where standing up is still an option, revealing fit problems a standing check cannot.
For fall arrest work in a sit harness-free configuration, the hang check may be as simple as taking weight on the lanyard from a low anchor while a colleague observes the harness geometry from behind. The point is not the elaborateness of the setup but that the harness is loaded and observed before the consequences of a poor fit matter.
Re-checking during the shift
Adjustment is not a one-time event at the start of the day. Webbing settles, adjusters can creep, clothing layers change with the weather, and any period of suspension will shift a harness slightly. A short re-check after the first break, and after any change of clothing or equipment carried on the harness, catches the drift while it is still minor.
Harnesses shared between workers need full readjustment for each wearer, not an approximate reuse of the previous settings. Where practical, individually assigned harnesses reduce both the adjustment burden and the inspection ambiguity about who has been using what.
Takeaway
Correct adjustment comes down to four checkable conditions: leg loops snug on the upper thigh, shoulder straps even and free of slack, chest strap at mid-chest, and the dorsal attachment point centred between the shoulder blades with untwisted webbing throughout. Confirm all four with a buddy check, then confirm them again under load with a hang check before the harness is relied upon. For the equipment requirements behind the fit, see the summary of EN 361 for full body harnesses; for related procedures, the rope access and confined space technique notes collect the rest of the practical material on this site.
Frequently asked questions
How tight should a full body harness be?
Tight enough that the harness cannot shift position on the body when it is loaded, but loose enough that the wearer can walk, climb and kneel without the webbing binding or restricting circulation. A common reference for leg loops is roughly a flat hand’s thickness of space between the webbing and the thigh. If a harness feels painfully tight, the slack is usually in the wrong place rather than the harness being genuinely over-tightened.
Where exactly should the chest strap sit?
Across the mid-chest, roughly level with the sternum. Worn too low across the stomach it does a poor job of holding the shoulder straps together and keeping the wearer upright during arrest and suspension; worn too high against the throat it becomes a neck and airway risk. Re-check its position after adding or removing clothing layers.
What should I adjust first when putting on a harness?
Set the leg loops first, since they determine where the harness sits vertically on the body, then any waist or hip webbing, then take up shoulder strap slack evenly, and close the chest strap last. Adjusting in the reverse order means each correction undoes the previous one. Shake the harness out by the dorsal D-ring before putting it on so twists are found early.
Why does the dorsal D-ring need to be centred between the shoulder blades?
That position keeps the wearer upright and head-forward when suspended and shares the arrest load evenly across the torso. A dorsal point sitting low usually indicates shoulder strap slack or leg loops set too loose, and one sitting off to one side indicates uneven shoulder adjustment. Either condition should be corrected before use, because harness geometry cannot be improved once it is loaded.
Is a pre-use hang check really necessary every time?
It is a genuinely recommended practice, not an excessive precaution. Briefly weighting the harness at a low height with the ground immediately below reveals leg loops that ride up, shoulder slack that only appears under load, a chest strap that migrates downwards, and pressure points that would become intolerable in prolonged suspension. In rope access work it also confirms connectors and rope adjustment devices are correctly installed.
Can two workers share the same harness on a shift?
A shared harness must be fully readjusted for each wearer rather than reused at the previous person’s settings. Individually assigned harnesses are preferable where practical, because they reduce daily adjustment work and remove ambiguity about who has been using and inspecting which item of equipment.